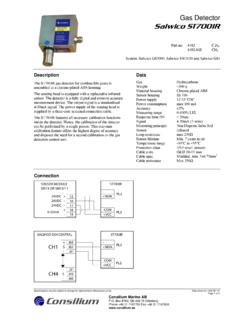
Transcription of Fire Alarm System - tmp.consilium.plushost.se
1 Installation Manualfor USCG Approved InstallationsFire Alarm SystemSalwico CS3004 Consilium The contents of this document are subject to revision without notice due to continued progress in methodology, design and manufacturing. Consilium Marine assumes no legal responsibility for any error or damage resulting from the usage of this document. Rev. 1, January 2005 Article no.: 910-001000 Consilium Marine AB S-402 76 G teborg, Sweden Installation Manual USCG Contents i Salwico CS3004 Contents About this Chapter 1: Installation Mechanical 1 Central unit .. 1 Section 3 Electrical 4 Test the 6 Set the address on the analogue detectors .. 8 Set the ID .. 10 Set address interval on timer .. 10 Cable 11 Connection to central 13 Internal connection of central unit .. 13 Terminal layout IOK-4 .. 14 Terminal description IOK-4.
2 15 Chapter 2: Verification 18 Polarity fault .. 22 Wrong number of section units .. 22 Information about analogue values .. 23 Central 25 Fault 25 Cable break .. 28 Earth fault .. 28 Short circuit .. 31 31 Mute 32 Reset faults .. 32 Safe state .. 33 Chapter 3: System description Loop 34 34 Section 35 Chapter 4: Commissioning requirements Installation Manual USCG Contents ii Salwico CS3004 Loop 37 Part A: Loop configuration .. 37 Part B: Loop status .. 38 Part C: Central 39 39 System 40 Appendix A: Address List/Test Report for Consilium Marine CS3004 fire Alarm Section Units Appendix B: Connections for Consilium Marine loop units Appendix C: Supplementary text for fire Alarm System Salwico CS3004 Appendix D: Component list for USCG approved systems Appendix E: USCG: Installation and Operation addendum Installation Manual USCG About this manual ii CS3004 About this manual This manual is intended to be used mainly by personnel installing CS3004 fire Alarm System .
3 The installation procedure is divided into two parts, the physical installation of the System and the verification of the functions of the System . The manual is therefore divided into the following chapters: Installation, Verification and a brief System description. We recommend the installation engineers with no previous knowledge about the CS3004 fire Alarm System to first read chapter 3 System description. This chapter will give a brief description of the functions in the fire Alarm System . The first chapter, Installation, describes the complete electrical installation process of the loops excluding the connection to the central unit . The test procedures for the cable are also included in this chapter. The installation engineer does not need to have any previous knowledge of the CS3004 fire System to be able to install the System . After the installation is completed the System must be verified which must be performed by a person with good knowledge of the various functions in CS3004 fire System .
4 Chapter two includes both the verification and the troubleshooting process. In chapter three you will find a brief description of loops and sections. The comission requirements and the installation procedure are described in chapter four. Information in this document may be subject to change without notice and does not represent a commitment on the part of Consilium Marine Manual USCG Chapter 1: Mechanical installation 1 CS3004 Chapter 1: Installation The different parts of the CS3004 fire System , the central unit and the section units, should first be mechanically installed. The different section units are thereafter electrically installed and set up according to the definition of the loops. To eliminate any problem with the cable and the electrical installation of the section units the cable must be tested before the loops can be connected to the central unit . The installation is completed with the electrical installation of the central unit .
5 Mechanical installation Install the central unit and the section units according to the drawings. Separate drawings are delivered with the System . Central unit The central unit can be delivered in one of two standard cabinets, 6U or 10U. The drawings below show the two standard wall mounted CS3004 cabinets. The System may be delivered in a non-standard cabinet, for the mechanical installation please see separate drawings. Cabinet size: 6U: W*H*D 542*304*155 mm 10U:W*H*D 542*483*155 mm Colour: Beige Installation Manual USCG Chapter 1: Mechanical installation 2 CS3004 6U Cabinet 11 x TET 10-14 CABLE ENTRANCE2026440 MOUNTING HOLEMOUNTING HOLESSEE DET. 14 x 6 (M8)46227115512430466542 DET. 125159 Installation Manual USCG Chapter 1: Mechanical installation 3 CS3004 10U Cabinet 25 CABLE ENTRANCE11 x TET 10-144622044340 MOUNTING HOLEMOUNTING HOLESSEE DET.
6 14 x 6 (M8)271155124483542 DET. 125159 Section units A section unit is a unit that can be connected to a loop, detector, manual call point, address unit , timer, sprinkler, etc. The mechanical installation of the different types of section units are described on the rear side of the data sheets respectively. Installation Manual USCG Chapter 1: Mechanical installation 4 CS3004 Electrical installation A loop may consist of different types and different numbers of section units, but how they should be connected to each other depends on how your System is configured. The example on next page will however give you an idea of how a loop may be configured. The information about the electrical installation of each type of section unit is provided on the back side of the data sheets respectively and in Appendix B. Important! Set the address switch on each section unit when connecting them to the loop.
7 If it is an address unit then also set the ID switch. See Setting the address of the section units and Setting the ID later in this chapter. To be able to test the loop the short circuit isolators must be bypassed. We recommend, connect the cores for terminal 2 and 4 and the cores for terminal 1 and 3 are joined with a connector block, inside the short circuit isolators. Installation Manual USCG Chapter 1: Mechanical installation 5 CS3004 Example 1. One section unit of each type is connected to the loop in this example. Installation Manual USCG Chapter 1: Mechanical installation 6 CS3004 Test the cable The cable should be tested for proper function after all the section units are connected and before the cable is connected to the central unit . The cable can only be tested if all short circuit isolators are bypassed. Note! It is not allowed to use an insulation tester with a voltage exceeding 30 V.
8 Test 1: Test for cable break Measure the resistance between the + poles and - poles respectively. Connect an ohm meter between the + poles. Measure and repeat the procedure for the - poles. The measured value should be less then 100 ohm for a cable with a maximum length of 2 km. Test 2: Test for short circuits Measure the resistance between the + pole and the - pole. Connect an ohm meter between the two poles. The measured value should be more then 1 kohm for a cable with a maximum length of 2 km. Installation Manual USCG Chapter 1: Mechanical installation 7 CS3004 Test 3: Test for earth failure Measure between the + pole and the - pole respectively and earth to detect an earth fault. Connect the ohm meter between + pole and earth. Measure and thereafter repeat the procedure for - pole. The measured value should be more then 50 kohm for a cable with a maximum length of 2 km.
9 Unexplainable communication errors may occur if there are several earth faults on the positive conductor. Installation Manual USCG Chapter 1: Mechanical installation 8 CS3004 Set the address on the analogue detectors An address must be specified for each section unit to make it operational. The address interval for each loop is 1-150. The address is set with the 8-pole DIP-switch. The address is binary coded, the least significant bit is indicated with "1" and the most significant bit is indicated with "8". The settings of the switch for all possible addresses are listed on the next page. The digits 1 - 8 are equal to the positions 1 - 8 on the DIP-switch. Set the pin corresponding to the digit in the table below to the ON position. RDJ-2, RDJ-2T, RDO-2 The address switch on an installed RDJ-2, RDJ-2T or RDO-2 must be sealed with the label attached to the detector. Print the section number and the address on the label.
10 Pull off the protective paper from the label and stick the label over the address switch. The base plate on the detector must also be marked with the section number and the address. Print the section number at the correct address on the enclosed label sheet. Stick the label to the outside of the base plate in full view. Indication unit , VL-2 and VL-2K The address of the indication unit , VL-2 or VL-2K, is set identical to the address of the detector which it shall indicate. Timer An address interval must be set for each connected timer. The address interval is set on two DIP-switches and the address interval indicates the range of detectors to be disconnected. For more information, see Set address interval on timer later on in this chapter. Installation Manual USCG Chapter 1: Mechanical installation 9 CS3004 1 1 2 2 3 1,2 4 3 5 1,3 6 2,3 7 1,2,3 8 4 9 1,4 10 2,4 11 1,2,4 12 3,4 13 1,3,4 14 2,3,4 15 1,2,3,4 16 5 17 1,5 18 2,5 19 1,2,5 20 3,5 21 1,3,5 22 2,3,5 23 1,2,3,5 24 4,5 25 1,4,5 26 2,4,5 27 1,2,4,5 28 3,4,5 29 1,3,4,5 30 2,3,4,5 31 1,2,3,4,5 32 6 33 1,6 34 2,6 35 1,2,6 36 3,6 37 1,3,6 38 2,3,6 39 1,2,3,6 40 4.