Transcription of FLIGHT RADIO PANEL - Logitech
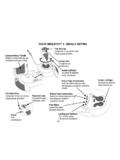
1 FLIGHT RADIO PANELP rofessional RADIO Cockpit Simulation Controller USER GUIDE | 4 ENGLISH 9 4 EnglishINTRODUCTIONThe RADIO PANEL interacts with microsoft FLIGHT Simulator X to control the cockpit RADIO stack communications and navigation AND STANDBY FREQUENCY SWITCHRADIO MODE SELECTOROUTER ROTARYA djusts standby frequency by increments of 1, inner rotary adjusts decimals5 EnglishINSTALLATIONFix the RADIO PANEL to the supplied mounting bracket. Insert the screws through the holes at the corners of the PANEL into the bracket behind and tighten. If you already own a Logitech G FLIGHT Yoke System, you can mount the RADIO PANEL and bracket on top of the Yoke unit using the screws FOR WINDOWS 10, WINDOWS AND WINDOWS 7 DRIVER INSTALLATION1 Visit to download the latest drivers and software for your operating system. 2 With device disconnected, follow the onscreen instructions to complete the installation. 3 At the Driver Setup screen, only when prompted, insert USB cable into one of your computer s USB ports, then click EnglishUSING THE Logitech G FLIGHT RADIO PANELThe Logitech G FLIGHT RADIO PANEL allows you to adjust the communications and navigation frequencies on your aircraft s RADIO stack for communicating with air traffic control or selecting VOR beacons or NDBs for and Com2 Communications channels 1 and 2 Nav1 and Nav2 Navigation channels 1 and 2 ADF Automatic Direction Frequency receiverDME Distance Measuring EquipmentXPDR Transponder frequency codeCom1 and Com2 Communications channels 1 and 2 Nav1 and Nav2 Navigation channels 1 and 2 ADF Automatic Direction Frequency receiverDME Distance Measuring EquipmentXPDR Transponder frequency codeTo adjust the RADIO stack frequencies, first select the RADIO mode using the RADIO mode selector knob on the left of the PANEL .
2 Using the rotary controls to the right of the LED screen, adjust the values of the standby frequency on the right side of the screen. The outer rotary adjusts standby frequency by increments of 1 and the inner rotary adjusts decimals. Please note, you can only adjust the standby values and not the active make the standby values active, press the ACT/STBY switch to the right of the PANEL . The standby values you have input will now move from the standby section of the screen to the active section and vice EnglishADFDMEXPDR8 EnglishADJUSTING THE XPDR CODE To adjust the transponder squawk code, first select XPDR on the RADIO mode selector knob on the left of the RADIO PANEL . Turn the outer rotary to adjust digit 1 and the inner rotary to adjust digit 2. To adjust digits 3 and 4, press the ACT/STBY button to the right of the unit and adjust digit 3 by turning the outer rotary and digit 4 by turning the inner you have installed the appropriate plug-in for FLIGHT Simulator X (FSX), the next time you run FSX it will prompt you that it is attempting to load the Logitech G PANEL (s) Plug-in for FSX - click Yes on this that you should see a Windows security warning asking you if you want to run - click Yes on that , FSX will prompt you if you wish to make a trusted piece of software - click you have installed the PANEL software, the PANEL buttons and controls should be automatically configured to control their functions in FSX software.
3 If your FSX software does not recognise the PANEL , unplug the USB cable and plug it back further help with other sims or any other questions, check the support page at SUPPORTO nline Support: microsoft FLIGHT Simulator X 1 10 G 123 WINDOWS 10 WINDOWS WINDOWS 7 1 2 3 USB USB 11 G G VOR NDB Com1 Com2 1 2 Nav1 Nav2 1 2 ADF DME XPDR Com1 and Com2 Communications channels 1 and 2 Nav1 and Nav2 Navigation channels 1 and 2 ADF Automatic Direction Frequency receiverDME Distance Measuring EquipmentXPDR Transponder frequency code LED 1 ACT/STBY
4 12 ADFDMEXPDR13 XPDR XPDR 1 2 3 4 ACT/STBY 3 4 FLIGHT Simulator X (FSX) FSX FSX G - Windows - FSX - FSX FSX USB 2017 Logitech . Logitech , Logi, and other Logitech marks are owned by Logitech and may be registered. All other trademarks are the property of their respective owners. 2017 Logi