Transcription of Ford multi-kit 1995-2011 WIRING & ANTENNA …
1 installation instructions for part 95-5817. ford multi -kit 1995 - 2011 WIRING & ANTENNA CONNECTIONS (sold separately). 95-5817 WIRING Harness: Please visit for WIRING KIT FEATURES harness options ISO DDIN radio provision ANTENNA Adapter: Not required Note: Sub-dash modifications are necessary to use this dash kit. You will need to trim the sub-dash to gain suitable depth and height. Once the kit is snapped in, it cannot be removed without dash panel removal. TOOLS REQUIRED. KIT COMPONENTS Dremel/Cutting tool Metra 86-5618 removal keys A) ISO DDIN brackets B) Filler bar A B. REV. 7/1/2016 INST95-5817. CAUTION! All accessories, switches, climate controls panels, and especially air bag indicator lights must be connected before cycling APPLICATIONS the ignition. Also, do not remove the factory radio with the key in the See application list inside cover on position, or while the vehicle is running. METRA. The World's best kits. COPYRIGHT 2004-2016 METRA ELECTRONICS CORPORATION.
2 95-5817. Applications Table of Contents ford Dash Disassembly Kit Assembly Crown 1995 - 2011 . - All 3 - ISO DDIN radio 3. 1997-2008. 2001-2007 ford Crown Victoria 1995 - 2011 . 2000-2005 ford Econoline 1997-2008. 1995 -2001 ford Escape 2001-2007. Explorer Sport 2001-2005 ford Excursion 2000-2005. F-250/350/450 1999-2004 ford Explorer 1995 -2001. F-650 2000-2010 ford Explorer Sport Trac 2001-2005. 1995 - 2011 . ford F-250/350/450/550 1999-2004. 1999-2003. ford F-650/750 2000-2010. Lincoln ford Ranger 1995 - 2011 . 1995 -1997. ford Windstar 1999-2003. Mark 1995 -1998. Town 1995 -2002 Lincoln Continental 1995 -1997. Lincoln Mark VIII 1995 -1998. Mazda Lincoln Town Car 1995 -2002. B-Series 1995 -2009. Mazda B-Series Pickup 1995 -2009. Mercury Mercury Cougar (with 6 disc in-dash) 2000-2002. Cougar (with 6 disc in-dash).. 2000-2002. Mercury Grand Marquis 1995 - 2011 . Grand 1995 - 2011 . 2003-2004 Mercury Marauder 2003-2004. 2005-2007 Mercury Mariner 2005-2007. 1997-2001 Mercury Mountaineer 1997-2001.
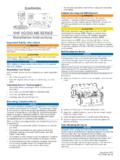
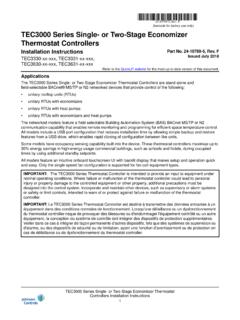
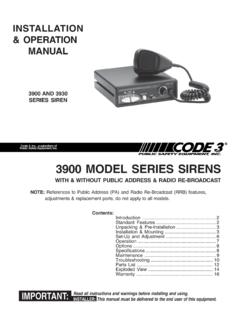
3 2. 95-5817. Dash Disassembly Kit Assembly All vehicles ISO DDIN radio provision 1. Using the Metra 86-5618 removal keys, slide the 1. Attach the ISO DDIN brackets to the radio using the radio out of the radio cavity. Unplug and remove screws supplied with the radio. (Figure A). the radio. 2. Locate the factory WIRING harness in the dash. Metra recommends using the proper mating adapter from 2. Cut and remove obstructions in dash cavity. Metra or AXXESS. Test the radio for proper operation. ATTENTION: Be careful not to cut into harnesses 3. Slide the completed assembly into the modified sub- or electronic components. dash until it clicks into place. Continue to kit assembly 4. Clip the filler bar into the bottom of the radio opening under the radio assembly with the rounded edges facing toward the dash. Tip: Hook one side in then (Figure A). push the other side in until it clips. (Figure B). CAUTION: ONCE THE KIT IS SNAPPED IN, IT. CANNOT BE REMOVED WITHOUT.
4 DASH PANEL REMOVAL. (Figure A) (Figure B). 3. installation instructions for part 95-5817. IMPORTANT. If you are having difficulties with the installation of this product, please call our Tech Support line at 1-800-253-TECH. Before doing so, look over the instructions a second time, and make sure the installation was performed exactly as the instructions are stated. Please have the vehicle apart and ready to perform troubleshooting steps before calling. KNOWLEDGE IS POWER. Enhance your installation and fabrication skills by enrolling in the most recognized and respected mobile electronics school in our industry. REV. 7/1/2016 INST95-5817. Log onto or call 800-354-6782 for more information and take steps toward a better tomorrow. Metra recommends MECP. certified technicians METRA. The World's best kits. COPYRIGHT 2004-2016 METRA ELECTRONICS CORPORATION. Instrucciones de instalaci n para la pieza 95-5817. ford multi -kit 1995 - 2011 CABLEADO Y CONEXIONES DE ANTENA.
5 (se venden por separado). 95-5817 Arn s de cableado: CARACTER STICAS DEL KIT Visite para las opciones del arn s Adaptador de antena: Provisi n de radio ISO DDIN. No se requiere Nota: Se requieren modificaciones al sub-tablero para utili- zar este kit de tablero. Deber recortar el sub-tablero para obtener la profundidad y altura necesarias. Una vez que haya colocado el kit a presi n, no podr . quitarlo sin retirar el panel del tablero. HERRAMIENTAS REQUERIDAS. COMPONENTES DEL KIT Dremel/Cutting tool Metra 86-5618 removal keys A) Soportes de ISO DDIN B) Barra de relleno B. A. REV. 7/1/2016 INST95-5817. PRECAUCI N! Todos los accesorios, interruptores, paneles de con- troles de clima y especialmente las luces del indicador de las bolsas de aire deben estar conectados antes ciclar la ignici n. Adem s, no APLICACIONES quite el radio de f brica con la llave en la posici n o de encendido ni Consulte la lista de aplicaciones dentro con el veh culo funcionando. METRA.
6 The World's best kits. COPYRIGHT 2004-2016 METRA ELECTRONICS CORPORATION. 95-5817. Aplicaciones Indice ford Desmontaje del tablero Ensamble del kit Crown 1995 - 2011 . - Todos los veh 3 - Provisi n de radio ISO 3. 1997-2008. 2001-2007 ford Crown Victoria 1995 - 2011 . 2000-2005 ford Econoline 1997-2008. 1995 -2001 ford Escape 2001-2007. Explorer Sport 2001-2005 ford Excursion 2000-2005. F-250/350/450 1999-2004 ford Explorer 1995 -2001. F-650 2000-2010 ford Explorer Sport Trac 2001-2005. 1995 - 2011 . ford F-250/350/450/550 1999-2004. 1999-2003. ford F-650/750 2000-2010. Lincoln ford Ranger 1995 - 2011 . 1995 -1997. ford Windstar 1999-2003. Mark 1995 -1998. Town 1995 -2002 Lincoln Continental 1995 -1997. Lincoln Mark VIII 1995 -1998. Mazda Lincoln Town Car 1995 -2002. B-Series 1995 -2009. Mazda B-Series Pickup 1995 -2009. Mercury Mercury Cougar (con 6 discos en el tablero). Cougar (con 6 discos en el tablero).. 2000-2002 2000-2002. Grand 1995 - 2011 . Mercury Grand Marquis 1995 - 2011 .
7 2003-2004. 2005-2007 Mercury Marauder 2003-2004. 1997-2001 Mercury Mariner 2005-2007. Mercury Mountaineer 1997-2001. 2. 95-5817. Desmontaje del tablero Ensamble del kit Todos los veh culos Provisi n de radio ISO DDIN. 1. Usando las llaves de remoci n Metra 86-5618, 1. Conecte los soportes ISO DDIN a la radio utilizando los deslice el radio para sacarlo de la cavidad. tornillos suministrados con la radio. (Figura A). Desconecte y retire el radio. 2. Ubique el arn s del cableado de f brica en el tablero. Metra recomienda usar el adaptador de acoplamiento 2. Corte y retire las obstrucciones de la cavidad adecuado de Metra o AXXESS. Pruebe la unidad para del tablero. verificar que funcione correctamente. ATENCI N: Tenga cuidado de no cortar los 3. Deslice el conjunto completo en el sub tablero arneses o los componentes electr nicos. modificado hasta que encaje en su sitio. Continuar al ensamble del kit 4. Enganche la barra de relleno en la parte inferior de la apertura del radio debajo del ensamble del radio con los bordes redondeados hacia el tablero.
8 Sugerencia: (Figura A). Enganche un lado y luego empuje el otro lado hacia dentro hasta que se enganche. (Figura B). PRECAUCI N: UNA VEZ QUE EL KIT SE ENCAJA A. PRESI N EN, NO PODR QUITARLO SIN. RETIRAR EL PANEL DEL TABLERO. (Figura A) (Figura B). 3. Instrucciones de instalaci n para la pieza 95-5817. IMPORTANTE. Si tiene dificultades con la instalaci n de este producto, llame a nuestra l nea de soporte t cnico al 1-800-253-TECH. Antes de hacerlo, revise las instrucciones por segunda vez y aseg rese de que la instalaci n se haya realizado exactamente como se indica en las instrucciones. Por favor tenga el veh culo desarmado y listo para ejecutar los pasos de resoluci n de problemas antes de llamar. EL CONOCIMIENTO ES PODER. KMejore sus habilidades deIS. NOWLEDGE POWER. instalaci n y fabricaci n Enhance inscribi ndose your installation en la escuela and fabrication de skills by enrolling in the most recognized and respected dispositivos electr nicos m viles m s reconocida mobile electronics school in our industry.
9 REV. 7/1/2016 INST95-5817. y respetada de nuestra industria. Reg strese Log onto or call en 800-354-6782 for more information and take o llame al steps toward a better tomorrow. 800-354-6782 para obtener m s informaci n y avance hacia un futuro mejor. Metra recomienda t cnicos con certificaci n del Programa de Certificaci n en Electr nica M vil (Mobile Electronics Certification Program, MECP). METRA. The World's best kits. COPYRIGHT 2004-2016 METRA ELECTRONICS CORPORATION.