Transcription of Getting started with DfuSe USB device ... - STMicroelectronics
1 July 2009 Doc ID 13379 Rev 41/22UM0412 User manualGetting started with DfuSe USB device firmware upgradeSTMicroelectronics extensionIntroductionThis document describes the demonstration user interface that was developed to illustrate use of the STMicroelectronics device firmware upgrade library. A description of this library, including its application programming interface, is contained in the DfuSe application programming interface document and installed with the DfuSe ContentsUM04122/22 Doc ID 13379 Rev 4 Contents1 Getting started .. requirements .. contents .. demonstration installation .. installation .. installation .. 62 DFU file .. 123 User interface description .. demonstration .. file manager .. Want to do dialog box .. generation dialog box .. extraction dialog box .. 174 Step-by-step procedures .. demonstration procedures .. to upload a DFU file.
2 To download a DFU file .. file manager procedures .. to generate DFU files from S19/Hex/Bin files .. to extract S19/Hex/Bin files from DFU files .. 205 Revision history .. 21UM0412 List of tablesDoc ID 13379 Rev 43/22 List of tablesTable demo dialog box description .. 14 Table generation dialog box description .. 16 Table bin injection dialog box description .. 17 Table extraction dialog box description .. 18 Table revision history .. 21 List of figuresUM04124/22 Doc ID 13379 Rev 4 List of figuresFigure properties dialog box .. 5 Figure the installation location .. 7 Figure selection option .. 8 Figure selection .. 9 Figure from disk .. 10 Figure message .. 10 Figure message .. 11 Figure finish .. 11 Figure demo dialog box .. 13 Figure option byte dialog box .. 15 Figure 11. Want to do dialog box.. 15 Figure 12. Generation dialog box .. 16 Figure 13.
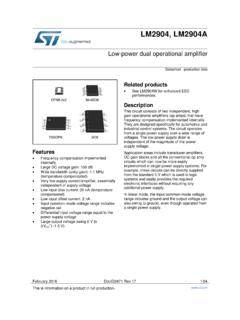
3 Multi bin injection dialog box .. 17 Figure 14. Extract dialog box .. 17UM0412 Getting startedDoc ID 13379 Rev 45/22 1 Getting System requirementsIn order to use the DfuSe demonstration with the Windows operating system, a recent version of Windows, such as Windows 98SE, Millennium, 2000, XP or VISTA, must be installed on the version of the Windows OS installed on your PC may be determined by right-clicking on the My Computer icon in the desktop, then clicking on the Properties item in the displayed PopUpMenu. The OS type is displayed in the System properties dialog box under the System label in the General tabsheet (see Figure 1).Figure properties dialog box Getting startedUM04126/22 Doc ID 13379 Rev Package contentsThe following items are supplied in this package:Software contents1. STTube driver consisting of the two following files: : Driver to be loaded for demo board.
4 : Configuration file for : Installation file which installs the DfuSe applications and source code on your contents This tool is designed to work with all STMicroelectronics devices which supports the device Firmware Upgrade via an USB interface. For more details, please contact your ST representative or visit the ST web site ( ). DfuSe demonstration Software installationRun file: the InstallShield Wizard will guide you to install DfuSe applications and source code on your computer. When the software is successfully installed, click the Finish button. You can then explore the driver driver files are located in the Driver folder in your install path (C:\Program files\ STMicroelectronics \ DfuSe ).The source code for the Demo application and DfuSe library is located in the C:\Program Files\ STMicroelectronics \ DfuSe \Sources is located in the C:\Program Files\ STMicroelectronics \ DfuSe \Sources\D oc Hardware installation Connect the device to a spare USB port on your PC.
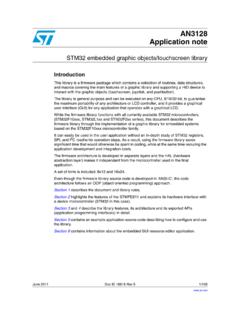
5 The Found New Hardware Wizard then starts. Select the Install from a list or specific location as shown below and then click Next .UM0412 Getting startedDoc ID 13379 Rev 47/22 Figure the installation location Select Don t search. I will choose the driver to install as shown below and then click Next . Getting startedUM04128/22 Doc ID 13379 Rev 4 Figure selection option If a driver is already installed, the model list will show the compatible hardware models, else click Have to locate the driver startedDoc ID 13379 Rev 49/22 Figure selection In the Install From Disk dialog box, click to specify the driver files location, the driver directory is located in your install path (C:\Program files\ STMicroelectronics \ DfuSe \Driver), then click OK .The PC autoselects the correct INF file, in this case Once Windows has found the required driver .INF file, the compatible hardware model will be displayed in the model list.
6 Click Next to proceed. Getting startedUM041210/22 Doc ID 13379 Rev 4 Figure from disk When Windows is performing the driver installation, a warning dialog will be displayed indicating that the driver has not passed Windows logo testing, click continue Anyway to messageUM0412 Getting startedDoc ID 13379 Rev 411/22 Figure message Windows should then display a message indicating that the installation was successful. Click Finish to complete the finish DFU fileUM041212/22 Doc ID 13379 Rev 42 DFU fileUsers that have purchased DFU devices require the ability to upgrade the firmware of these devices. Traditionally, firmware is stored in Hex, S19 or Binary files, but these formats do not contain the necessary information to perform the upgrade operation, they contain only the actual data of the program to be downloaded. However, the DFU operation requires more information, such as the product identifier, vendor identifier, Firmware version and the Alternate setting number (Target ID) of the target to be used, this information makes the upgrade targeted and more secure.
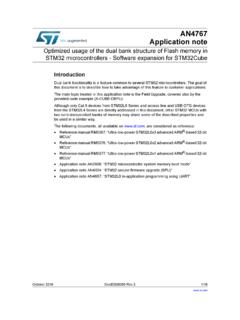
7 To add this information, a new file format should be used, to be called DFU file format. For more details refer to the DfuSe File Format Specification document (UM0391).UM0412 User interface descriptionDoc ID 13379 Rev 413/22 3 User interface descriptionThis section describes the different user interfaces available in the DfuSe package, and explains how to use them to perform DFU operations such as Upload, Download and firmware file DfuSe demonstration Firmware upgrades need to be able to be performed without any special training, even by novice users. Hence, the user interface was designed to be as robust and simple to use as possible (see Figure 9). The numbers in Figure 9 refer to the description in Ta b l e 1 listing the available controls in the DfuSe Demonstration demo dialog box1234567891012131411161715 User interface descriptionUM041214/22 Doc ID 13379 Rev 4 If the microcontroller in use in an STM32F105xx or an STM32F107xx, the DfuSe demo shows a new feature that consists in reading the option byte data over the exported Option byte memory part.
8 A double click on the related item in the memory map (Item 6 in Ta b l e 1/Figure 9) opens a new dialog box that displays the read option bytes. You can use this box to edit and apply your own configuration (see Figure 10).The tool is able to detect the capabilities of the selected memory part (read, write and erase). In case of an unreadable memory (readout protection activated), it indicates the memory read status and prompts to ask whether to deactivate the read protection or demo dialog box descriptionControlDescription1 Lists the available DFU and compatible HID devices, the selected one is the one currently HID device is a HID class device providing the HID detach feature (USAGE_PAGE 0xFF00 and USAGE_DETACH 0x0055) in its report :0xa1, 0x00, // Collection(Physical)0x06, 0x00, 0xFF, // Vendor defined usage page - 0xFF000x85, 0x80, // REPORT_ID (128)0x09, 0x55, // USAGE (HID Detach)0x15, 0x00, // LOGICAL_MINIMUM (0)0x26, 0xFF, 0x00, // LOGICAL_MAXIMUM (255)0x75, 0x08, // REPORT_SIZE (8 bits)0x95, 0x01, // REPORT_COUNT (1)0xB1, 0x82, // FEATURE (Data,Var,Abs,Vol)0xC0, // END_COLLECTION (Vendor defined)2 device identifiers for DFU mode; PID, VID and identifiers for Application mode.
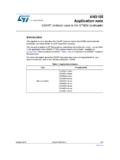
9 PID, VID and Enter DFU mode command. Target will switch from Application to DFU mode or send a HID Detach if the device is a compatible HID Leave DFU mode command. Target will switch from DFU to Application mapping, Double click each item to view more details about the memory destination DFU file, the uploaded data will be copied into this Upload of the transferred data during the current operation (Upload/Upgrade).10 Duration time of the current operation (Upload/Upgrade).11 Available targets in the loaded DFU source DFU file, the downloaded data will be loaded from this upgrade operation (Erase then download).14 Verify if data was successfully the progress of the current interface descriptionDoc ID 13379 Rev 415/22 Figure 10. Edit option byte dialog DFU file Want to do dialog boxWhen DFU file manager application is executed, the Want to do dialog box appears, the user has to choose the file operation he wants to do.
10 Select the first radio button to generate a DFU file from an S19, Hex or Bin file, or the second to extract an S19, Hex or Bin file from a DFU file (see Figure 11).Figure 11. Want to do dialog boxSelect I want to GENERATE a DFU file from S19, HEX or BIN files radio button if you want to generate a DFU file from S19, Hex or Binary files. User interface descriptionUM041216/22 Doc ID 13379 Rev 4 Select I want to EXTRACT S19, HEX or BIN files from a DFU one radio button if you want to extract an S19, Hex or Binary file from a DFU File generation dialog boxIf the first choice was selected, click the OK button to display the File Generation dialog box . This interface allows the user to generate a DFU file from an S19, Hex or Bin file. Figure 12. Generation dialog box Because S19, Hex and Bin files do not contain the target specification, the user must enter the device properties (VID, PID and version), the Target ID and the target name before generating the DFU generation dialog box descriptionControlDescription1 Vendor identifier2 Product identifier3 Firmware version4 Available images to be inserted in the DFU file5 Target identifier number6 Open S19 or Hex file7 Open Binary files8 Target name9 Delete selected image from the images list10 Generate DFU file11 Cancel and exit application UM0412 User interface descriptionDoc ID 13379 Rev 417/22 Figure 13.