Transcription of I2C C Master - Microchip Technology
1 1 Getting Startred: I2C Master Mode 2001I2C Master ModeII22CC Master Master ModeModeOverview and Use of the PICmicro MSSP I2C Interface with a 24xx01x EEPROMO verview and Use of the PICmicro MSSP I2C Interface with a 24xx01x EEPROMv to the Microchip Technology Presentation on using the MSSP module in Master I2C this presentation, we will look at what I2 Cis and how it is used to communicate data to and from a PICmicro Microcontroller and a serial will be connecting a device from the popular family of PIC16F87x microcontrollers to a 24x01 serial EEPROM. Both of these devices are manufactured by Microchip Technology Inc and can be found on the popular PICDEM2 Demonstration a popular protocol and is supported by many devices. This presentation answers some questions about I2 Cand explains with a full example how to connect a PICmicro MSSP module to an EEPROM. 2 Getting Startred: I2C Master Mode 2001 TopicsTopicsTopicslCovered Topics:lOverview of I2 ClUsing I2 Con the PICmicro MicrocontrollerlExample: A code walk-though for connecting a 24x01x to a PIC16F87 XlFinding More InformationlCovered Topics:lOverview of I2 ClUsing I2 Con the PICmicro MicrocontrollerlExample: A code walk-though for connecting a 24x01x to a PIC16F87 XlFinding More InformationIn this presentation, we will cover the following topics:We will first cover an Overview of chapter of the presentation will introduce you to the I2 CProtocol and its , we will examine the use of I2 Con the PICmicro details of how SPI is implemented on a PICmicro device will be examined.
2 We will look at the MSSP module, which is available on a wide selection of popular PICmicro will then examine a code walkthough will explore code for both writing and reading a serial EEPROM. The example sends sample data to the EEPROM, then reads back thedata and displays it. The code to do this looks rather long, but it is not complex. We will break the code down into smaller and easy to understand , there will be a few resources given at the end of the presentation. These resources will allow you to explore in more detail the Startred: I2C Master Mode 2001 OverviewOverviewOverviewlUsed for moving data simply and quickly from one device to anotherlSerial InterfacelSynchronouslBidirectionallUsed for moving data simply and quickly from one device to anotherlSerial InterfacelSynchronouslBidirectionalI2 Cstands for Inter-Integrated Circuit implemented in the PICmicro by a hardware module called the Master Synchronous Serial Port, known as the MSSP module . This moduleis built into many different PICmicro devices.
3 It allows I2 Cserial communication between two or more devices at a high speed and communicates with other PICmicro devices and many peripheral IC s on the market a synchronous protocol that allows a Master device to initiate communication with a slave device. Data is exchanged between these devices. We will look at this more in detail as we progress though this also bi-directional. This is implemented by an Acknowledge system. The Acknowledge system or ACK system allows data to be sent in one direction to one item on the I2 Cbus, and then, that item will ACK to indicate the data was received. We will look at this in detail later, as you can see,this is a powerful feature of I2C. Since a peripheral can acknowledge data, there is little confusion on whether the data reached the peripheral and whether it was understood. 4 Getting Startred: I2C Master Mode 2001 OverviewOverviewOverviewlI2C is a SynchronousprotocollThe data is clocked along with a clock signal (SCL)lThe clock signal controls when data is changed and when it should be readlSince I2 Cis synchronous, the clock rate can vary, unlike asynchronous (RS-232 style) communicationslI2C is a SynchronousprotocollThe data is clocked along with a clock signal (SCL)lThe clock signal controls when data is changed and when it should be readlSince I2 Cis synchronous, the clock rate can vary, unlike asynchronous (RS-232 style) communicationsI2 Cis a synchronous protocol that allows a Master device to initiate communication with a slave device.
4 Data is exchanged between these devices. Since I2 Cis synchronous, it has a clock pulse along with the data. RS232 and other asynchronous protocols do not use a clock pulse, but the data must be timed very accurately. Since I2 Chas a clock signal, the clock can vary without disrupting the data. The data rate will simply change along with the changes in the clockrate. This makes I2 Cideal when the micro is being clocked imprecisely, such as by aRC Startred: I2C Master Mode 2001 OverviewOverviewOverviewlI2 Cis a Master -SlaveprotocollThe Master device controls the clock (SCL)lThe slave devices may hold the clock low to prevent data transfer lNo data is transferred unless a clock signal is presentlAll slaves are controlled by the Master clocklI2 Cis a Master -SlaveprotocollThe Master device controls the clock (SCL)lThe slave devices may hold the clock low to prevent data transfer lNo data is transferred unless a clock signal is presentlAll slaves are controlled by the Master clockI2 Cis a Master -Slave , the Master device controls the clock line, SCL.
5 This line dictates the timing of all transfers on the I2 Cbus. Other devices can manipulate this line, but they can only force the line low. This action means that item on the bus can not deal with more incoming data. By forcing the line low, it is impossible to clock more data in to any device. This is known as Clock Stretching .As stated earlier, no data will be transferred unless the clock is slaves are controlled by the same clock, Startred: I2C Master Mode 2001I2C -OverviewI2C I2C --OverviewOverviewlI2 Cis a BidirectionalprotocollData is sent either direction on the serial data line (SDA) by the Master or a BidirectionalprotocollData is sent either direction on the serial data line (SDA) by the Master or a Bi-directional protocol. Data can flow in any direction on the I2 Cbus, but when it flows is controlled by the Master Startred: I2C Master Mode 2001 OverviewOverviewOverviewlI2 Cis a Serial Interfaceof only two signals:lSDAS erial DAta This line transfers data to or from the CLock This controls when data is sent and when it is read.
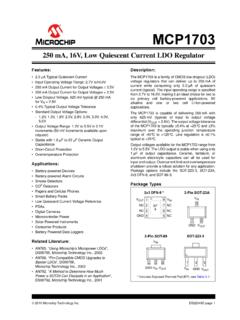
6 The Master controls a Serial Interfaceof only two signals:lSDAS erial DAta This line transfers data to or from the CLock This controls when data is sent and when it is read. The Master controls a Serial Interface and uses only the following two signals to serially exchange data with another device:SDA -This signal is known as Serial Data. Any data sent from one device to another goes on this line. SCL -This is the Serial Clock signal. It is generated by the masterdevice and controls when data is sent and when it is read. As mentioned earlier, the signal can be forced low so that no clock can occur. This is done by a device that has become too busy to accept more Startred: I2C Master Mode 2001I2C SignalsII22CC SignalsSignalslSignal LevelslFloat High (logic 1)lDrive Low (logic 0)lSignal LevelslFloat High (logic 1)lDrive Low (logic 0)+5+5 Float HighDrive LowNote: Diagrams are symbolicI2 Clines can have only two possible electrical states. These states are known as float high and drive low.
7 I2 Cworks by having a pull-up resistor on the line and only devices pull the line low. If no device is pulling on the line, it will float high . This is why pull-up resistors are important in I2C. If no pull-up resistor were used, the line would float to an unknown one tried to drive the line high, it might cause contention with a device trying to drive the line low. This contention could damage the either or both devices driving the line. To prevent this, the pull-up-drive low system controls when one device has control of the bus. If another device tried to use the bus when it was busy, it would find the bus to be driven low already and know it was busy. Even if it tried to use the bus accidentally, it would only drive it low and not damage other diagrams shown are symbolic. In each case, the solid diagram represents the ACTIVE part of the bus. In the case of driving low, the buffer is actively pulling the line low. In the case of floating high, the resistor pulls the line high, while the buffer is turned off.
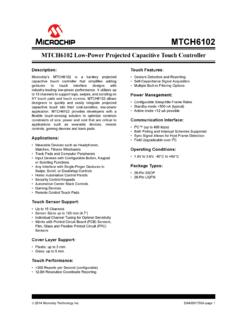
8 A buffer turned off has very high impedance and behaves as if it were disconnected. Only the output buffers are shown for Startred: I2C Master Mode 2001I2C HardwareII22CC HardwareHardwareI2 CPull-up Resistor Setting SuggestionsI2 CPull-up Resistor Setting Suggestions1 k100 kbps400 kbps< 100 kbpsNOTE:Values are approximateThis diagram represents the recommended pull-up resistor value for various I2 Cspeeds. You are free to use any resistor value you like, but the calculation of what to use will depend on the capacitance of the driven line, and the speed of the I2 Ccommunication. There may be other factors as well. These values were chosen as they represent values that have been found to work frequently atthese speeds. They are provided for reference only as suggested values. Your application may choose other , we will examine the building blocks or elements of I2C10 Getting Startred: I2C Master Mode 2001I2C ElementsII22CC ElementsElementslBuilding Blocks of I2 ClI2C consists of many conditions which to simplify this presentation will be represented as elements.
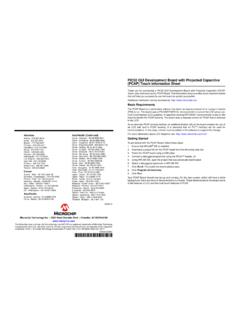
9 LBuilding Blocks of I2 ClI2C consists of many conditions which to simplify this presentation will be represented as elements . SPRDataAThe I2 Cbus has a number of conditions . These conditions indicate when a transfer is starting, stopping, being acknowledged, and other events. To simplify the explanation of I2 Ccommunications, this presentation will represent these as elements , small colored blocks with a letter and color to represent each elements will be used thought the presentation to aid the explanation of I2C. Some sample blocks are shown here. [pause]Let s take a closer look at these elements Startred: I2C Master Mode 2001I2C ElementsII22CC ElementsElementslStart ConditionlInitializes I2C BuslSDA is pulled low while SCL is highlStart ConditionlInitializes I2C BuslSDA is pulled low while SCL is highSSDASCL=The first element we need to look at is the Startcondition. A start condition indicates that a device would like to transfer data on the I2 Cbus. Pictured here is the block with an S in it and what it the signals look like on the I2 Cbus.
10 As you can see, SDA is first pulled low, followed by PICmicro microcontroller will take care of the timing details for you. However it will need to be told you want a start condition and you will check for when it completes. We will look at how these blocks relate to using a PICmicro device Startred: I2C Master Mode 2001I2C ElementsII22CC ElementsElementslStop ConditionlReleases I2C BuslSDA is released while SCL is highlStop ConditionlReleases I2C BuslSDA is released while SCL is highSDASCL=PThe next element we will discuss is the Stopcondition. A start condition indicates that a device has finished its transfer on the I2 Cbus and would like to release the bus. Once released other devices may use the bus to transmit data. As you can see, a block with a T in it represents the stop condition. A T is used because S was already used for start earlier. This conventionwill continue to be used thought this signaling used for a stop is a release of the SCL line followed by a release of the SDA line.