Transcription of ImageJ Basics
1 Larry Reinking Department of Biology, Millersville University Millersville, PA 17551 Biology 211 Laboratory Manual Updated June 2007 ImageJ Basics (Version ) ImageJ is a powerful image analysis program that was created at the National Institutes of Health. It is in the public domain, runs on a variety of operating systems and is updated frequently. You may download this program from the source ( ) or copy the ImageJ folder from the C drive of your lab computer. The ImageJ website has instructions for use of the program and links to useful resources.
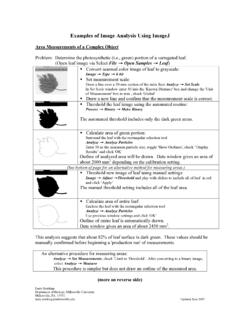
2 Installing ImageJ on your PC (Windows operating system): Copy the ImageJ folder and transfer it to the C drive of your personal computer. Open the ImageJ folder in the C drive and copy the shortcut (microscope with arrow) to your computer s desktop. Double click on this desktop shortcut to run ImageJ . See the ImageJ website for Macintosh instructions. ImageJ Window: The ImageJ window will appear on the desktop; do not enlarge this window. Note that this window has a Menu Bar, a Tool Bar and a Status Bar.
3 Menu Bar Tool Bar Status Bar Adjusting Memory Allocation: Use the Edit Options Memory command to adjust the default memory allocation. Setting the maximum memory value to more than about 75% of real RAM may result in poor performance due to virtual memory "thrashing". Opening an Image File: Select File Open from the menu bar to open a stored image file. Tool Bar: The various buttons on the tool bar allow you measure, draw, label, fill, etc. A right-click or a double left-click may expand your options with some of the tool buttons.
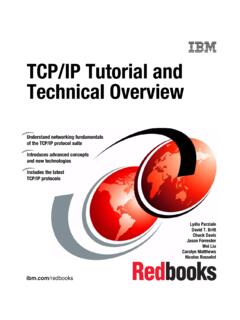
4 Area Selection Tools: The first four buttons on the tool bar allow you to surround an area on the image with a rectangle, oval, polygon or freehand shape. After selection, these areas may be Graphics are from the ImageJ website ( ). Larry Reinking Department of Biology, Millersville University Millersville, PA 17551 Biology 211 Laboratory Manual Updated June 2007 altered, analyzed, copied, etc. using the menu commands. Note that the status bar, below the tool bar, gives information such as the coordinates (xx, yy) of the selection on the frame.
5 Line Selection Tools: This button allows you to create straight, segmented or freehand lines (right-click to select line type). Information about the line is displayed on the status bar. Double-click on the button to alter the line width, select Analyse Measure (or Ctrl+M) to record a line length and Edit Draw (or Ctrl+D) to make a line permanent. Angle Tool: Draws two intersecting lines and measures the formed angle. Point Tool: When Auto-Measure is selected, this tool allows you to mark locations on an image; with each click the coordinates of the mark (xx, yy) and brightness values (0-255) are recorded in a data window.
6 Color images will have three brightness readings displayed on the status bar, one each for the red, green and blue channels, however only a single grayscale brightness value will appear in the data window. Wand Tool: This tool automatically finds the edge of an object and traces its shape. It works best with high contrast images (see Thresholding, next page). Place the wand to the left of an edge; click and the algorithm will search to the right for an edge. It will then trace along the edge of the object until it returns to the starting point.
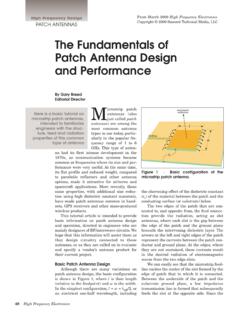
7 Text Tool: Double click on this button to select a font and size. A large font size will probably be required for an image from a high resolution digital camera. Single click the button, click-drag a text box and type the label. Move the box to the desired location and permanently set the text in place with Edit Draw (or Ctrl+D). Use the color picker tool to select font color. Magnifying Glass: Left-click on the image to magnify; right-click to reduce the image size. Scrolling Tool: This button allows you to move an image if it is larger than the window.
8 Pressing the keyboard space bar is a shortcut that temporarily activates this tool. Color Picker: This tool sets the foreground drawing/text color when a color on an image is picked up with the eyedropper. Colors also may be selected from the Colors window by double-clicking the color picker button (or via Image Color Color Picker). Use Alt+click to change the background color. The icon for this tool (eye dropper) shows the current foreground color while the frame around it shows the background color. Other Tools: The remaining tool buttons are similar to those found in drawing programs (spray can, flood fill, etc.)
9 And can be easily used after a bit of experimentation. Image Editing and Analysis The following is a small sampling of processing techniques that are possible with ImageJ . I often use ImageJ in conjunction with a photo editing program such as Adobe Photoshop. During analysis, measured values can be easily transferred to a spreadsheet with a cut and paste . It is a very good idea to make a backup copy of your image before doing any processing. Refer to the ImageJ and NIH Image websites for more information Undo.
10 Edit Undo reverses the preceding action. Only one back-step is possible. Revert. File Revert converts all changes back to the original saved version. Cropping. Surround the area with the rectangular selection tool followed by Image Crop. Clear Outside. Make a perimeter with an area selection tool followed by Edit Clear Outside. This technique is useful for clearing extraneous objects near an area of interest. Edit Clear clears inside of the perimeter. Larry Reinking Department of Biology, Millersville University Millersville, PA 17551 Biology 211 Laboratory Manual Updated June 2007 Enhancing Brightness and Contrast.