Transcription of INSTALLATION GUIDE FOR TROJAN CONCRETE …
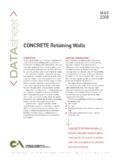
1 INSTALLATION GUIDE FOR TROJAN CONCRETE SLEEPER retaining WALL Available From: STEP 1: BASE PREPRATION Clear and level your site where you plan to build the retaining wall. Please ensure you leave a minimum of 200mm behind the retaining wall area for backfill. STEP 2: POST HOLES Starting from one end of the wall, mark a cross on the ground at Intervals. STEP 3: AUGER HOLES Auger holes to a minimum diameter of 450mm and a depth as required determined by the height of the retaining wall, see schedule 1. Step 4: Placement of Steel Posts Ensure post are level and spaced at 1800mm centres. Step 5: CONCRETE Placement CONCRETE should be a minimum of 20mpa, check alignment of post before CONCRETE sets. Allow a least 3 days before installing CONCRETE sleepers. Set a CONCRETE levelling pad between posts for the bottom sleeper to sit on. This pad can be below ground level if you do not wish to view the pad when finished.
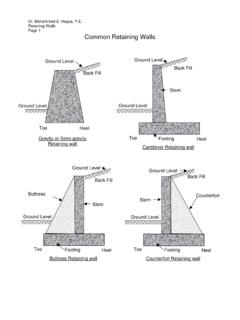
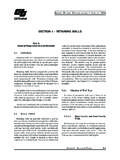
2 Step 6: CONCRETE Sleeper Placement Slide the first sleeper into steel posts, check if sleeper is level, if not pack the bottom of the sleeper with CONCRETE mortar to level. Place 90mm ag pipe, with sock, behind the bottom sleeper and connect to a legal point of discharge, slide the remaining sleepers into place. Step 7: Backfill Drainage Material Place 20mm gravel, crushed stone or recycled CONCRETE behind the CONCRETE sleeper wall, plug the last 100mm from the top of the last sleeper with CONCRETE or clay to stop any ground water from entering the rear of the CONCRETE sleeper wall. Height "H" Depth "D" Embed "E" Diameter "d" Column Size C1 1000 1400 1200 450 100 UC15 1200 1600 1400 450 100 UC15 1400 1800 1600 450 100 UC15 1600 2000 1800 450 150 UC23 1800 2300 2000 450 150 UC23 2000 2500 2200 450 150 UC31 Schedule 1 These retaining wall details are generic only and are suitable for wall up to 1-metre-high and are applicable to the soil conditions in note W6 of the detailed drawings 18000-R01 Revision A (available on request).
3 walls over 1-metre-high should be certified by a qualified engineer, ensure local council requirements are adhered to for all retaining walls regardless of height. All steel shall be in accordance with Grade 300 and be (I) hot dip galvanised, or (II) have one coat of an inorganic Zinc Silicate, followed by one coat of all-weather gloss acrylic with UV protector. or (III) Epoxy high corrosion-resistant system or equivalent. Galvanised steel should nave a primer coat followed by a finish coat both of Zinc Dust or Zinc Oxide Type. Both coats may either be brushed or sprayed.