Transcription of INSTALLATION INSTRUCTIONS - James Hardie Pros
1 INSTALLATION INSTRUCTIONSE ffective May 2017 Te c h n i c a l S e r v i c e s : For most recent version visit PAGE 2 INSTALLATION Manual for Reveal Panel SystemTable of Contents1 Introduction ..32 General INSTALLATION Requirements ..43 MATERIALS AND TOOLS ..5-9 Sub-wall Assembly Rainscreen Materials ..5 Reveal Panel System Materials Supplied by James Hardie ..6-7 Required Cutting Tools ..8 Required Fasteners and Drilling Tools Supplied by James Hardie ..8 Other Tools Needed ..8 Recommended Finishing Materials ..94 Material Storage and Staging ..105 INSTALLATION PROCESS ..11-24 Wall Preparation ..11 INSTALLATION Overview ..12 Step 1: Install Water Resistive Barrier ..13 Step 2: Install Drainage Flashing Trim and Vent Screen ..14 Step 3: Attach Furring for Rainscreen ..15 Step 4: Floor Breaks & Trim Layout ..16-20 Surround Trim Layout.
2 17 Recess Trim Layout ..18 Surround Window Treatment ..19 Recess Window Treatment ..20 Step 5: Cutting Materials ..21 Step 6: Pre-Drilling Panels ..22 Step 7: Trim and Panel INSTALLATION ..23 Step 8: Finishing ..246 FASTENER LAYOUT ..25-27 Exposed Countersunk Fastening ..26 Fastener Layout and Off Stud Trim Placement ..27 Builder s INSTALLATION Checklist ..28 PAGE 3 INSTALLATION Manual for Reveal Panel SystemSection 1 IntroductionThe material contained herein provides INSTALLATION guidelines for the Reveal Panel System by James Hardie . This document is intended for use by builders, cladding installers, and other contractors who may be involved with the INSTALLATION of the Reveal Panel Reveal Panel System by James Hardie provides a durable, expressed joint panel appearance for building facades offering versatility to architects and builders.
3 A variety of design styles can be created panels installed vertically, horizontally or in a brick pattern, with exposed or countersunk fastening. The Reveal Panel System is intended for use for contemporary panel solutions up to 60 feet from the ground. The guidance and INSTRUCTIONS contained in this documents are generally applicable to the Reveal Panel System. They are not intended to replace the specifications and INSTRUCTIONS supplied by a qualified architect or designer for your architect or designer is responsible for using the Reveal Panel System in compliance with local laws, building codes and any other requirements that pertain to moisture management, energy efficiency or structural : failure to follow James Hardie written INSTALLATION INSTRUCTIONS and comply with applicable building codes may violate local laws, affect building envelope performance and may affect warranty coverage.
4 Failure to comply with all health and safety regulations when cutting and installing this product may result in personal injury. Before INSTALLATION , confirm you are using the correct HardieZone product INSTRUCTIONS by visiting or call 1-866-942-7343 (866-9- Hardie ).If you are a specifier or other responsible party for a project, ensure the information in these specifications is appropriate for the application you are planning and that you undertake specific design and detailing for areas which fall outside the scope of these you begin your siding project read the instruction manual completely and thoroughly. This document describes and illustrates the minimum steps required to install the Reveal Panel instruction manual can anticipate every condition, circumstance, situation or problem that might arise during INSTALLATION over the course of the project.
5 When in doubt about assembly details, contact the architect, specifier, or a building official. Contact your James Hardie Sales and Install Representative for product support 1-800-9 Hardie (1-800-942-7343).PreparationEnsure the drainage plane is intact and all penetrations are your work, use the proper tools, techniques, and follow INSTALLATION procedures as covered in this INSTALLATION manual. It is important that builders, specifiers, and installers recognize requirements and information pertaining to:- Safety- Storage and Handling- Cutting- Wall Preparation- FasteningFor best results, before INSTALLATION , ensure your Reveal panels are clean and free of dirt, dust, chalking, oil, grease, organic contaminants, or mold. Dust from cutting and construction should be removed immediately upon INSTALLATION . Practice installing MaterialUtilize a mock-up to evaluate INSTALLATION and finishing techniques, with a focus on specific applications designed by a design professional or engineer.
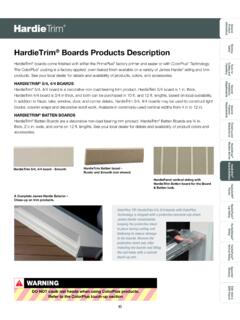
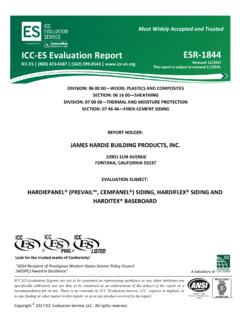
6 Do not proceed with remaining work until workmanship, color, and sheen are approved. Repeat mock-up area as required to produce acceptable 2 | PAGE 4 INSTALLATION Manual for Reveal Panel System3/4 in minSection 2 General INSTALLATION RequirementsRainscreen furring (3/4 in thick)Water resistive barrier (code approved)1/2 in gapSeam tapeVent ScreenDrainage flashing trim with 1/2 in gapEnd damJ trim1inMin 1 in gap between gutter end caps and sidingSeam tapeVent screenDrainage flashing trimMinimum weather cutCut trim block into two pieces to retro-fit around existing ventCode-approved weather resistive barrier laps over the step flashingCaulk sides and bottom6inOS corner trimVent screenDrainage flashing trim with 1/2 in gapMinimum 6 in clearanceGroundSeam tapeDrainage flashing trim with 1/2 in gapVent screenTrim with 1/2 in gapMinimum 1/2 in clearance between the trim and horizontal surfaceFlashing below trim rests on solid sheathingDrip edgeBlocking LedgerJ-ChannelSoffitReveal PanelSub-fasciaFasciaCode-approved weather resistive barrier laps over the step flashingExterior sheathingRainscreen furring (3/4 in thick)Vent screen3/4 in min gap (do not caulk)
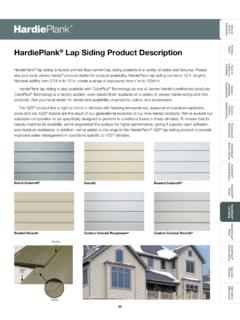
7 Drainage flashing trimOptional decorative band board with extended z-flash2inCode-approved weather resistive barrier laps over the step flashingSeam tapeVent screenDrainage flashing trim with 2 in clearance from slabExterior slabCode-approved weather resistive barrier laps over the step flashingJ trimVent screenDrainage flashing trim1/2 in gap for aesthetics2in minExtend at least 1 in out from the fascia when gutters are PanelVent screenDrainage flashing trimMinimum 2 in clearanceSeal field cut edges of panelsRoofingFlashingCode-approved weather resistive barrier laps over the step flashingStep flashingKickout flashing as required by code, min 4 in high and 4 in wide to direct water awayRoofing feltFasciaSelf-adhering membraneKickout FlashingRoof Line ClearanceValley FlashingPanel to MasonrySoffit & FasciaPenetrationsFloor BridgingDecks & Solid Surface ClearanceTrim Flashing & ClearanceGround ClearanceHeader FlashingGutter ClearanceSoffit1/8 in gapVent screenJ trimCountersunk screw with fillerRainscreen Soffit DetailSECTION 3 | PAGE 5 INSTALLATION Manual for Reveal Panel SystemSection 3 Materials and ToolsSub-wall and Rainscreen MaterialsProductDescriptionSteel Hat Channels or Z-Girts Minimum 3/4 in depth, minimum 20 gauge,maximum 16 gauge galvanized steel.
8 Non-Permeable Membrane Installed over full face of Aluminum Flashing For grade, penetrations, window and door Resistive BarrierHardieWrap weather barrier, or other code-approved weather resistive TapeHardieWrap seam tape, or FlashingHardieWrap Flex Flashing, or Pro-Flashing, or Furring Pressure treated wood (ACQ, CA, MCQ, or MCA). Minimum 3/4 in nominal (23/32 actual) thick. Minimum 4 in wide. Non-permeable membrane covering the face of furring. Select wood with minimum Specific Gravity of to comply with James Hardie published wind load : Pressure treated wood should not be installed in direct contact with 3 Materials and ToolsSECTION 3 | PAGE 6 INSTALLATION Manual for Reveal Panel System1010 Installed FirstVent Screen15 Section 3 Materials and ToolsReveal Panel System Materials Supplied by James HardieVERTICAL PROFILESP roductProductDescriptionDescriptionRevea l PanelsThickness: 7/16 inSize: in x inWeight: ftPallets of 40 or 10 Surround J-Channel TrimThickness: 16 gaugeLength: 8 ftNote: Can also be used horizontally only directly under penetrations and (Pcs.)
9 Per Box)Quantity (Pcs. Per Box)Recess F Vertical TrimThickness: 16 gaugeLength: 8 ftNote: Vertical use only; do not use 3 Materials and ToolsRecess Vertical TrimThickness: 16 gaugeLength: 8 ft20 Surround Vertical TrimThickness: 16 gaugeLength: 8 ft20 SECTION 3 | PAGE 7 INSTALLATION Manual for Reveal Panel SystemReveal Panel System Materials Supplied by James HardiePRODUCTPRODUCTDESCRIPTIONDESCRIPTI ONRECESS HORIZONTAL TRIMT hickness: 16 gaugeLength: 8 ft2020 RECESS HORIZONTAL EDGE TRIMT hickness: 16 gaugeLength: 8 ftNote: For use under windows, penetra-tions, and (Pcs. Per Box)QUANTITY (Pcs. Per Box)RECESS DRAINAGE FLASHINGT hickness: 16 gaugeLength: 8 ft20 SURROUND HORIZONTAL TRIMT hickness: 16 gaugeLength: 8 ft Available with or without termination DRAINAGE FLASHINGT hickness: 16 gaugeLength: 8 ft20 ORORORS ection 3 Materials and ToolsSURROUND INSIDE CORNER TRIMT hickness: 16 gaugeLength: 8 ft20 SURROUND OUTSIDE CORNER TRIM Thickness: 16 gaugeLength: 8 ft20 RECESS OUTSIDE CORNER TRIM Thickness: 16 gaugeLength: 8 ft20 CORNER PROFILESHORIZONTAL PROFILESSECTION 3 | PAGE 8 INSTALLATION Manual for Reveal Panel SystemPRODUCTDESCRIPTIONNON-FERROUS METALS BLADE80-toothBLADE FOR FIBER CEMENT HardieBlade saw bladePANEL SAW WITH VACUUM DUST COLLECTION SYSTEM7-1/4 IN CIRCULAR SAW WITH VACUUM DUST COL-LECTION SYSTEMC utting against straight edge is recommended.
10 Section 3 Materials and ToolsCutting Tools PRODUCTDESCRIPTIONMITER SAWTo cut Reveal Panel System Trims PNEUMATIC STAPLE GUN .5 in x .25 in narrow crown galvanized stapleFor Fastening Reveal Trims to wood furring(Recommended)STAPLES 1/2 in x 1/4 in narrow crown galvanized stapleDRILL / IMPACT DRIVERDRILL BIT Drill bit for pre-drilling exposed fasteners. Minimum (#9 drill)T-20 TORXFor exposed fastener#2 SQUAREFor countersunk fastenerRequired Fasteners and Drilling Tools Supplied by James HardieOther Tools NeededPRODUCTDESCRIPTIONEXPOSED FASTENER FOR WOOD in Length x in in HD, 10-12 SS, T20 WTorx Pan HeadFOR STEEL long x x in. HD, T20W Torx Pan Head Self-DrillingCOUNTERSUNK FASTENER FOR WOOD1 5/8 in length x in HD 316 SS, bugle head square driveFOR STEEL1 5/8 in length x in HD, 410 SS Bugle Head #2 Square Drive1/2 inch 90 countersink for pre-drilling Countersunk Fasteners DRILL BITDRILL COLLARBit usage rate for countersunk fastening application, 1 unit per pallet (40 sheets)FILLER FOR COUNSTERSUNK FASTENERSF iller usage rate, 1 unit per pallet (40 sheets)WoodWoodSteelSteelSection 3 Materials and ToolsORSECTION 3 | PAGE 9 INSTALLATION Manual for Reveal Panel SystemSection 3 Materials and ToolsRecommended Finishing MaterialsPRODUCTDESCRIPTION EDGE SEALERFor field cut edges of primed panels installed with Recess GUN AND ROLLERS pray paint and back acrylic exterior grade top coat should be used and applied according to manufacturer s guidelines.