Transcription of INSTALLATION INSTRUCTIONS - TMI
1 BRACKET SIZE: 32'' 46'' 58''SPRINGTENSION: Light Medium HeavyIMPACTPLATES: 24'' 30'' 36'' 42'' 48''Date of Purchase: INSTALLATION INSTRUCTIONSMEGA-PROTMSWINGING DOORSPANEL THICKNESS:StandardClear .160''Optional .250'' Clear .275'' ClearReinforced .375'' ScrimReinforced5350 Campbells Run RoadPittsburgh, PA 15205-9738800-888-9750 412-787-9750 Copyright 2007 TMI, LLCC atalog No. II-MPSD 06-07 All integral parts of theMEGA-PRO swinging Doorare the bottom edges ofthe panels are touch-ing the floor, you willneed to cut off someof the PVC, so thepanels hang straightand create a goodseal. First, mark thepanel approximately1/2 above the floor. 1/2'' Above FloorADJUSTMENTSP anel LengthWithout removing thepanel, place the bottomedge on a raised boardor cutting surface.
2 Usinga straight edge, carpenter s square, anda utility knife, carefullycut the PVC. 4 WELDINGBOLTINGA fter marking all 6 mounting holeson the wall and door jamb, removethe bracket and drill a 1/4 hole atthe center of each mark. Next, usea 5/16 tap to create threads in the bracket and attachwith 5/16 hex head bolts. Securethe bracket by firmly tightening all6 bolts. Repeat these instructionsto attach the other you are attaching the bracketby welding, make sure that allmetal surfaces are clean frompaint, grease and oil. Weld thebracket to both the wall and doorjamb. Repeat these instructionsto attach the other 2 Hanging Door Panels12345 With the mounting plates slightlyseparated, slip each bolt into amounting slot (holes 2 and 4).
3 Thiswill allow the panel to be in position,so the remaining bolts can be easilyplaced into their appropriate mountingholes (holes 1, 3 & 5).Next, attach nuts to the 3 bolts andfirmly tighten all 5 mounting this process with the other THEJAMB HINGE OPTIONOPTIONAL:BREAKAWAYHINGEF irst place nuts and bolts in holes2 and 4 of the panel plate. Theseholes should correspond to themounting slots on the attaching theJamb Bracket to theDoor Jamb, oppositethe Strap Retainer,loop the Hook and Loop Strap through theBracket and the Retainer Slot and attach the strap toitself as shown in the illustration to the PVC panel has been fastenedbetween a set of mounting plate has 5 mounting and Loop StrapStrapRetainerStrapSlot 5 CHECK YOUR ORDERYour MEGA-PRO swinging Door was manufactured to your specific doorwayopening.
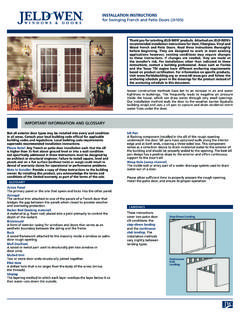
4 Although INSTALLATION is not complicated, you will need an assistant. WARNING: Do not attach this hardware to wood, plaster, brick, cement blockor cinder block. A steel channel or cap plates should be in place on the insideof the door jamb and wall surface on both sides of the doorway order should have: 2 Mounting Brackets(left & right) 2 Pre-Assembled PVCP anels / MountingPlates 10 Sets of Nuts & Bolts(to connect the Platesto the Brackets)Mounting Boltsfor each side(if applicable)supplied by othersIf your order has been damaged in shipping, please reportthe problem to the shipping company immediately. Thank you for choosing a TMI quality product. 2 MountingBracket(left)MountingBracket(rig ht)MountingPlateMountingPlatePVCP anelPVCP anel 7 If the panels are not aligning at the center overlap,a simple adjustment can be the panels are not flush with one another and do not align with the header,they will need to be Loosen, but do notremove,the 2 Stop Bar Loosen, but do notremove,the 3 Adjusting Plate Manually center the door in the Tighten the 3 Adjusting Plate Move the Stop Bar so the bartouches the Stop Tighten the 2 Stop Bar AlignmentStop BarBoltsStopBarAdjusting Plate BoltsStopBarStopPinOptional.
5 Kick PlatesSTEP 1 The MEGA-PRO brackets should be welded or bolted to the steel U screws cannotbe used. Tapping threads into the steel memberscan be applied if the steel is at least 1/4 is done in 2 steps. STEP 1is attaching the MEGA-PRObrackets to the doorway opening and STEP 2is hanging the doorpanels on each of the brackets. 3 Attaching Brackets13/8'' U ChannelorCap Plates13/8''Measure 13/8 down from the edgeof the header and place a mark onthe the bracketso the top of the walltab is on that markand the bracket issnug against thedoor you are mounting usingbolts, mark all 6 determine which side of the doorway you want to attach the : There is a right and a left bracket.
6 6 1. Push the DoorPanel open inthe directionthat movesthe Stop Pinaway from theStop Hold the Door Panelopen in the direction thatmovesthe Stop Pinaway from the Stop Finger tightenthe Bolt into theThreadedPort (3) furthestfrom the StopPin (1). Placethe pipe overthe Finger tighten theHex Bolt into theThreaded Port (2)nearest the Stop Pin(1) and place thePipe over the Remove theStop Pin usingan Allen Removethe StopPin usingan Using the Pipe,turn the BrassAdjustment Plateone position tothe Place the StopPin into theThreadedPort (2) oneposition to theleft. Tightenthe Place the Stop Pininto the ThreadedPort (6) one positionto the right. Tightenthe While holding the door open, removethe Hex Bolt and release the While holding the door open, removethe Hex Bolt and release the closing speed of the door panels is set at the factory.
7 If the panelresistance is too tight or the panels do not close all the way, you willneed to make the proper PinThreadedPortsStop BarDoorPanelCut-OutWindowBrass AdjustmentCollarBrassAdjustmentCollarADJ USTMENTSS pring TensionTO LOOSEN TENSIONTO TIGHTEN TENSIONT hreadedPorts (6)StopBarDoor PanelCut-OutWindowStop Pin5/16''x 2''x 18 THex Bolt Items Needed Supplied By OthersPLAN VIEWR epeat process if moreadjustment is process if moreadjustment is ''x 12''Pipe3/16''AllenWrench