Transcription of MINI 18/24 & HELIX - Epilog Laser
1 mini 18/24 & HELIXL aser System manual | Model 8000 Technical Support: +1 (303) 215-9171 Knowledge Base: Registration: : your system now for driverupdates and access to our Training Suite! FEBRUARY 2020 | i - TABLE OF CONTENTSFire Warning 1 Introduction 2 How to Use This Owner s manual ..2 Icons Used in this manual ..2 Section 1: Safety 3 Laser Safety ..3 Electrical Safety.
2 4 Fire Warning ..5 Safety Features and Regulatory Compliance ..6Do s and Don ts ..9 Section 2: Getting Started 111. Unpacking the Laser System ..112. Choose Where to Locate the Connecting the Exhaust ..124. Connecting Electrical Power ..145. Connect the Laser to Your Computer ..156. Set the mini / HELIX IP Address ..157. Sign Up for Driver Updates and Register Your System ..16 Section 3: Driver Installation 19 Windows 7: Ethernet Installation ..19 Windows 7: USB Installation ..23 Windows 8 and 10: Ethernet Installation ..26 Windows 8 and 10: USB Installation.
3 30 Section 4: The Epilog Job Manager 35 Epilog Job Manager to Install the Epilog Job Manager ..35 Trouble Shooting Job Manager Installation ..37 Important Epilog Job Manager Notes ..38 Using the Epilog Job Manager ..38 Section 5: Using The Laser Dashboard 45 Changing Laser Dashboard Defaults ..45 General Tab ..46 Advanced Tab ..49 Color Mapping Tab ..51 Additional CorelDRAW Laser Dashboard Features ..52 Section 6: mini / HELIX Control Panel 53 Display ..53 Button Functions ..54 Job Storage: Temporary Memory ..59 Section 7: Quick Start Guide 61 First Test Job.
4 61 Artwork Setup ..61 Setting a Vector Cutting Line ..63 Landscape or Portrait ..66- ii -TABLE OF CONTENTS Piece and Page Size ..67 Section 8: Cleaning & Maintenance 69 Reduce Fire Risk with a Clean Laser ..69 Cleaning the Auto Focus Plunger ..69 Cleaning the Optics ..69 Cleaning the Optical Strip and Encoder ..70 Cleaning and Lubricating the Bearing Rails ..71 Crumb Tray Cleaning ..73 Exhaust Cleaning ..73 Section 9: System Features 75 Air Assist ..75 Auto Focus vs. manual Focus ..75 Image Home Position ..83 Red Dot Pointer.
5 83 Movable Home Position ..84 Center Engraving ..85 Front Access Door ..87 Task Plate ..87 Vector Cutting Table ..88 Changing the Table ..88 Vacuum Hold-Down Table ..89 Integrated Crumb Tray ..89 Section 10: Optional Features 91 Pin Table ..91 Rim-Drive Rotary Attachment ..94 Optional Lens Assemblies ..100 PhotoLaser Plus ..101 Section 11: Upgrading the Operational Firmware 109 How to Upgrade Your Firmware ..109 Section 12: Printing From AutoCAD 111 How to Print from AutoCAD to the 13: Material Engraving Techniques 113 Laser Materials/Techniques.
6 1133D Engraving ..113 Acrylic ..114 Anodized Aluminum ..115 Brass - Painted ..116 Glass ..117 Notary Seals: Delrin ..118 Plastic Engraving/Cutting ..119 Rubber Stamps ..120 Wood ..124- iii -TABLE OF CONTENTS Section 14: Specifications 129 Epilog mini / HELIX Laser Technical Specifications ..129 Compatibility ..130 Recommended The CO2 Laser Source ..131 Federal Communications Commission (FCC) Notice ..132 Section 15: Technical Support 133 Contacting Technical Support ..133 Frequently Asked Questions ..134 Section 16: Material Suppliers 137 Industry Material Supplier List.
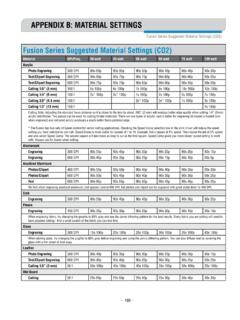
7 137 Appendix A: Warranty Statement 141 Warranty Statement for the Epilog mini / HELIX Laser ..141 Appendix B: Material Settings 143 Epilog mini / HELIX Suggested Material Settings ..143 Index 147- iv -- 1 - Fire WarningYour Laser system uses a high intensity beam of light that can generate extremely high temperatures when it comes into contact with the material being engraved, marked or cut.
8 Some materials are extremely flammable and can easily ignite and burst into open flame setting the machine afire. This open flame is very dangerous and has the potential to destroy not only the machine, but the building in which it is shows that vector cutting with the Laser has the most potential to create an open flame. Many materials are susceptible to igniting, but acrylic, in all its different forms, has been shown to be especially flammable when vector cutting with the read the following warnings and recommendations and follow them closely at all times!
9 Stay with the Laser . Never operate the Laser system while unattended. Keep the area clear. Clean around the machine and keep the area free of clutter, combustible materials, explosives, or volatile solvents such as acetone, alcohol, or gasoline. Be prepared with a fire extinguisher. Always keep a properly maintained and inspected fire extinguisher on hand. Epilog recommends a Halotron fire extinguisher or a multi-purpose dry chemical fire extinguisher. The Halotron extinguishers are more expensive than a dry chemical, but offer certain advantages should you ever need to use an extinguisher.
10 The Halotron extinguisher discharges a clean, easily removable substance that is not harmful to the mechanics or wiring of the Laser system. The dry chemical extinguisher discharges a sticky, corrosive powder that is very difficult to clean up. Use Air Assist. Always use the system s Air Assist feature when vector cutting. Use caution when vector cutting. Many materials have the potential to suddenly burst into flames when cut with a Laser even materials that may be very familiar to the user. Always monitor the machine when it is operating.