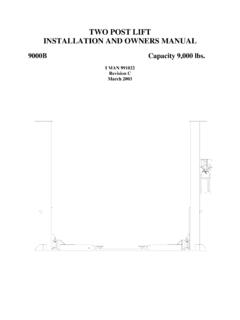
Transcription of MODEL 12000 SAR/LAR/SWT/EWT FOUR POST …
1 MODEL 12000 SAR/LAR/SWT/EWT FOUR POST DRIVE ON LIFT, 12000 pound capacity installation AND operator S manual December 2002 IMAN 991002 2 IMPORTANT NOTICES: 1. The floor in which this lift is to be installed must be four (4) inch minimum thickness concrete, with a minimum compressive strength of 3000 PSI, and reinforced with steel mesh or bar per commercial practice. Pads must be two (2) feet by two (2) feet by one (1) foot thick, rein-forced with steel per commercial practice. 2. Failure by the purchaser to provide the recommended mounting surface could result in unsat-isfactory lift performance, property damage, or personal injury.
2 3. Read this instruction manual before installing the lift. 4. Read the anchor bolt instruction page before drilling and installing the concrete anchor bolts. 5. Do not raise a vehicle on the lift until the lift has been correctly installed and adjusted as de-scribed in this manual . 6. Refer to Figure 1, General Arrangement. The lift is to be installed with the toprail on the pas-senger side as shown. The standard mounting positions for the power unit is also shown. If it is necessary to mount the power unit in another position, the installer must reroute the hydrau-lic lines to the pump.
3 The installer must use 3/8 diameter hydraulic hose or stainless steel tub-ing with a rated working pressure of 2500 PSI and a recommended rated burst pressure of 6000 PSI. The routing of the hydraulic lines should clear the safety latch mechanism of the toprail. 1. Never use this lift to raise just one end of any vehicle. Property damage or personal injury could result. 3 TABLE OF CONTENTS Tools for 4 Figure 1, General 5 installation 6 Figure 2, Overall 7 Figure 3, Leg Foot 8 Figure 4, Chalk Line 8 Figure 5, Top Rail & Mainside Leg 9 Figure 6, Crossrail Chain 11 Figure 7, Safety Rod installation , 13 Figure 8, Safety Rod installation , 13 Concrete Anchor Bolt 16 Operating 17 Maintenance 17 Troubleshooting 18 Figure 10, Single Point Safety 19 Figure 11, Electrical Wiring 20 Figure 12.
4 GHS Power Unit 20 Figure 13, Alignment Lift Leveling 21 Figure 14, Slip Plate 21 4 TOOLS FOR installation CONCRETE HAMMER DRILL WITH 3/4 DIAMETER SOLID DRILL BIT WITH CARBIDE TIP. OPEN END WRENCHES: 1/2 , 9/16 , 11/16 , 3/4 HEX ALLEN WRENCHES: 3/16 RATCHET DRIVE WITH SOCKETS: 3/8, 1/2 DEEP SOCKET 12 CRESCENT WRENCH HAMMER NEEDLE NOSE PLIERS CARPENTER S LEVEL, 3 PULL WIRE CHALK LINE SMALL PUNCH ALSO REQUIRED FOR installation 3 GALLONS OF DEXTRON III ATF or PETROLEUM BASE HYDRAULIC OIL, NONDETERGENT, NON- FOAMING, 10 WEIGHT, SUCH AS MOBIL DTE 24 OR TEXACO HD 32.
5 5 installation 6 Determine the location for the lift installation . Fig. 2 gives the overall dimensions of the lift, including the drive on ramps. The area must be level and there must be free access to load and unload vehicles. There must be enough overhead clearance to raise the vehicles 6 feet above the floor. 13 feet is the recommended ceiling height. The floor must be concrete with a minimum thickness of 4 inches and steel reinforced per commercial practice. If pads are used, they must be 2 feet square with a minimum thickness of 12 inches and steel reinforced per commercial practice.
6 Fig. 3 gives the pad layout dimensions. 2. Refer to Figure 1, General Arrangement. For muffler work it is satisfactory to erect the lift with the top rail on the left or driver s side. For alignment and work that requires access to the front seat of the car, the top rail can be positioned on the right or passenger s side so that it is out of the way. 3. Refer to Figure 3 for the dimensions for the leg foot location. Refer to Figure 2 to determine where to locate the sides and ends of the leg foot rectangle with respect to walls and other obstacles at the installation .
7 Include additional clearance where required near walls and ob-stacles. 4. Refer to Figure 4. Once the location is determined, use a chalk line to mark base line A-B to locate one side of the lift. Use the width dimension to measure off the dimension A-D and B-C. Draw the arcs as shown. Draw the chalk line D-C tangent to the arcs to establish the other side of the lift. 5. Mark on one of the two parallel lines the points 1 and 2 to establish the ends of the leg foot rectangle as determined from Figures 2 and 3.
8 From points 1 and 2 measure diagonally to the opposite parallel line to determine points 3 and 4. Draw the chalk line between points 1 and 4 and points 2 and 3. These four lines determine the outside corners of the leg foot rectangle. 6. Position the top rail and the two mainside legs as shown in Figure 5. The mainside leg that has the drilled hole pattern on side is the power unit leg. Bolt the top rail to the mainside legs using x 1-3/4 bolts, washers and nuts provided. Use two bolts per leg.
9 7. Lift the assembled top rail and legs to the upright position. Place the leg feet into their cor-ners of the chalk line rectangle. Check the centering of the bolting slots of the top rail and mainside leg tops. Correct as necessary and tighten the nuts. 8. Review the Concrete Anchor Bolt Instructions near the back of this manual . Drill, install, but do not tighten the four anchor bolts for the rear leg. Do only the rear mainside leg at this time. 7 8 9 109. Plumb the post so that it is perpendicular.
10 Use the level and check both side to side and front to rear. Use the shims provided. Also, ID steel washers or 1/16 or 1/8 thick by 1 wide steel flat strips are recommended for shims. Tighten the anchor bolt nuts and recheck the plumbness. Adjust if necessary. 10. After anchoring the rear mainside post, align the front post with the chalk lines. Check and adjust the plumbness of the front leg. The foot may vary from the measured dimension slightly, as it is more important that the leg be perpendicular and parallel to the other leg.