Transcription of Model 4103XV Installation Guide - …
1 Model 4103XV . Installation Guide This product is intended for Installation by a professional in- staller only! Any attempt to install this product by any person other than a trained professional may result in severe damage to a vehicle's electrical system and components. 2009 Directed Electronics, Vista, CA. N4103V 2009-07. Bitwriter , Code Hopping , Doubleguard , ESP , FailSafe , Ghost Switch , Learn Routine , Nite-Lite , Nuisance Prevention Circuitry, Reveng- er , Silent Mode , Soft Chirp , Stinger , Valet , Vehicle Recovery System , VRS , and Warn Away are all Trademarks or Registered Trademarks of Di- rected Electronics. The Bitwriter (p/n 998U). requires chip version or newer to program this unit.
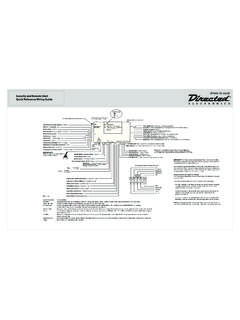
2 Bitwriters with a date code of 6a or older require an IC upgrade (p/n 998M). Some Bitwriters with a date code of 6B do not require the IC. upgrade. Refer to Tech Tip # 1112 for more information. Also required, the Bitwriter T-Harness included in the chip version kit (998U). Contents Warning! Safety What is Installation points to Virtual Component locations and finding Making your wiring Primary harness (H1) wiring 4-pin satellite harness Heavy gauge relay wiring Door lock harness, 3-pin Remote start harness (H2) wiring Primary harness (H1), 9-pin Heavy gauge relay Remote start harness (H2), 5-pin Optional anti-grind Plug-in program Neutral safety switch D2D and programmer Programming Light flash (+)/(-).
3 26. Tach threshold Virtual tach Tach To learn the tach Remote control learn Remote Operating settings learn Features Menu Menu Feature Menu Menu Timer mode, rear Bitwriter ..41. Owner Shutdown Safety Wiring quick reference Warning! Safety first The following safety warnings must be observed at all times: Due to the complexity of this system, Installation of this product must only be performed by an authorized Directed Electronics dealer. When properly installed, this system can start the vehicle via a command signal from the remote control. Therefore, never operate the system in an area that does not have adequate ventilation. The following precautions are the sole responsibility of the user; however, autho- rized Directed Electronics dealers should: Never use a test light or logic probe when installing this unit.
4 Always use a multimeter. Never operate the system in an enclosed or partially enclosed area without ventilation (such as a garage). When parking in an enclosed or partially enclosed area or when having the vehicle serviced, the remote start system must be disabled using the installed toggle switch. It is the user's sole responsibility to properly handle and keep out of reach from children all remote controls to assure that the system does not unintentionally remote start the vehicle. USER MUST INSTALL A CARBON MONOXIDE DETECTOR IN OR ABOUT. THE LIVING AREA ADJACENT TO THE VEHICLE. ALL DOORS LEADING. FROM ADJACENT LIVING AREAS TO THE ENCLOSED OR PARTIALLY. ENCLOSED VEHICLE STORAGE AREA MUST REMAIN CLOSED AT ALL.
5 TIMES. Use of this product in a manner contrary to its intended mode of operation may result in property damage, personal injury, or death. Except when performing the Safety Check outlined in this Installation Guide , (1) Never remotely start the vehicle with the vehicle in gear, and (2) Never remotely start the vehicle with the keys in the ignition. The user is responsible for having the neutral safety feature of the vehicle periodically checked, wherein the vehicle must not remotely start while the car is in gear. This testing should be performed by an authorized Directed Electronics dealer in accordance with the Safety Check outlined in this product Installation Guide .
6 If the vehicle starts in gear, cease remote start opera- 4 2009 Directed Electronics. All rights reserved. tion immediately and consult with the user to fix the problem immediately. After the remote start module has been installed, test the remote start module in accordance with the Safety Check outlined in this Installation Guide . If the vehicle starts when performing the Neutral Safety Shutdown Circuit test, the remote start unit has not been properly installed. The remote start module must be removed or properly reinstalled so that the vehicle does not start in gear. All installations must be performed by an authorized Directed Electronics dealer. OPERATION OF THE REMOTE START MODULE IF THE VEHICLE STARTS IN.
7 GEAR IS CONTRARY TO ITS INTENDED MODE OF OPERATION. OPERAT- ING THE REMOTE START SYSTEM UNDER THESE CONDITIONS MAY RESULT. IN PROPERTY DAMAGE OR PERSONAL INJURY. IMMEDIATELY CEASE THE. USE OF THE UNIT AND REPAIR OR DISCONNECT THE INSTALLED REMOTE. START MODULE. DIRECTED ELECTRONICS WILL NOT BE HELD RESPONSIBLE. OR PAY FOR Installation OR REINSTALLATION COSTS. 2009 Directed Electronics. All rights reserved. 5. What is included The control module (see diagram). XR Plus antenna receiver Two remote controls (P/N 7142V). A push-button Valet switch A hood pinswitch A shut-down toggle switch . 4103XV . 2009 Directed Electronics. All rights reserved. 7. Installation points to remember Important: This product is designed for fuel-injected, automatic transmission vehicles only.
8 Installing it in a standard transmission vehicle is dangerous and is con- trary to its intended use. Before beginning the Installation : Please read this entire Installation Guide before beginning the Installation . The Installation of this remote start system requires in- terfacing with many of the vehicle's systems. Many new vehicles use low-voltage or multiplexed systems that can be damaged by low resistance testing devices, such as test lights and logic probes (computer safe test lights). Test all circuits with a high quality digital multi-meter before making connections. Do not disconnect the battery if the vehicle has an anti-theft-coded radio. If equipped with an air bag, avoid disconnecting the bat- tery if possible.
9 Many airbag systems will display a diagnostic code through their warning lights after they lose power. Discon- necting the battery requires this code to be erased, which can require a trip to the dealer. Remove the dome light fuse. This prevents accidentally draining the battery. Roll down a window to avoid being locked out of the vehicle. After the Installation : Test all functions. The Using Your System section of the Owner's Guide is very helpful when testing. Complete the vehicle Safety Check outlined in this manual prior to the vehicle reassembly. 8 2009 Directed Electronics. All rights reserved. Virtual tach Virtual Tach is the default RPM-sensing method for new remote start systems.
10 Virtual Tach gives the installer the performance of a hardwired tach wire, with the convenience of voltage sensing. It is far superior to any voltage-sense feature you've tried before. Virtual Tach monitors the cranking voltage of the vehicle using a very fast micro-controller and an analog-to-digital converter. The micropro- cessor saves the base voltage as a reference. When Virtual Tach sees the slightest uptick in voltage, indicating that the alternator is charging the battery, the starter motor shuts off instantly. D2D. The system has the ability to interface with an Xpresskit module through the D2D port. The advantage to using a D2D interface is that there is less wiring involved in the Installation .