Transcription of Op Amp Precision Design: PCB Layout Techniques
1 AN1258. Op Amp Precision Design: PCB Layout Techniques Author: Kumen Blake THERMOCOUPLE JUNCTION. Microchip Technology Inc. BEHAVIOR. Most electrical engineers are aware that INTRODUCTION thermocouples are a common temperature sensor [4]. What is not so commonly known is that every PCB. This application note covers Printed Circuit Board design includes many unintended thermocouple (PCB) effects encountered in high (DC) Precision op junctions that modify the signal voltages. This section amp circuits. It provides Techniques for improving the covers the physics behind this effect and gives performance, giving more flexibility in solving a given practical illustrations. design problem. It demonstrates one important factor necessary to convert a good schematic into a working Seebeck Effect Precision design. When two dissimilar conductors (or semi-conductors). This material is for engineers that design slow Precision are joined together, and their junction is heated, a circuits, including those with op amps.
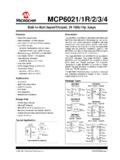
2 It is aimed at voltage results between them (Seebeck or those engineers with little experience in this kind of thermoelectric voltage); this is known as the Seebeck design, but can also help experienced engineers that effect. This voltage is roughly proportional to absolute are looking for alternate solutions to a design problem. temperature. There are many references that discuss The information in this application note can be applied this effect in detail, including the Temperature to all Precision (DC) analog designs, with some thought Products section of reference [7]; see especially and diligence. The focus is on common op amp circuits pages Z-13, Z-14 and Z-23 through Z-32. so that the reader can quickly convert this material into Figure 1 shows the Seebeck voltage as a function of improvements on their own op amp designs. temperature for the standard type K thermocouple. Additional material at the end of the application note Notice that the response is not strictly linear, but can be includes references to the literature and the schematic linearized over small temperature ranges ( , 10 C).
3 Of a PCB used in the design example. 60. Thermocouple Voltage (mV). Key Words and Phrases 55. 50. ITS-90. Type K Thermocouple 45. Op Amp 40. 35. Temperature 30. 25. Thermal Gradient 20. 15. Thermocouple Junction 10. 5. Thermoelectric Voltage 0. -5. IC Sockets -10. 1,100. 1,200. 1,300. -300. -200. -100. 300. 700. 800. 1,000. 1,400. 0. 100. 200. 400. 500. 600. 900. Contact Potential PCB Surface Contamination Thermocouple Temperature ( C). Related Application Notes FIGURE 1: Type K Thermocouple's Response. The following application notes, together with this one, form a series about Precision op amp design topics. Most thermocouple junctions behave in a similar They cover both theory and practical methods to manner. The following are examples of thermocouple improve a design's performance. junctions on a PCB: AN1177 on DC Errors [1] Components soldered to a copper pad AN1228 on Random Noise [2] Wires mechanically attached to the PCB.
4 Jumpers Solder joints PCB vias 2009 Microchip Technology Inc. DS01258A-page 1. AN1258. The linearized relationship between temperature and TABLE 1: ASSUMED THERMOCOUPLE. thermoelectric voltage, for small temperature ranges, is JUNCTION PARAMETERS. given in Equation 1. The Seebeck coefficients for the junctions found on PCBs are typically, but not always, VREF kJ. Junction No. below 100 V/ C. (mV) ( V/ C). 1 10 40. EQUATION 1: SEEBECK VOLTAGE 2 -4 -10. V TH k J ( T J T REF ) 3 4 10. V TH = V REF + V TH 4 -10 -40. Where: Note 1: VREF and kJ have polarities that assume a left to right horizontal direction. VTH = Change in Seebeck voltage (V) 2: TREF = 25 C. kJ = Seebeck coefficient (V/ C). TJ = Junction Temperature ( C) CONSTANT TEMPERATURE. TREF = Reference Temperature ( C) In this illustration, temperature is constant across the PCB. This means that the junctions are at the same VTH = Seebeck voltage (V). temperature. Let's also assume that this temperature is VREF = Seebeck voltage at TREF (V) +125 C and that the voltage on the left trace is 0V.
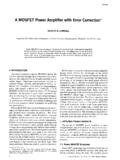
5 The results are shown in Figure 3. Notice that VTH is the voltage change from one conductor to the next. Illustrations Using a Resistor Three different temperature profiles will be shown that 14 mV 9 mV 14 mV. illustrate how thermocouple junctions behave on PCB. 0 mV 0 mV. designs. Obviously, many other components will also produce thermoelectric voltages ( , PCB edge connectors). Figure 2 shows a surface mount resistor with two metal (copper) traces on a PCB. The resistor is built with end caps for soldering to the PCB and a very thin conducting film that produces the desired resistance. Thus, there are three conductor types shown in this + C + C. figure, with four junctions. + C + C. VREF VTH VTH. Location Resistor Copper Resistor (mV) (mV) (mV). Film Traces End Caps Junction #1 10 4 14. Junction #2 -4 -1 -5. Junction #3 4 1 5. Junction #4 -10 -4 -14. FIGURE 3: Constant Temperature Results. TEMPERATURE CHANGE IN THE NORMAL. Junction #1 Junction #4 DIRECTION.
6 Junction #2 Junction #3. In this illustration, temperature changes vertically in FIGURE 2: Resistor and Metal Traces Figure 2 (normal to the resistor's axial direction), but on PCB. does not change in the axial direction (horizontally). The metal areas maintain almost constant voltages in For illustrative purposes, we'll use the arbitrary values the normal direction, so this case is basically the same shown in Table 1. Notice that junctions 1 and 4 are the as the previous one. same, but the values are shown with opposite polarities; this is one way to account for the direction Note: When temperature is constant along the current flows through these junctions (the same applies direction of current flow, the net change in to junctions 2 and 3). thermoelectric voltage between two conductors of the same material is zero. DS01258A-page 2 2009 Microchip Technology Inc. AN1258. TEMPERATURE CHANGE IN THE AXIAL PREVENTING LARGE. DIRECTION THERMOELECTRIC VOLTAGES.
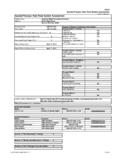
7 In this illustration, temperature changes horizontally in This section includes several general Techniques that Figure 2 (along the resistor's axial direction), but does prevent the appearance of large temperature gradients not change in the normal direction (vertically). Let's at critical components. assume 0V on the left copper trace, +125 C at Junction #1, a temperature gradient of 10 C/in ( C/mm) from left to right (0 in the vertical Reduced heat generation direction) and a 1206 SMD resistor. When a PCB's thermal gradient is mainly caused by The resistor is in long ( mm) and in wide components attached to it, then find components that ( mm). Assume the end caps are about in dissipate less power. This can be easy to do ( , long ( mm) and the metal film is about in long change resistors) or hard (change a PICmicro . ( mm). The results are shown in Figure 4. microcontroller). Increasing the load resistance, and other resistor mV values, also reduces the dissipated power.
8 Choose lower power supply voltages, where possible, to further mV mV. reduce the dissipated power. 0 mV mV. Redirect the Heat Flow Changing the direction that heat flows on a PCB, or in its immediate environment, can significantly reduce temperature gradients. The goal is to create nearly constant temperatures in critical areas. + C + C ALTERNATE HEAT PATHS. + C + C. Adding heat sinks to parts that dissipate a lot of power VREF VTH VTH will redirect the heat to the surrounding air. One form of Location (mV) (mV) (mV) heat sink that is often overlooked is either ground planes or power planes in the PCB; they have the Junction #1 10 advantage of making temperature gradients on a PCB. Junction #2 -4 lower because of their large (horizontal) thermal Junction #3 4 conductivity. Junction #4 -10 Adding a fan to a design will also redirect heat to the surrounding air, which reduces the temperature drop FIGURE 4: Axial Gradient Results. on the PCB.
9 This approach, however, is usually avoided to minimize other design issues (random Thus, the temperature gradient of 10 C/in ( C. temperature fluctuations, acoustic noise, power, cost, increase from left to right) caused a total of -38 V to etc.). It is important to minimize air (convection). appear across this resistor. Notice that adding the currents near critical components. Enclose either the same temperature change to all junction temperatures parts with significant temperature rise, or the critical will not change this result. parts. Conformal coating may also help. Note: Shifting all of the junction temperatures by the same amount does not change the ISOLATION FROM HEAT GENERATORS. temperature gradient. This means that the It is possible to thermally isolate critical areas on the voltage drop between any two points in the PCB. Regions with little or no metal act like a good circuit using the same conductive material thermal insulator.
10 Signals that need to cross these is the same (assuming we are within the regions can be sent through series resistors, which will linear region of response). also act as poorly conducting thermal elements. Place heat sources as far away from critical points as possible. Since many heat sources are in the external environment, it can be important to place these critical points far away from the edges of the PCB. Components that dissipate a lot of power should be kept far away from critical areas of the PCB. 2009 Microchip Technology Inc. DS01258A-page 3. AN1258. Low profile components will have reduced exposure to CURING THERMOELECTRIC. the external environment. They may have the VOLTAGE EFFECTS. additional advantage of reduced electrical crosstalk. This section focuses on methods that minimize the Thermal barriers, such as conformal coating and PCB. effects of a given temperature gradient. They can be enclosures, can be helpful too.