Transcription of Operator’s Series 300 Manual 30 through 400 amp. …
1 381333 067 DASCO POWER TECHNOLOGIES 50 Hanover Road, Florham Park, New Jersey 07932 1591 USAtelephone 1 800 937 2726 (ASCO), for service call 1 800 800 2726 (ASCO) POWER TECHNOLOGIES CANADA PO Box 1238, 17 Airport Road, Brantford, Ontario, Canada N3T 5T3telephone 519 758 8450, fax 519 758 0876, for service call 1 888 234 2726 (ASCO) sManualSeries 300 Automatic Transfer Switches30 through 400 amp. sizes225 400 amp sizesAn experienced licensed electrician must install the is used in this Manual to warn of highvoltages capable of causing shock, burns, or of possible personal injury.!CAUTION isusedinthismanualtowarnof possible equipment damage.!Refer to the outline and wiring drawings provided withyour ASCO Series 300 ATS for all installation Series 300 Automatic Transfer Switches (ATSs) areListed under Underwriters Laboratories UL 1008 Standardfor Safety for Automatic Transfer Switches. ASCO Series300s are also Listed under CSA No.
2 178 Standard forAutomatic Transfer Switches. All control features are ULComponent Recognized, which assures that ASCO automatictransfer switches meet OSHA Safety Requirements and willbe acceptable to electrical Series 300 Automatic Transfer Switches are suitablefor emergency and standby system applications. They meetemergency system rating requirements as defined inNational Electrical Code (NEC) Article 700 and UL , they are suitable for the requirements of NEC Article517 Health Care Facilities, NEC Article 701 LegallyRequired Standby Systems, NEC Article 702 OptionalStandby Systems, NFPA 99 Health Care Facilities, andNFPA 110 Emergency and Standby Power LabelEach automatic transfer switch contains a rating label todefine the loads and fault circuit withstand / closing to the label on the transfer switch for specific not exceed the values on the rating the rating can cause personal injuryor serious equipment damage.
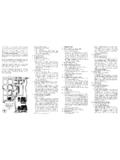
3 !TABLE OF OF & and Catalog Number IdentificationThe Transfer Switch nameplate includes data for each specific ASCOS eries 300 ATS. Use the ATS only within thelimits shown on this nameplate. A typical Catalog Number is shown below with its elements , 70, 104 amp Catalog No. IdentificationThe example is for a Series 300 ATS with switchedneutral, 3 pole, 104 amp, 480 V, in a Type 1 enclosure:B 300B3104N1 CPhase PolesNeutralC overlappingAmperesVoltageControllerEnclo sureB switched1 standardG type4C type1F type3RL type123 three 2 single D220C208E230K415M460J400L440N480F240H380 Q575P550R6001043070blank solidblank open type1X ifaccessoriesorderedtransfer switchprefix letterB120A115150, 200** amp Catalog No. IdentificationThe example is for a Series 300 ATSwith solidneutral,2 pole, 200 amp, 240 V, opentype (withoutenclosure):C 3002200F1 Phase PolesNeutralC overlappingAmperesVoltageControllerEnclo sureB switched1 standardG type4C type1F type3RL type123 three 2 single D220C208E230K415M460J400L440N480F240H380 Q575P550R600150blank solidblank open type1X ifaccessoriesorderedtransfer switchprefix letterB120A115** 200 amp limited to 240 volts200**terminals forengine startcontactsTransferSwitchControllernor mal powerconnectionsemergency powerconnectionsmembranecontrols200 amp.
4 Size in typical enclosure with location of customer connectionsterminals forswitch positioncontactsload powerconnections225, 260, 400 amp Catalog No. IdentificationThe example is for a Series 300 ATS with switchedneutral, 3 pole, 400 amp, 480 V, in a Type 1 enclosure:E 300C 3400N1 CPhase PolesNeutralAmperesVoltageControllerEncl osureC overlapping1 standardG type4C type1F type3RL type123 three 2 single D220C208E230K415M460J400L440N480F240H380 Q575P550R600400225260blank solidblank open type1X ifaccessoriesorderedtransfer switchprefix letterB120A115terminals forengine startcontactsTransferSwitchControllernor mal powerconnectionsemergency powerconnectionsmembranecontrols400 amp. size in typical enclosure with location of customer connectionsterminals forswitch positioncontactsload powerconnectionsSECTION 1 INSTALLATION1--1 Series 300 Automatic Transfer Switches are factory wiredand tested. Installation requires skid removal then secur-ing the enclosure to the supporting FoundationThe supporting foundation for the enclosure must be leveland straight.
5 Refer to the applicable enclosure outlinedrawing included with the Series 300 for all mountingdetails including door opening bottom cable entry is used, the foundation must beprepared so that the conduit stubs are located to the enclosure outline drawing for specified areaandlocation. Provide cablebendingspaceand clearancetolive metal parts. When a concrete floor is poured, useinterlocking conduit spacer caps or a wood or metaltemplate to maintain proper conduit to the applicable enclosure outline drawing fur-nished with this switch and mount the Series 300 accordingto details and instructions shown on the switch from construction gritand metal chips to prevent malfunction orshortened life of the automatic switch switch.!Mount the ASCO ATS vertically to a rigid supportingstructure. Level all mounting points by using flat washersbehind the holes to avoid distortion of the switches rated 225, 260, and 400 amp.
6 Aremounted on an insulator backing piece (installed behindthe transfer switch). If the transfer switch is removed fromthe cabinet and then reinstalled, this insulator piece mustbe placed behind the transfer switch. See Figure 1 ConnectionsRefer to the Wiring Diagram provided withyour Series300 ATS. All wiring must be made in accordance with theNational Electrical Code and local energize the conductors before making anyline or auxiliary circuitry connections. Be surethat Normal and Emergency line connectionsare in proper phase rotation. Place engine gen-erator starting control in the OFF position. Makesure engine generator is not in is not necessary to remove the barriers from the transferswitches to install sure that the insulator piece is behind225, 260, and 400 ampere transfer switches.!insulatorbackingpieceFigure 1-1. Insulator for 225, 260, & 400 design transfer controller is mounted on the cabinet door.
7 An add-onDIN rail is provided for some optional accessories and ismounted below the controller on the Power ConductorsDo not connect the power conductors to the ASCO Series300 transfer switch until they are tested. Installing powercables in conduit, cable troughs and ceiling-suspendedhangers often requires considerable force. The pulling ofcables can damage insulation and stretch or break theconductor s strands. For this reason, after the cables arepulled into position, and beforethey are connected, theyshould be tested to verify that they are not defective orhave been damaged during Power ConductorsAfter the power cables have been tested, connect them tothe appropriate terminal lugs on the transfer switch asshown on the wiring diagram provided with this Series sure the lugs provided are suitable for use with thecables being installed. Standard terminal lugs are solder-less screw type and will accept the wire sizes listed on thedrawings provided with the Series 300.
8 Be careful whenstripping insulation from the cables; avoid nicking orringing the conductor. Remove surface oxides from cablesby cleaning with a wire brush. When aluminum cable isused, apply joint compound to conductors. Tighten cablelugs to the torque specified on rating not run cables behind the switch. Cables can bebundled on the right side of the switch. Maintain properelectrical clearance between the live metal parts andgrounded metal: inch ampINSTALLATION(continued)1--2 Three cable spacers are included with 150 and 200 amperetransfer switches. When installing power cables, run thecables through the cable spacers as shown in Figure 1 cable spacers within 1 inches from cable spacers must be located as shownfor 150 and 200 ampere transfer switches.!cable spacercable spacers1 inch approximateFigure 1-2. Cable spacer for 150 & 200 design transfer Starting ContactsThe engine control contact connections are located on thetransfer switch.
9 Connect signal wires to appropriate term inals as specified in Table A, shown in Figures 1 3 and 1 A. Engine start normal sourcefailsTerminals on transferswitchcontact closesTB14 and TB15contact opensTB14 and TB16TB 14TB 15TB 16 ENGINE STARTING CONTACTS( SHOWN DE ENERGIZED )TOPSTUDMIDDLESTUDBOTTOMSTUD141516 TSNRNR left sideof switchFigure 1-3. Engine starting contact label and locationfor 30, 70 and 104 amp. B design transfer switchesand 150 and 200 amp. C design transfer 1-4. Engine startingcontact location for 225, 260,and 400 amp. E designtransfer to Controller for other Control Features(located on bottom of Controller):for factoryuse onlyRemote Control Features Connections(refer to the Wiring Diagram &page 5 4 for DIP switch settings)Each control contact must be suitablefor a 5 V DC low energy Exerciserconnection,if provided(refer topage 5 2)Load DisconnectFeatureConnections(see Wiring Diagram& refer to page 5 4for DIP switch settings)Figure 1-5.
10 Input / output label on the Controller showing possible connections to the lower terminal (continued)1--3 Controller GroundA grounding wire must be connected to the controller slower left mounting stud. Because the controller ismounted on the enclosure door, a conductivestrap must beused between the enclosure and the door. This connectionprovides proper grounding which does not rely upon thedoor transfer switch is connected to the left side of thecontroller by a plug in harness (two plugs).Auxiliary CircuitsConnect auxiliary circuit wires to appropriate terminals ontransfer switch. Note the control features that are fur-nished on this switch. Make the necessary auxiliaryconnections by referring toSection 5, Control TestThe Functional Test consists of three checks: manualoperation, voltage checks, and electrical these checks in the order presented toavoid damaging the automatic transfer switch.!Read all instructions on the Wiring Diagram and labelsaffixed to the automatic transfer switch.