Transcription of Reveals & Moldings Brochure 090716 - Fry Reglet
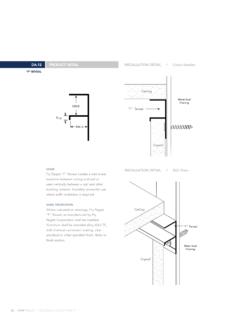
1 | Reveals & Moldings Brochure | 123 ARCHITECTURAL METALS / Reveals + MOLDINGSLATHING - VERTICAL INSTALLATION1. Place building paper behind all Moldings and shiplap a minimum of 6 .2. Secure Moldings on 7 centers using fasteners as appropriate to substrate to meet ASTM Install wire lath over installation flange of Moldings . 4. Use vinyl or cloth tape specifically manufactured for masking anodized aluminum trim prior to plastering. For painted surfaces, use plastic Plaster (Stucco)Metal LathExterior SheathingFramingBuilding Paper (6" Shiplap)Channel Screed(PCS-TYPE molding )124 | Reveals & Moldings Brochure LATHINGHORIZONTALINSTALLATION - HORIZONTAL INSTALLATION1. Place building paper behind all Moldings and shiplap a minimum of 6.
2 2. Secure Moldings on 16 centers using fasteners as appropriate to Place building paper over upper flange of reveal, extending upward and under the above building paper Place wire lath over upper installation flange on horizontal Install wire lath over bottom installation flange of Use vinyl or cloth tape specifically manufactured for masking aluminum trim prior to plastering. For painted surfaces, use plastic OF Moldings AFTER BUILDING PAPER AND WIRE LATH HAVE BEEN INSTALLEDMake sure that the 7/8 installation flanges are covered with wire lath. This will prevent : Uniform Building Code requires two layers of grade D paper when applied over wood base Plaster (Stucco)Building Paper (6" Shiplap)FramingExterior SheathingMetal LathChannel Screed(PCS-TYPE molding )Building PaperMetal Lath | Reveals & Moldings Brochure | 125 ARCHITECTURAL METALS / Reveals + 2-PIECE PLASTEREXPANSION JOINTINSTALLATIONINSTALLATION - 2-PIECE PLASTER EXPANSION JOINT1.
3 Place building paper behind all Moldings and shiplap a minimum of 6 .2. to attachment, place sealant in the movement groove along the back of the : If installation is horizontal, place movement flange on top and lap additional building paper over top Leave alignment clips in place while fastening Moldings to framing or Secure Moldings on 16 centers using fasteners as appropriate to Place building paper and wire lath over upper movement installation flange on horizontal installation, and shiplap a minimum of 6 . (See Horizontal Installation)6. Install wire lath over bottom installation flange of Use vinyl or cloth tape specifically manufactured for masking anodized aluminum trim prior to plastering. For painted surfaces, use plastic : Qualifies for use as an expansion joint for stucco and plaster applications when installed in accordance with ASTM + CONNECTOR CLIPS1.
4 The use of sealant at all butt joints and Fry Reglet Connector Clips is Use Fry Reglet Connector Clips to align molding during Apply sealant as indicated.