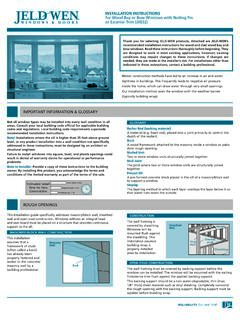
Transcription of Installation Instructions for Vinyl Flush Fin …
1 Sealant Gap 6 IF USING FLASHING 1. Seal the top corners of the window with a 1/4" bead of sealant. Tool into a fillet shape. 2. Release the building wrap from above the header (previously taped up) and overlap the header flashing. Seal the ends with self-sealing flashing or building wrap tape. 3. Ensure weep holes/ channels are clear of debris for proper water drainage; do not seal weep holes/channels if present. IS USING FLexIbLe FLASHING Mechanically fasten flashing. Apply sealant down sides where the window meets the flashing. Tool or smooth out the sealant. AFter INStALLAtIoN1. Install exterior wall surface within seven days of window Installation . 2. Maintain gap of 1/4"-3/8" between window frame and final exterior wall surface (siding, stucco, etc.)
2 3. Seal the gap with backer rod and sealant. Do not apply sealant on top of window frame or drip cap if On the interior, seal the void between the rough opening and the window frame with backer rod and sealant, or with low expansion foam. Do not use high-expansion foam as this may cause frame deflection. 5. Adjust window for best Protect recently installed units from damage from plaster, paint, etc. by covering the unit with For casement window, remove the shipping block (cork) underneath the ! For integral J-channel Vinyl product installed into a structure with shiplap siding, no expansion/contraction joint is Installation for Vinyl Windows with Nailing FinPlease visit our website at to download a copy of the complete guide to care and maintenance for your you for choosing GLOSSAry336.
3 Shim the side jambs aligned with the predrilled holes or 3"-6" from the corners and at 24" maximum intervals. 7. Inspect window for square, level, plumb. Adjust as needed with Fasten window through side jambs and ! To avoid injury, use two people to Place window into the rough opening. 2. Temporarely fasten window with a galvanized roofing nail through a nailing fin hole between 3"-7" from one top corner. 3. Shim the side jambs aligned with the predrilled holes or 3"-6" from the corners and at 24"maximum intervals. 4. Inspect window for square, level, plumb. Adjust as needed with shims. Fasten window through side jambs predrilled holes and shims. 5. If the window is taller than 3', fasten the side jambs at 24 maximum intervals.
4 If the window is wider than 3', fasten the head jamb at 24 maximum intervals with a free flowing screw. Do not shim the head. 6. Install Vinyl plugs supplied or available through suppliers if ! a. Use a 1/8" tapered drill bit with 3/8" countersink to drill a screw hole through the side jamb and into the buck (on the interior, or exterior if insufficient space). Countersink should not penetrate the back wall of the frame. b. Apply sealant to the threads of a 3 1/2" screw and drive into the side ! Fastener heads must be Flush . Do not dent nailing fin. For any product B4 or above, fastener spacing is 4". For mulled units, fastener spacing is 4 around the mulled joint as shown. Installation Instructions for Vinyl Flush Fin Windows and Vinyl Windows with Nailing FinThe Flush fin window is a retro-fit product designed for Installation into an existing window frame with a 3/8 or wider return that protrudes past or is Flush with the exterior siding.
5 There cannot be any fins or lips that extend past this vertical plane. The Flush fin window will be sealed to this construction methods have led to an increase in air and water tightness in buildings. This frequently leads to negative air pressure inside the home, which can draw water through very small openings. Our Installation method integrates the window with the weather barrier (typically building wrap). *These Installation Instructions do not supercede any national, provincial or local building codes. They are meant as a guideline and reflect good Installation attached are JELD-WEN s recommended Installation Instructions for Vinyl windows which incorporate an integral nail fin. These Installation Instructions do not supersede any national, provincial, or local building codes.
6 While the use of these Installation Instructions is recommended, in Canada, Installation in strict compliance with CSA A440-4 is an alternate method of window Installation and will not affect the application of the JELD-WEN limited PACkAGING & INSPECT yOUr WINDOW 2 For Vinyl Flush Fin Windows Verify width/height of new window are each 3/4" smaller than minimum opening width/height of the existing frame. Verify the existing opening is square. The "A" and "B" measurements above should be the same. Maximum allowable deviation from square is 1/8" for windows 20 sq. ft. and smaller, and 1/4" for windows larger than 20 sq. ft. Verify the existing frame is level and plumb. The maximum allowable deviation is 1/16" for every 2' (not to exceed 1/8").
7 The exterior face of the rough opening must be in a single plane with less than 1/8" twist from corner to corner. Signs of water leakage near the existing frame must be investigated and corrected prior to installing the new Flush fin Vinyl Windows with Nailing Fin Verify the width and height of the window are each 1/2" smaller than the rough opening width/ height. Verify the rough opening is square. The "A" and "B" measurements above should be the same. Maximum allowable deviation from square is 1/8" for windows 20 sq. ft. and smaller, and 1/4" for windows larger than 20 sq. ft. Verify the rough opening is level and plumb. The maximum allowable deviation is 1/16" for every 2' of rough opening (not to exceed 1/8"). The rough opening sill must not be crowned or sagged.
8 The exterior face of the rough opening must be in a single plane with less than 1/8" twist from corner to corner. The header must be supported by trimmer studs. Signs of water leakage near the existing frame must be investigated and corrected prior to installing the new window. Installation PrErEqUISITES for Vinyl Flush Fin Windows SAFETy & HANDLING SeAL betWeeN rePLACemeNt WINdoW ANd exIStING FrAmeThe lack of an adequate return significantly adds to the complexity of a long-term, water-tight Installation . If the existing window frame does not have a sufficient return, consult an Installation professional to design an Installation that completely seals the new window in a weatherproof manner. remoVe PACkAGINGR emove shipping materials such as corner covers, shipping blocks or pads.
9 If there is a protective film on the glass, do not remove it until Installation and construction are complete. INSPeCt yoUr WINdoW Cosmetic damage Product squareness (diagonal measurements no more than 1/4" difference) Correct product (size, color, grid pattern, handing, glazing, energy-efficiency requirements, etc.) Cracked frame Splits, cracks or missing sections in nailing fin longer than 6" Cracks, holes or other damage to nailing fin within 1/2" of window frame Flush Fin Window: A Vinyl window used for retro-fit Installation into an existing window frame. The integral exterior trim is decorative and covers the gap between the new window and the existing Stile: A vertical frame member of a window that sits in the center of the exterior sill track and either holds one side of the fixed glass or keeps the stationary sash from opening Width/Height: Measurements taken to determine the size of window that will fit into a retro-fit opening.
10 For example, the minimum opening height is the distance between the highest frame point on the sill to the lowest frame point on the : The exterior face of an existing window frame that helps tie the window to the Unit: Two or more window units structurally joined : The layering method in which each layer overlaps the layer below it so that water runs down the Hole (weep channel): The visible exit or entry part of a water drainage system used to drain water out of a window."#BASealantMeeting sti leCentermax. 24 "3 " -6 "3 " -6 "Interior3"-7"3"-7"8"3"-7" 8"Center max. 24" Interior Screw with Sealant Countersink ExteriorWeepholeDrywall returnExteriorsidingReturn3/8" minimumNo extending fins or lips IMPOrTANT INFOrMATIONE stimated Install Time for New Construction First Time: 4 hrs Experienced: 3 hrs Professional: 2 hrs 123456789101112 Vinyl Flush Fin Windows This Installation assumes that the existing frame has a water-tight Installation into the structure.