Transcription of TUNING GUIDE - Fox Factory
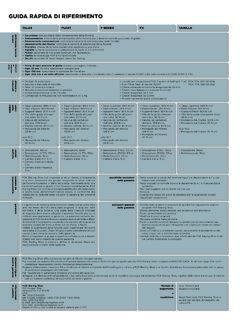
1 TUNING GUIDE . sag setting To achieve the best performance from your FOX. suspension, adjust the air pressure to attain your proper sag setting. Sag is the amount your suspension compresses under your weight and riding gear. Sag range should be set to 15 20% of total fork travel. For forks with the FIT4 damper: make sure to set sag with the 3-position lever in the OPEN mode, see page 5. For forks with the HSC/LSC (RC2) or LSC (RC) damper: make sure to set sag with the LSC adjuster in the full TOTAL FORK TRAVEL. counter-clockwise (OPEN) position, see page 6-7. Watch the sag setup video at O-RING. Suggested Sag Measurements SAG RANGE. Travel 15% sag (Firm) 20% sag (Plush). DUST WIPER. 140 mm ( in) 21 mm ( in) 28 mm ( in). 150 mm ( in) 22 mm (.9 in) 30 mm ( in). 160 mm ( in) 24 mm ( in) 32 mm ( in). 170 mm ( in) 26 mm ( in) 34 mm ( in). 180 mm ( in) 27 mm ( in) 36 mm ( in). Your fork has a 4 digit ID code on the back of the lower leg. Use this number on the Help page at to find out more information about your fork, including fork travel.
2 2. 36. The recommended settings in this TUNING GUIDE are designed to be a starting point, in order to get you out on your first ride in as few steps as possible. Consult your bike manufacturer's instructions for setup recommendations. As you ride and get used to your new fork, adjust your settings as needed. Detailed information and videos can be found in the online owner's manual. Suggested Starting Points for Setting Sag Rider Rider FLOAT TALAS. Weight Weight Pressure Pressure (lbs) (kgs) (psi) (psi). 120-130 54-59 51 98. 130-140 59-64 55 105. 140-150 64-68 59 113. 150-160 68-73 63 121. 160-170 73-77 67 129. 170-180 77-82 71 137. 180-190 82-86 75 144. 190-200 86-91 79 152. 200-210 91-95 83 160. 210-220 95-100 87 168. 220-230 100-104 91 176. 230-240 104-109 95 183. 240-250 109-113 99 191. Do not exceed maximum air pressure: 36 FLOAT maximum air pressure is 125 psi. 36 TALAS maximum air pressure is 200 psi. 3. rebound ADJUST ment The rebound adjustment is dependent on the air pressure setting.
3 For example, higher air pressures require slower rebound settings. Use your air pressure to find your rebound setting. Turn your rebound knob to the closed position, clockwise until it stops. Then turn it counter-clockwise to the number of clicks shown in the table below. Rebound controls the rate of REBOUND speed at which the fork extends after compressing. FLOAT TALAS Recommended Pressure Pressure Rebound (psi) (psi) Setting <51 <98 9+. 51-59 98-113 8. 59-67 113-129 7. REBOUND. KNOB 67-75 129-144 6. 75-83 144-160 5. 83-91 160-176 4. 91-99 176-191 2. >99 >191 CLOSED. OPEN 9 8 7 6 5 4 3 2 1 CLOSED. (COUNTER-CLOCKWISE) (CLOCKWISE). LEAST AMOUNT OF MOST AMOUNT OF. REBOUND DAMPING, REBOUND DAMPING, FORK REBOUNDS FORK REBOUNDS. FASTEST SLOWEST. 4. 36. compression ADJUST ments The 3-position lever is useful to make FIT4 3-POSITION LEVER on-the-fly adjustments to control fork performance under significant Begin with the 3-position lever in the changes in terrain, and is intended to OPEN mode.
4 Be adjusted throughout the ride. OPEN. Use the OPEN mode during rough descending, the MEDIUM mode for MEDIUM undulating terrain, and the FIRM. mode forsmooth climbing. FIRM. *OPEN mode adjust is useful to *OPEN MODE ADJUST control fork performance under rider weight shifts, G-outs, and slow inputs. Set the OPEN mode adjust to 18 clicks out OPEN mode adjust provides 22. (counter-clockwise until it stops). additional fine TUNING adjustments for the OPEN mode. OPEN MODE Setting 18 will have a more plush feel ADJUST and setting 1 will have a firmer feel. * Factory Series and Performance Elite Series forks only OPEN 18. CLICKS. CLOSED. (CLOCKWISE). (COUNTER-CLOCKWISE) OUT. LEAST AMOUNT MOST AMOUNT. OF COMPRESSION OF COMPRESSION. DAMPING; FORK DAMPING; FORK. COMPRESSION COMPRESSION. LIGHTEST FIRMEST. The 3-Position Micro Adjust lever is GRIP COMPRESSION ADJUST useful to make on-the-fly adjustments to control fork performance. Use the OPEN. positions between the OPEN, MEDIUM, and FIRM modes to fine-tune your compression damping.
5 MEDIUM. FIRM. 5. Factory SERIES HSC/LSC. compression ADJUSTERS. Use this diagram as a starting point for your compression adjusters. Turn your compression adjusters to the closed position (full clockwise) until they stop. Then back them out (counter-clockwise) to the number of clicks shown below. High-speed compression Low-speed compression adjustment adjustment is useful to control fork is useful to control fork performance performance during bigger hits, during rider weight shifts, G-outs, landings, and square-edged bumps. and other slow inputs. OPEN. 22 CLICKS. 15. CLICKS. CLOSED. (FULL CLOCKWISE). OUT. HIGH-SPEED COMPRESSION (HSC). OPEN 15. CLICKS. CLOSED. (FULL CLOCKWISE). 26 CLICKS OUT. LEAST AMOUNT MOST AMOUNT. OF COMPRESSION LOW-SPEED COMPRESSION (LSC) OF COMPRESSION. DAMPING; FORK DAMPING; FORK. COMPRESSION COMPRESSION. LIGHTEST FIRMEST. 6. 36. PERFORMANCE SERIES LSC. compression ADJUSTer Use this diagram as a starting point for your compression adjuster. Turn your compression adjuster to the closed position (full clockwise) until it stop.
6 Then back it out (counter-clockwise) to the number of clicks shown below. Low-speed compression adjustment is useful to control fork performance during rider weight shifts, G-outs, and other slow inputs. OPEN 12. CLICKS. CLOSED. (FULL CLOCKWISE). 21 CLICKS OUT. LEAST AMOUNT MOST AMOUNT. OF COMPRESSION LOW-SPEED COMPRESSION (LSC) OF COMPRESSION. DAMPING; FORK DAMPING; FORK. COMPRESSION COMPRESSION. LIGHTEST FIRMEST. 7. Converting to the 20mm axle 1. Remove the pinch bolts, axle pinch bars, and 15mm axle slit shims. 2. Squeeze the 15mm axle adapters with smooth jawed pliers, . compressing their slits while pulling toward the opposite dropout . to remove. 3. Install the 20mm axle slit shims into the dropout slits. 4. Reinstall the pinch bolts and axle pinch bars. WARNING: The 20mm axle slit shims must be used when using the 20mm axle. Leaving the 20mm axle slit shims out when using the 20mm axle can allow for dropout damage to occur, which can lead to a loss of control of the bicycle that can result in SEVERE INJURY OR DEATH.
7 Axle assembly 20mm axle slit shim Pinch bolt Axle pinch bar 8. 36. Converting to the 15mm axle 1. Remove the pinch bolts, axle pinch bars, and 20mm axle slit shims. 2. Coat the axle adapters with a thin film of multi-purpose lithium based grease or suspension oil. 3. Press the adapters into their appropriate dropouts making sure to align the slit in the adapter with the slit in the dropout. 4. If necessary, you can rotate the axle adapter by squeezing it with smooth jawed pliers to compress the slit and allow it to rotate until aligned. 5. Install the 15mm axle slit shims into their correct dropouts as shown. 6. Reinstall the pinch bolts and axle pinch bars. WARNING: The 15mm axle should only be used with the 15mm axle adapters and 15mm axle slit shims. Do not use the 15mm axle without the 15mm axle adapters. Do not use the 15mm axle with the 20mm axle slit shims. Failure to use the proper adapters and axle slit shims with the 15mm axle can damage the fork dropouts which can lead to a loss of control of the bicycle which can result in SEVERE INJURY OR DEATH.
8 WARNING: Never attempt to modify axle slit shims or axle adapters. Modification of these parts can lead to improper installation which can lead to a loss of control of the bicycle which can result in SEVERE INJURY OR DEATH. WARNING: When using the 15mm axle slit shims, make sure to install the notched shim in the rider's left dropout. Failure to install the 15mm axle slit shims in their correct locations may result in damage to the dropout that can lead to a loss of control of the bicycle which can result in SEVERE INJURY OR DEATH. WARNING: Never attempt to force any parts to fit. Doing so may result in dropout damage, which can lead to a loss of control of the bicycle that can result in SERIOUS INJURY OR DEATH. Axle assembly Pinch bolt 15mm axle slit shim, right-side 15mm axle adapter, right-side 15mm axle adapter, left-side Axle pinch bar 15mm axle slit shim, left-side Properly aligned axle adapter 9. Installing the Front Wheel - QR. Wheel installation is identical for both the 15x100 mm and 15x110 mm axles.
9 1. Install the front wheel into the fork dropouts. Slide the axle through the non-drive side dropout and hub. 2. Open the axle lever. 3. Turn the axle clockwise 5-6 complete turns into the axle nut. 4. Close the lever. The lever must have enough tension to leave an imprint on your hand. 5. The closed lever position must be between 1-20 mm in front of the fork leg. 6. If the lever does not have enough tension, or has too much tension when closed at the recommended position (1-20 mm in front of the fork). See the next page for adjustment instructions. KABOLT INSTALLATION. 1-20 mm Wheel installation is identical for both the 15x100. mm and 15x110 mm Kabolt axles. 1. Install the front wheel into the fork dropouts. Slide the K abolt axle through the non-drive side dropout and hub. 2. Use a 6 mm hex wrench to torgque the Kabolt axle (clockwise) to 17 Nm (150 in-lb). WARNING: Use hand pressure only. Never use any tool to tighten the 15QR levers onto the lower legs. Over-tightening the levers can damage the axle or fork dropouts, leading to a sudden failure with one or more of these components, resulting in SERIOUS INJURY OR DEATH.
10 WARNING: Failure to secure the axle properly can cause the wheel to become detached from the bicycle, resulting in SERIOUS INJURY OR DEATH. 10. 36. adjust the qr lever position 1. Note the axle number, which is the number at the indicator arrow. 2. Use a mm hex wrench to loosen the axle nut keeper screw approximately 4 turns, but do not completely remove the screw. 3. Move the 15QR to the open position and unthread the axle approximately 4 turns. 4. Push the 15QR axle in from the open lever side. This will push the axle nut keeper out and allow you to rotate it out of the way. 5. Continue to push on the 15QR axle and turn the axle nut clockwise to increase the lever tension, or counter-clockwise to decrease the lever tension. 6. Return the axle nut keeper into place and torque the bolt to Nm (8 in-lb). 7. Repeat the axle installation instructions to verify proper installation and adjustment. Axle nut keeper screw Axle nut keeper Axle nut Indicator arrow Axle number 11.