Transcription of User Guide AC1200 Max Wi-Fi Range Extender - Linksys
1 User Guide AC1200 Max Wi-Fi Range Extender Model # RE6500 2 Table of Contents Product Overview ..3 RE6500 .. 3 How to Install the Range Extender ..6 Special Feature Music Streaming .. 11 iOS .. 11 Android* .. 12 Windows .. 13 Mac OS X .. 13 How to Access the Settings Interface .. 15 Using Range Extender Settings .. 16 Using Wi-Fi Protected Setup .. 17 Wi-Fi Protected Setup light activity .. 17 Connecting the Range Extender to an existing access point or router .. Error! Bookmark not defined. Connecting devices to your network through the Range Extender .. 17 How to Use Site Survey.
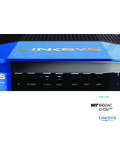
2 19 Troubleshooting .. 20 You cannot get your Range Extender connected .. 20 Your Wi-Fi coverage isn t meeting expectations .. 20 You cannot access your Range Extender .. 20 You have intermittent connection problems .. 22 Specifications .. 23 RE6500 .. 23 Environmental .. 23 3 Product Overview RE6500 Front view Indicator LED The light on the top of the Range Extender gives you information about power, updating, Wi-Fi Protected Setup and signal strength. Note: Your antennas might look different from those pictured here. Power Light Status/ description Blinking white Booting up.
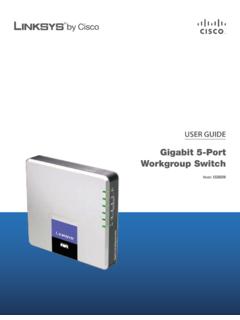
3 Resetting to factory defaults. Upgrading firmware. Solid white Ready to use. Blinking orange Ready for setup. Disconnected from router. Solid orange Weak connection to router. 4 Back view Audio Jack (1) Connect the Extender to your speakers. Ethernet (2) Connect wired devices to your wireless network with Ethernet (network) cables. The green lights turn on when an Ethernet device is connected and active on these ports. The lights blink when the Extender is sending or receiving data over the Ethernet ports. Wi-Fi Protected Setup Button (3) Use Wi-Fi Protected Setup to automatically and securely add compatible wireless devices to your network.
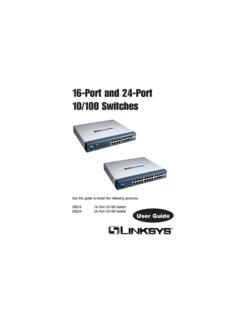
4 Refer to Using Wi-Fi Protected Setup on page 17. Power Port (4) Plug in the provided power cable. Power Switch (5) Only on European versions. 5 Bottom view Reset Button Press and hold until the power light on the top of the Range Extender blinks to reset to factory defaults. You can also restore the defaults from the Administration > Factory Defaults screen in the Extender s settings interface (page 16). 6 How to Install the Range Extender Before starting setup, make sure your router has a working Internet connection. Does your router have a WPS button? Wi-Fi Protected Setup (WPS) is a simple way to connect Wi-Fi devices with Push Button Connect.
5 routers that support WPS have a button that might be labeled with this symbol: If yes, continue with Wi-Fi Protected Setup below If no (or not sure), continue with browser-based setup, also in this user Guide . Note The WPS button will not work if you have disabled WPS on your router. Wi-Fi Protected Setup (WPS) 1. Connect antennas and power cable Antennas should be upright for best results. Note Your antennas might look different from those shown. 2. Plug the Range Extender into an electrical outlet close to your router. You can move the Range Extender to an ideal location later in step 5.
6 After the Range Extender is plugged in the indicator LED on the top will blink white for up to a minute. 3. Wait for the indicator LED to blink orange before going to step 4. This can take up to a minute. 4. Extend your GHz network. a. Press the WPS button on your router. Within the next two minutes complete step 4b. b. Press the WPS button on the back of your Range Extender . The indicator LED on the top of your Range Extender will blink white. Watch the indicator LED on the front of your Range Extender to verify whether the connection was successful. 7 If it turns solid white, the connection was successful.
7 Move to step 5. If it starts to blink orange , the connection failed. You may try again by repeating step 4 or try browser-based setup, also in this document. 5. Extend your 5 GHz network. You may skip this step if your router does not have a 5 GHz network or if you don't want to extend that network. a. Press the WPS button on your router again. Within the next two minutes complete step 5b. b. Press the WPS button on your Range Extender again. The indicator LED on the top of your Range Extender will start to blink white. Watch the indicator LED on the front of your Range Extender to verify whether the connection was successful.
8 If it turns solid white, the connection was successful. If it starts to blink orange before it turns solid white, the connection failed. You may try again by repeating step 5. 6. Move your Range Extender to an ideal spot. Unplug your Range Extender and plug it back in midway between your router and the area without Wi-Fi . Using your mobile device or laptop, be sure you have at least two bars (around 50%) of your router s Wi-Fi signal at that location. If you don t have two bars, move the Range Extender closer to the router. 7. Check indicator LED for connection quality.
9 It can take up to a minute for the ranger Extender to boot up after moving it. During this period you will see the blinking white LED once again. Solid white Ready to use. Solid orange Weak connection to the router. Find an outlet closer to your router. Blinking orange Not connected to the router. Find an outlet closer to your router. 8. Connect your Wi-Fi devices to the extended network you just created. Select the extended network on your device's Wi-Fi manager. Extended networks are identified by "_Ext" added to the end of your main network name(s). 8 Your Range Extender is now set up.
10 Enjoy your extended Wi-Fi coverage. Accessing your Range Extender settings after WPS Your Range Extender 's default admin password is "admin". It is highly recommended that you change this after WPS setup. To change or view Range Extender settings, first connect to an extended network. In a browser, go to and enter your admin password. Browser-Based Setup 1. Plug in the Range Extender Connect the antennas and plug in the Range Extender midway between your router and the area without Wi-Fi . Using your mobile device or laptop, be sure you have at least two bars (around 50%) of your router s Wi-Fi signal at that location.