Transcription of User Guide - KitchenAid
1 THANK YOU for purchasing this high-quality product. Register your built-in oven at In Canada, register your built-in oven at future reference, please make a note of your product model and serial numbers. They can be found on the label located on the bottom edge of the control panel, right hand Number _____Serial Number_____Para una versi n de estas instrucciones en espa ol, visite tener a mano el n mero de modelo y de serie, que est n ubicados en el marco del horno, detr s del lado derecho superior de la puerta del horno. user GuideBuilt-In Electric Single and Double OvensTABLE OF CONTENTSBUILT-IN OVEN SAFETY .. 2 PARTS AND FEATURES .. 3 FEATURE Guide .. 4 Electronic Oven Controls .. 6 Display .. 6 Start .. 6 Lower Cancel, Upper Cancel and Cancel .. 6 Tones.
2 7 Fahrenheit and 7 Tools .. 7 Kitchen Timer .. 7 Control Lock .. 7 Oven Temperature Control .. 8 Sabbath 8 OVEN USE .. 9 Aluminum 9 Oven Racks .. 9 Rack and Bakeware Positions .. 9 SatinGlide Roll-Out Extension 11 Meat 11 Oven Vent(s)..11 Preheating and Oven Temperature ..11 Baking and Roasting ..12 Broiling .. Bake ..12 Convection Roast ..13 Convection Broil ..13 Proofing Cooking ..14 OVEN CARE ..14 High Temp Self-Cleaning Cycle ..14 General Cleaning ..15 Oven OR SERVICE ..18In the OVEN SAFETYYou can be killed or seriously injured if you don't immediately You can be killed or seriously injured if you don'tfollow All safety messages will tell you what the potential hazard is, tell you how to reduce the chance of injury, and tell you what canhappen if the instructions are not safety and the safety of others are very have provided many important safety messages in this manual and on your appliance.
3 Always read and obey all safety is the safety alert symbol alerts you to potential hazards that can kill or hurt you and safety messages will follow the safety alert symbol and either the word DANGER or WARNING. These words mean:follow THESE INSTRUCTIONSIMPORTANT SAFETY INSTRUCTIONSWARNING: To reduce the risk of fire, electrical shock, injury to persons, or damage when using the oven, follow basic precautions, including the following: Proper Installation Be sure the oven is properly installed and grounded by a qualified technician. Never Use the Oven for Warming or Heating the Room. Do Not Leave Children Alone Children should not be left alone or unattended in area where oven is in use. They should never be allowed to sit or stand on any part of the oven.
4 Wear Proper Apparel Loose-fitting or hanging garments should never be worn while using the oven. user Servicing Do not repair or replace any part of the oven unless specifically recommended in the manual. All other servicing should be referred to a qualified technician. Storage in Oven Flammable materials should not be stored in an oven. Do Not Use Water on Grease Fires Smother fire or flame or use dry chemical or foam-type extinguisher. Use Only Dry Potholders Moist or damp potholders on hot surfaces may result in burns from steam. Do not let potholder touch hot heating elements. Do not use a towel or other bulky cloth. Use Care When Opening Door Let hot air or steam escape before removing or replacing food. Do Not Heat Unopened Food Containers Build-up of pressure may cause container to burst and result in injury.
5 Keep Oven Vent Ducts Unobstructed. Placement of Oven Racks Always place oven racks in desired location while oven is cool. If rack must be moved while oven is hot, do not let potholder contact hot heating element in oven. DO NOT TOUCH HEATING ELEMENTS OR INTERIOR SURFACES OF OVEN Heating elements may be hot even though they are dark in color. Interior surfaces of an oven become hot enough to cause burns. During and after use, do not touch, or let clothing or other flammable materials contact heating elements or interior surfaces of oven until they have had sufficient time to cool. Other surfaces of the oven may become hot enough to cause burns among these surfaces are oven vent openings and surfaces near these openings, oven doors, and windows of oven self-cleaning ovens: Do Not Clean Door Gasket The door gasket is essential for a good seal.
6 Care should be taken not to rub, damage, or move the gasket. Do Not Use Oven Cleaners No commercial oven cleaner or oven liner protective coating of any kind should be used in or around any part of the oven. Clean Only Parts Listed in Manual. Before Self-Cleaning the Oven Remove broiler pan and other utensils. State of California Proposition 65 Warnings:WARNING: This product contains one or more chemicals known to the State of California to cause : This product contains one or more chemicals known to the State of California to cause birth defects or other reproductive manual covers different models. The oven you have purchased may have some or all of the items listed. The locations and appearances of the features shown here may not match those of your Electronic oven controlB.
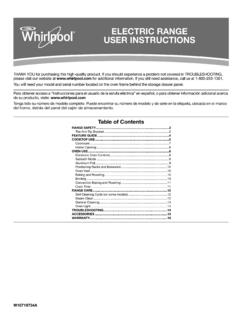
7 Automatic oven light switchC. Oven door lock latchD. Model and serial number plate (on bottom edge of control panel, right hand side)E. Oven lightsF. Temperature probe jack (oven with convection element and fan only)G. Oven racks (roll-out racks available on select models only)H. GasketI. Lower oven (on double oven models)J. CleanBake bake element(hidden beneath floor panel)K. Convection element and fan(in back panel)L. Broil elements (not shown)M. Oven ventParts and Features not shownTe m p e r a t u r e p r o b ePARTS AND FEATURESB,CADEFGHMLKJI4 This manual covers several models. Your model may have some or all of the items listed. Refer to this manual or the Frequently Asked Questions (FAQs) section of our website at for more detailed instructions . In Canada, refer to the Service and Support section at GUIDEWARNINGFood Poisoning HazardDo not let food sit in oven more than one hour before or after so can result in food poisoning or Oven settingsB.
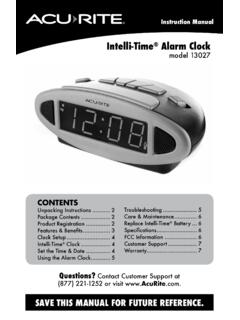
8 Oven displayC. Number keysD. Kitchen timerE. Upper and lower oven cancel (double oven models) Cancel (single oven models)F. S t a r t / c o n t r o l l o c kG. Oven lightH. Self cleanI. clock /ToolsJ. Convection cooking settingsK. Stop timeL. Cook timeABCAB Double Oven DisplayA. Upper oven cavity displayB. Lower oven cavity displayC. Time of day, timer display Single Oven DisplayA. Oven cavity displayB. Time of day, timer displayKEYFEATUREINSTRUCTIONSCLOCK/TOOLS C lockThe clock uses a 12-hour cycle. See the Electronic Oven Controls the 1 key to select clock . Then touch the number keys to set the time of you to personalize the audible tones and oven operation to suit your needs. See the Electronic Oven Controls LIGHTOven cavity lightThe oven light is controlled by a key on the oven control panel.
9 While the oven door is closed, touch OVEN LIGHT to turn the light on and off. When the oven door is opened, the oven light will automatically come on. 5 TIMER(SET/OFF)Oven timerThe Timer can be set in hours or minutes up to 23 hours and 59 TIMER SET/OFF. Touch TIMER SET/OFF again to switch between MIN/SEC, HR/MIN, and OFF. If no action is taken, the control will continue to wait for a length of time to be the number keys to set the length of TIMER SET/OFF. If the key is not touched, the control will continue to wait for SET/START to be touched. When the set time ends, 4 chimes will continuously repeat until the Timer Set/Off key is TIMER SET/OFF anytime to cancel the Kitchen Timer or stop the reminder tones. If CANCEL is touched, the respective oven will turn off.
10 However, the kitchen timer can be turned off only by using TIMER startThe Start key begins any oven function. If Start is not touched within 5 minutes after touching a key, the function is canceled and the time of day is UPPERCANCEL LOWERR ange functionThe Cancel keys stop any function for the appropriate oven except the clock and (Upper and Lower Oven)Baking and Upper Oven or Lower Oven BAKE. Touch the number keys to enter a temperature other than 350 F (177 C). The bake range can be set between 145 F and 550 F (63 C and 288 C). START. Lo will appear on the oven display if the actual oven temperature is under 100 F (38 C), and Preheating will appear in the lower area of the display. When the actual oven temperature reaches 100 F (38 C), the oven display will begin displaying the temperature as it increases.