Transcription of Intelli-Time Alarm Clock - AcuRite
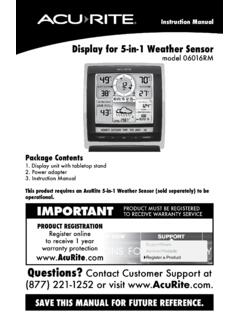
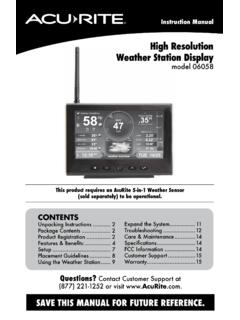
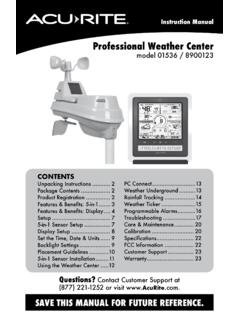
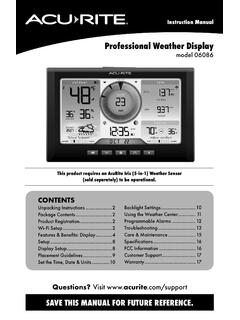
1 Instruction Manual Intelli-Time Alarm Clock model 13027 CONTENTS Unpacking instructions .. 2 Package Contents .. 2 Product Registration .. 2 Features & 3 Clock 4 Intelli-Time Clock .. 4 Set the time & Date .. 4 Using the Alarm 5 Troubleshooting .. 5 Care & 6 Replace Intelli-Time Battery .. 6 6 FCC Information .. 6 Customer Support .. 7 7 Questions? Contact Customer Support at (877) 221-1252 or visit SAVE THIS MANUAL FOR FUTURE REFERENCE. RITE Archived Products Congratulations on your new AcuRite product. To ensure the best possible product performance, please read this manual in its entirety and retain it for future reference. Unpacking instructions Remove the protective film that is applied to the LCD screen prior to using this product.
2 Locate the tab and peel off to remove. Package Contents 1. Alarm Clock 2. Instruction Manual IMPORTANT PRODUCT MUST BE REGISTERED TO RECEIVE WARRANTY SERVICE PRODUCT REGISTRATION Register online to receive 1 year warranty protection Register a Product 2 Features & Benefits 12 3 4567 8 9 FRONT OF Clock 1. PM Indicator 2. Alarm ON Indicator TOP OF Clock 3. HI/LO Dimmer Switch 4. Alarm SET Button 5. " " Button 6. "+" Button 7. time SET Button 8. Alarm ON/OFF Switch 9. SNOOZE Button BOTTOM OF Clock 10. RESET Button Full reset to factory defaults 11. time ZONE Switch 12. DST ON/OFF Switch 13. Intelli-Time Battery Compartment 10 11 1213 3 SETUP Clock Setup Plug the power cord into power outlet.
3 Intelli-Time Clock Intelli-Time Clock and calendar are pre-programmed to the correct time and date, and update automatically for Daylight Saving time . All you need to do is select your time zone using the time ZONE switch. Set the time & Date Choose the correct time zone (AST HST AKST PST MST CST EST) using the time ZONE switch on the bottom of the Clock . Set Daylight Saving time ON or OFF using the DST ON/OFF switch on the bottom of the Clock .* Press and hold the time SET button for 3 seconds to enter the SET MODE. Once in the SET MODE the preference you are currently in will blink on the Clock . To adjust the currently selected (flashing) item, press and release the + or - buttons (press and HOLD to fast adjust). To save your adjustments, press and release the time SET button to adjust the next preference.
4 The preference order is as follows: Clock HOUR (Please note PM Indicator light) Clock MINUTE Clock MONTH CALENDAR DATE CALENDAR YEAR You will automatically exit SET MODE if no buttons are pressed for 5 seconds. Enter SET MODE any time by pressing and holding time SET button for 3 seconds. *If you live in an area that observes daylight saving time , DST should be set to ON. 4 OPERATION Using the Alarm Clock Set the Alarm time To set Alarm time , press and hold the Alarm SET button for 3 seconds to enter Alarm SET MODE. To adjust the currently selected (flashing) item, press and release the + or buttons (press and HOLD to fast adjust). To save your adjustments, press and release the Alarm SET button to adjust the next preference. The preference set order is as follows: Alarm Clock HOUR (Please note PM Indicator light) Alarm Clock MINUTE You will automatically exit Alarm SET MODE if no buttons are pressed for 30 seconds.
5 Enter Alarm SET MODE by pressing and holding the Alarm SET button for 3 seconds. Alarm Clock ON or OFF Function To turn Alarm on: Slide the Alarm ON/OFF switch to ON. The Alarm ON indicator appears on the screen. To turn Alarm off: Slide the Alarm ON/OFF switch to OFF. The Alarm ON indicator disappears from the screen. Alarm Clock SNOOZE Function The Alarm will sound for 60 minutes before turning off when no button is pressed. When the Alarm is sounding, activate the 8 minute SNOOZE function by pressing the SNOOZE button at the top of the Alarm Clock . SNOOZE function can be activated up to 10 times before the Alarm will no longer sound. Troubleshooting Clock is too dark, hard to read or doesn t work Reset the unit by pressing the RESET button located on the bottom of the Clock .
6 This will reset the Alarm to the original factory settings. time and date will need to be entered after a reset. If your AcuRite product does not operate properly after trying the troubleshooting steps, visit or call (877) 221-1252 for assistance. 5 WARNING: THIS PRODUCT CONTAINS A BUTTON-CELL BATTERY. IF SWALLOWED, ITffi COULD CAUSE SEVERE INJURY OR DEATH IN JUST 2 HOURS. SEEK MEDICAL ATTENTION IMMEDIATELY IF INGESTED. ~ POISON Care & Maintenance Clock Care Clean with a soft, damp cloth. Do not use caustic cleaners or abrasives. Keep away from dust, dirt and moisture. Clean ventilation ports regularly with a gentle puff of air. Replace Intelli-Time Clock Battery CR2032 3V Intelli-Time technology is powered by a pre-installed coin-cell battery that stores the time and date settings.
7 The battery has a shelf life of several years. To replace the Intelli-Time battery: 1. Locate the coin cell battery compartment door on the bottom of the Clock . Unscrew and remove the compartment cover. 2. Insert 1 x CR2032 coin cell battery into the battery compartment, as shown. Install battery with + positive terminal facing OUT. 3. Screw in the battery cover. Specifications POWER AC power cord (120V) FCC Information This device complies with part 15 of FCC rules. Operation is subject to the following two conditions:1- This device may NOT cause harmful interference, and2- This device must accept any interference received, including interference that may cause undesired : Changes or modifications to this unit not expressly approved by the party responsible for compliance could void the user s authority to operate the : This equipment has been tested and found to comply with the limits for a Class B digital device, pursuant to Part 15 of the FCC rules.
8 These limits are designed to provide reasonable protection against harmful interference in a residential installation. This equipment generates, uses and can radiate radio frequency energy and, if not installed and used in accordance with the instruc-tions, may cause harmful interference to radio communications. However, there is no guarantee that interference will not occur in a particular installation. If this equipment does cause harmful interference to radio or television reception, which can be determined by turning the equipment off and on, the user is encouraged to try to correct the interference by one or more of the following measures: Reorient or relocate the receiving antenna. Increase the separation between the equipment and the receiver. Connect the equipment into an outlet on a circuit different from that to which the receiver is connected.
9 Consult the dealer or an experienced radio/TV technician for : The manufacturer is not responsible for any radio or TV interference caused by unauthorized modifications to this equipment. Such modifications could void the user authority to operate the device complies with Industry Canada licence-exempt RSS standard(s).Operation is subject to the following two conditions:(1) This device may not cause interference, and(2) This device must accept any interference received, including interference that may cause undesired operation of the device. 6 (() Archi~ed Products Customer Support AcuRite customer support is committed to providing you with best-in-class service. For assistance, please have the model number of this product available and contact us in any of the following ways: (877) 221-1252 24/7 support at Installation Videos Register your Product Instruction Manuals Support User Forum Replacement Parts Submit Feedback & Ideas IMPORTANT PRODUCT MUST BE REGISTERED TO RECEIVE WARRANTY SERVICE PRODUCT REGISTRATION Register online to receive 1 year warranty protection Register a Product Limited One Year Warranty At AcuRite , we proudly uphold our commitment to quality technology.)
10 Chaney Instrument Co. warrants that all products it manufactures to be of good material and workmanship, and to be free of defects when properly installed and operated for a period of one year from the date of purchase. We recommend that you visit us at for the fastest way to register your product. However, product registration does not eliminate the need to retain your original proof of purchase in order to obtain warranty benefits. Chaney Instrument Co. warrants that all products it manufactures to be of good material and workmanship, and to be free of defects when properly installed and operated for a period of one year from the date of purchase. Remedy for breach of this warranty is limited to repair or replacement of the defective item(s). Any product which, under normal use and service, is proven to breach the warranty contained herein within ONE YEAR from date of sale will, upon examination by Chaney, and at its sole option, be repaired or replaced by Chaney.