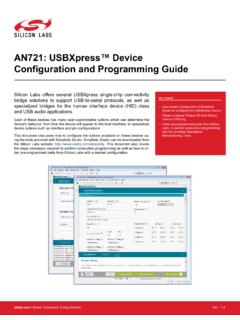
Transcription of User Manual
1 1 / 10 User Manual 2 & 4 Port Dual Monitor KVM Switches I. Applicable Models: Dual HDMI KVM Switch 2 Port Dual HDMI KVM Switch 4 Port Dual VGA KVM Switch 2 Port Dual VGA KVM Switch 4 Port These models are designed to control up to 2 or 4 multi-graphics card dual-output computers, laptops and other applicable devices from one set of keyboard, mouse and 2 monitors for extended or duplicated display . Mouse and keyboard can be used alternately between two monitors, operating two interface files respectively. It is suitable for high resolution display and monitoring, multimedia design, multimedia post-production and video editing etc. It provides users with great convenience. There are two kinds of dual KVM switches for your selection in this series including dual HDMI KVM switch, dual VGA KVM switch. Please refer to the correspondent product type for product features and specifications in this Manual .
2 II. Product Features: One USB console controls 2/4 multi-graphics card dual -output computer and other devices. Support extended or duplicated display depending on computer setting. Support Resolution : For Dual HDMI KVM Switch: 480i, 480p, 720p, 1080i, 1080p and For Dual VGA KVM Switch: 2048*1536@450 MHz Multiplatform support: Windows 10/7/2000/XP/Vista Linux and Mac; Support hot plug & play Support HDCP and auto EDID for Dual HDMI KVM Switch Support DDC2 for Dual VGA KVM Switch Support auto detection if one computer is powered off, the switch will automatically switch to the next powered-on computer (The default is in closed state,if you want to open it. Please read the below setting operation instructions ). With memory function in case of power -down Support independent mouse keyboard switch, even without USB signal input, you can switch the input device easily by keyboard or mouse.
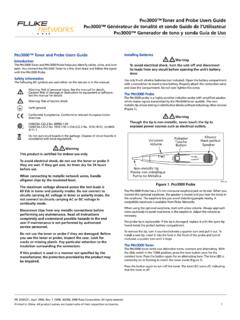
3 Auto Scan Mode for monitoring all computers /DVR/NVR With Hub and separate audio & microphone output III. Important Reminder before Set-up: Dual monitor display requires dual video inputs. Most computers and laptops only have one HDMI output + VGA/DVI/DP output or USB C output, make sure you have VGA/DVI/DP to HDMI adapter or USB C Dock ready before setup, you may need multiple adapters for multiple computer connection. Here are some examples: 2 / 10 Dual HDMI KVM Switches 2 and 4 Port: 3 / 10 Dual VGA KVM Switches 2 and 4 Port: 4 / 10 USB-C (Type C) Laptops: Note: 1. If VGA to HDMI adapter needed, make sure it has built-in chips and separate power supply. If a USB C Dock has dual video outputs, make su re it supports extended display (some only supports duplicated display). 2. Outsourced adapters or docks are beyond our control , make sure you get those that would work with our KVM switches.
4 IV. How to Set Up: 1. Power off all devices ; 2. Connect Cable A from your computer to IN 1 A of the Switch; 3. Connect Cable B from your computer to IN 1 B of the Switch (If an adapter is needed, please c onnect your adapter with Cable B ; 4. Repeat step 2 & 3 to connect other input devices to correspondent KVM ports; 5. Plug your mouse and keyboard to correspondent USB mouse and keyboard port on back panel; for gaming or mechanical keyboard, please plug them into the USB HUB on front panel if they did not work well on USB keyboard port. 6. Connect your Monitors to HDMI OUT 1 if your monitor has both input and Input (1080P/4K@40Hz), please plug in the Input. 7. Plug in your speaker or microphone if needed; 8. Power on the switch and boot all devices; 9. Set computer dis play modes to extended display / duplicated display as needed. Note: The monitors take around 20 seconds to display at first set -up, later on it only takes around 2-3 seconds to display upon switching.)
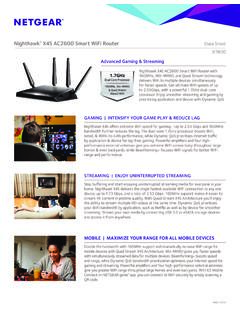
5 5 / 10 V. Connection Diagram: ---------------------------------------- -------------------------------------- VI. Dual graphics card display settings Take win7 as an example: hold down the keyboard windows + P , as shown in the figure , a dialog will pop up as below. Select Duplicate or Extend, then the two monitors can be displayed at the same time per selected display mode . 6 / 10 VII. Switch Modes Button Switch Switch to any port by buttons on front panel. Click mouse Switch : 2 port dual KVM switch: Double click the mouse middle roller for circular switching (within 1 second) 4 port dual KVM switch: a. Double click the middle roller of mouse, and then press the right mouse button to switch to the next port. 7 / 10 b. Double click the middle roller of mouse, then press the left mouse button to switch to the previous port. Keyboard Hot-key Switch : Double click the right Ctrl + Port Number + Enter VIII.
6 Hotkey Setting Default hot-key is the right Ctrl (the Ctrl key on right side of keyboard). If use the right Ctrl conflicts with other hot-key, t he hot-key can be set to Num lock or Scroll Lock . For example Double click the right Ctrl + Num lock + Enter The hot-key changes to Num lock double click the right Ctrl + Scroll Lock + Enter The hot-key changes to Scroll Lock the hot-key set as Scroll Lock and you want to set the hot-key as the left Ctrl key then double click the Scroll Lock +the left Ctrl + Enter then the hot-key changes to the left Ctrl . Hotkey Change Setting: IX. Keyboard Hot-key Operation Double click the right Ctrl + Num lock + Enter Hotkey change to Num lock Double click the right Ctrl +left Ctrl + Enter Hotkey change to the left Ctrl Double click the right Ctrl + Scroll Lock + Enter Hotkey change to Scroll Lock If the hotkey is changed to Scroll Lock You want to change it to the left Ctrl Then double click Scroll Lock +the left Ctrl + Enter Double click the right Ctrl + N+ Enter The KVM can switch to the device you choose.
7 Double click the right Ctrl + S + Enter Turn on/off the auto-scan function, or you can press the scan button on front panel Double click the right Ctrl + S +N+ Enter Set the scan interval Can set to 8-999 seconds The system defaults to 8 seconds Double click the right Ctrl + B + Enter Turn on/off the beeping sound Double click the right Ctrl + T + Enter Turn on/off the detection function (default is off) Double click the right Ctrl + R + Enter Reset the KVM System to solve the keyboard and mouse freeze. 8 / 10 Notes: 1. The N stands for the computer s Port ID number (1, 2, 3, 4) or auto scan interval time of 8 to 999 seconds. 2. When the auto scan function is activated, you can press any key on the KVM front panel, the auto scan function turns off automatically. 3. Keyboard and mouse must be plug in the positions marked with keyboard and mouse icon, so keyboard hot keys and mouse click switching will be effective. 4. For wireless mouse and keyboard; Please plug the Bluetooth receiver into the USB keyboard port for better performance.
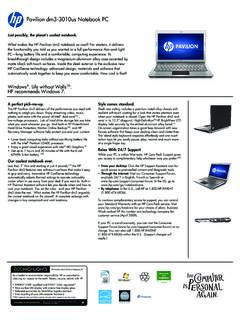
8 5. For some high speed, optical, multi-functional, gaming or mechanical keyboard or mouse, please plug into the USB port on front panel, this connection does not support hotkey or mouse switching. X. Sound Settings 1. AMD HDMI Output Setting Right click on the desktop taskbar to popup task box , click Playback devices , then jump out of the interface shown in Figure A. Then select the AMD HDMI Output , right click and shown as Figure B. And then select the Set as Default Device . It displayed tick status, which indicates successful setup as the Figure C. Figure A Figure B Figure C 9 / 10 2 Interface Sound Settings Right click on the desktop taskbar to popup task box , click Loudspeaker , then jump out of the interface shown in Figure A. Then select the Loudspeaker , right click and show as Figure B. And then select the 'Set as Default Device'.
9 It displayed tick status, which indicates successful setup as the Figure C. Figure A Figure B Figure C XI. Box Contents: 1* 2 or 4 Port Dual KVM Switch 2 or 4* Cable A Feet ( Meters) 2 or 4* Cable B Feet ( Meters) 1* power adapter 1* user Manual in English XII. FAQ & Trouble Shooting Q1. Why I cannot get extended displays or only one monitor works? 1. Make sure your computer has dual video outputs and connect both cable A and cable B from your computer to the switch; use reliable adapter if needed. 10 / 10 2. Make sure the computer is set as extended display mode. Q2: Keyboard or mouse does not work. 1. Firstly, make sure that the USB connector of cable A is already connected to the computer side, there is no signal exception, and the power has been connected. 2. After the image switch normally, mouse and keyboard access to the KVM switcher, wait a few seconds for the computer to complete the device recognition.
10 3. Turn off the kvm and restart power to re-identify 4. Refer to Q9 for gaming or mechanical keyboard Q3: Monitors does not display or images display improperly: 1. Check if the cables are connected well or swap the cables, see if it is cable problem. 2. Push the 1080P/Auto EDID button to reset (for Dual HDMI KVM Switches only). Q4. Mouse on my Mac only have curse moving but I can t click and drag the mouse: 1. Try double click the right Ctrl + L + Enter, Or 2. Install USB Overdrive on your Mac Q5. My computers only have one HDMI output, how can I connect both cable A and cable B? Please refer to Important Reminder before Set-up Q6. Does it work with USB-C (Type C) Laptops? Yes, but depends on the USB-C dock quality which is beyond what we can control. Q7. How can I turn off the beep sound? You can double click the right Ctrl + B + Enter to turn the beep on/off. Q8. How Can I deactivate the mouse switching function? Simply plug your mouse into the Port on front panel.