Transcription of Vi-Cell XR Cell Viability Analyzer User Instructions
1 Vi-Cell XR Cell Viability AnalyzerUser InstructionsWritten by CMCresson 15-Feb-06 The Vi-Cell XR Cell Viability Analyzer is a video imaging system used to analyze yeast, insectand mammalian cells. It automates the trypan blue exclusion protocol, in which dead cells takeup the dye while live cells do not, and provides data on percent Viability and cell , the Vi-Cell system is an automated hemocytometer unlike the multisizer, which wassimply a particle counter. The Vi-Cell takes up the sample and delivers it to a flow cell andcamera for imaging where differences in the grey scale between live and dead cells is determinedby the software. For every sample you run, the instrument requires 500 L of sample volume,which is mixed 1:1 with trypan blue, and takes 50 images to determine the cell concentration andviability. All of this data is output on the computer screen and can also be sent to a printer orexcel spreadsheet for further SpecsCell Diameter Range = 3 to 70 mCell Concentration Range = 5 x 10⁴ to 1 x 10⁷ cells/mLViability Range = 0% - 100%Counting Accuracy = 6%Sample Volume = mL to mLAcquisition Time = 2 minutesGetting Started with the Vi-CellEveryone who will be using the Vi-Cell system must be trained by the system administrator.
2 Inaddition, everyone will be given a user account and password to log on to the will be a main system log in which user activity will be recorded. So, if you allowsomeone else to use your account, then you will be the responsibility party in the use log ifsomething happens to the instrument. UROPs will not be given user accounts and will be theresponsibility of their lab Vi-Cell system default cell type may work for some cell lines in the lab and it is really thebest place to start. However, since trypan blue uptake, cell size, and appearance are unique toeach cell type you should run some tests to determine the best parameters with your particularcell line. For cell lines that are used by many lab members and that need changes to the defaultparameters, we will create a cell type that will be specific for those cells. The cell types willappear in every user s menu. The software contains a tutorial for creating your cell lines so thismay be a helpful feature for more difficult cell lines.
3 In addition, you can email cell images toBeckman Coulter and they can assist you in determining the best parameters for your particularcell is also important to be aware of the amount of time your samples will be sitting at roomtemperature waiting on the carousel. Each sample takes 2 minutes to run and the carousel holds12 samples. You may not want to prepare more than 12 samples to run at any give time as thewaiting could affect Viability counts. However, as sensitivity to temperature and pH will varyfor each cell line you may want to run controls before making a large number of Vi-Cell user manual will be located on the shelf above the instrument at all times. Pleaseconsult the manual or the software help function if you have any questions. If these sources donot provide the info you need, then please contact Catherine or 8-9488).This is a very expensive instrument and it will be heavily used by many different lab members soplease take good care of the Vi-Cell and follow all of the operating proceduresThe SoftwareClick on the Vi-Cell icon on the desktop to begin the will then need to login to the program with your user ID and password provided by thesystem the Navigation Bar on the left side to determine what is displayed in the main Image allows for the viewing of sample images during and aftera runAutosampler Queue shows the completed samples along with the list ofsamples in the queue, this is where you can modify/remove samples that arealready in the queueCell Types displays windows with the information for each specific celltype; this is where you create or remove new cell typesBioprocess the last icon represents a bioprocess.
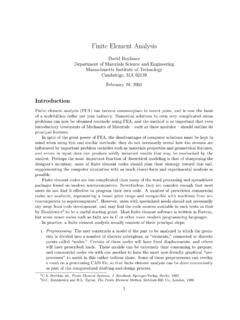
4 There can be many ofthese icons that each represents an ongoing experiment in which data iscollected over days or months (for more details of setting up bioprocessessee pg. 49 in the user a SampleAll reagents including the trypan blue are internal to the instrument so all you need is your cellsolution to get started. Sample cups are located on the shelf above the samples can be suspended in any of the following solutions: PBS, isoton (liquid usedwith old cell counter), or media (even if it contains phenol red). See system specs to ensureyou will be within the necessary volume and cell concentration Sample Prepa. Prepare samples in the TC hood and bring to bench in ependorf or conical Make the necessary dilutions to keep your cell concentration within the At the lab bench, add 600 L of solution to sample cup. Exact volume does NOTmatter as the instrument sucks up entire solution and only uses 500 Place sample cup in next available carousel Log in sample on the computer by clicking on the Log in sample button: (log in windowshown below)a.)
5 Select cup position on carouselb. Enter your Sample ID (the software is smart and will increment for you withmultiple samples)c. Choose a Cell type (*first time choose default)d. Select a dilution factore. Click OK or Next sample to enter additional sample data (*once you start thequeue you can continue to enter samples, so it saves time to start the queue first)5. From the navigation menu, choose Autosampler queue to see your samples in the this screen, you can also edit/remove samples in the queue while a run is Click on Start queue to begin sample analysis. Once the run begins, your sample willdisappear from the queue and you will only see it on the main screen. The bottom of thescreen will tell you exactly what the instrument is doing ( mixing trypan blue, loadingflow cell, etc) and right side displays the run data ( image #, % viable, cell count).Indicates which position in the carouselyou are putting your sample in. NOTE:the current three positions at the back ofthe carousel do NOT appear in the menuEach user will be able to set their preferencesfor the default setting.
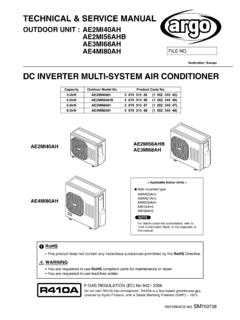
6 Also, we will createnew cell types for common lab cell dilution factor will automatically beadded into the result calculation by theinstrument. Choices are to Click on Camera view in the navigation bar to see images as they are collected. Cellsoutlined in green are counted as live and cell outlined in red are counted as On the right side of the screen, data is displayed for each image as it is collected and theoverall average is updated as the run progresses. There is also a graph that displaysdetailed data from each parameter such as size distribution, % Viability per image, To add additional samples to the queue, click on Log in Sample and repeat the process inStep 4 above. You can only add 9 samples to the queue at any given time. But, you cancontinually add samples as carousel positions become When the sample run is complete, the instrument will clean itself. (Note: You cannotreview data images until this process is complete and there are no more samples to becounted.)
7 11. The carousel will then rotate to check for additional samples. At this time, empty samplecups will be knocked into an internal waster Read general system information below to ensure that you follow proper the Sample RunWhen the cell analysis is complete, you can flip through the images to check the accuracy of theinstrument in identifying live/dead cells. You will also want to look at the size distribution graphto ensure that the correct minimum size value was you would like to change any of the cell type parameters, choose instrument from the top toolbar and scroll down to click on reanalyze. At this point, the default cell type window will openup and you can adjust the necessary parameters and click ok. The cell images will then beanalyzed using the new parameter values and the data will be displayed on the right side of thescreen. Reanalyzing a sample does not overwrite the original data and the new data is notautomatically saved. So you need to choose save run from the main menu in the top tool bar tosave data before you would like to reanalyze a previous run, then you can reload the data by clicking open runfrom the main menu.
8 Then, select the text file from your data folder and the correspondingimages will be automatically loaded as DataIn the user preferences, everyone will have their own directory in which data is automaticallysaved. All image files appear as file folders containing tiff files of the individual images and thedata is saved as a text file. If selected during the sample log in process, your data will also beoutput to an excel spreadsheet. There is an example excel sheet with explanations in the Vi-Celluser manual for your reference. It is recommend that all images are saved during the setupperiod so that data can easily be reanalyzed to determine the best cell type , as the hard drive will quickly fill up you will need to alter your preferences at alater date NOT to automatically save the images. Please be respectful of how much space youtaking up on the computer and remove any unnecessary files. The computer is not currentlyconnected to the internet so data will have to be transferred by floppy disk, CD, or USB memorystick at this System InformationIt is recommended that the Vi-Cell instrument remains ON at all times.
9 Do NOT turn off the end of a run, the sample cup is dumped into a bin inside the machine. The software willalert you when the bin has become full. To empty the bin, open the side door, remove the metaltray, and dispose of the cups in a biohazard waste , all of the liquid waste is collected by the instrument. When the waste container inside theinstrument is full, the software will alert you. First add 50% bleach to the waste, and then youshould dispose of the waste in the proper hazardous waste container in the hood. If there is nowaste container please fill out a new waste disposal card by following the example that is tapedinside the door of the Vi-Cell . The waste percentages listed on the card should be the same forall samples: trypan blue + 1% sodium hypochlorite + 15% isopropanol. If you aresuspending your cells in a solution that is also hazardous, you need to write that information onthe waste card as well every time you use the cell for the instrument reagents, these will be ordered from beckman Coulter by the lab managerand stocked near the instrument.
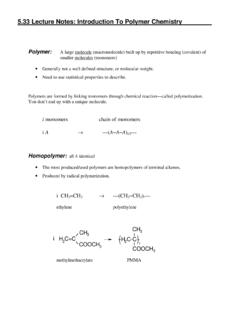
10 Only the beckman Coulter reagents are compatible with thisinstrument. Do NOT use any other brand of trypan blue. If we are running low on reagents, youwill need to place them on the order board in the lab. The instrument contains a reagent fueltank that displays the relative amount of reagents in the machine and also the remaining numberof runs at all times. When the reagents do run out, once again the software will give you analert. Do NOT attempt to change the reagents on your own. This is the most commonproblem that occurs with the instrument so you will need to locate Catherine to change thereagents for you. If Catherine is not around, then please see Christina, HD, or Lisa to change instrument will be decontaminated once a month by a 50% bleach cleaning and the person incharge of the Vi-Cell will take care of this ExclusionDetermine ViabilityBased on spot brightness & spot areaLiveCellReject Non-Circular ObjectsSeparate Cells from BackgroundBased on brightness & sharpnessVi-CellXR Cell Image Analysis Scheme Not Viable Debris Meets MinCircularityViable DeclusterCellsDeadCellCMCresson15-March- 06 Creating and Modifying Vi-Cell Cell TypesWhen you begin using the instrument, it is best to select the Default Cell Typeto analyze your sample.