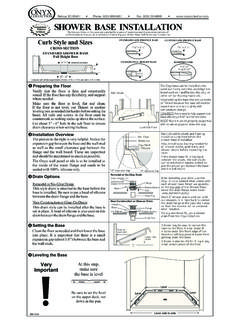
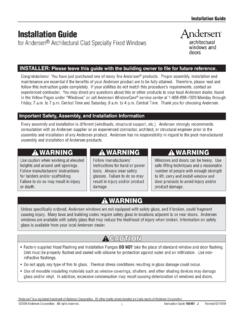
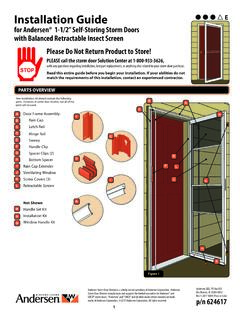
Transcription of WALL PANEL INSTALLATION - Onyx Collection
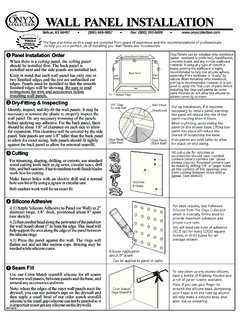
1 WALL PANEL INSTALLATIONS ilicone AdhesivePanel INSTALLATION OrderCuttingNotches& HolesSilicone Application about 8 apartFor best results, Silicone from which is specially formulated to provide maximum adhesion and proper cure rate. You will need one tube of adhesive( oz) for every 1,000 square inches, or 6-10 tubes for an average Adhesive The Onyx CollectionSeam FillDry-Fitting & InspectingThe tips and hints on this page are compiled from years of experience and the recommendations of professionals to help you do a perfect job of installing your Wall panels and AccessoriesRight PanelLeft PanelCeiling PANEL (Optional)Back PanelFFFFFF= Finished EdgeColor Match Onyx SeamFillOnyx panels can be installed onto sheetrock (water resistant is preferred)
2 , HardiBacker, concrete board, and any similar wallboard material. If using any type of concrete board, priming the wallboard is highly recommended to help the silicone adhere, especially if the wallboard is dusty by nature. When installing onto sheetrock, priming is recommended. However, it is not good to apply the final coat of paint before installing the Onyx wall panels as some paint finishes do not allow the silicone to adhere correctly to INSTALLATION , if it becomes necessary to bend a PANEL , warming the PANEL will reduce the risk of the PANEL cracking when it dryfitting, avoid sliding the PANEL on the shower base.
3 Lifting the PANEL into place will reduce the chance of scratching the panels are sent taller to allow for exact on-site cut-outs for notches or accessories should have rounded corners (sharp corners can cause stress cracks). Rounded corners can be made by drilling 1/4" or larger holes at the corners of the openings and then cutting between holes with a jigsaw. (see sketch) To have a bottle of Rubbing Alcohol and a roll of paper towels , if you use your finger to smooth the silicone bead, dampening your finger with the rubbing alcohol will help make a smooth bead and also reduce clean up any excess silicone, Onyx PANEL (Side Wall)Onyx PANEL (Back Wall)Wall StudSheetrock1/8 Gapto side wallWhen there is a ceiling PANEL , the ceiling PANEL should be installed first.
4 The back PANEL is installed next and the side panels are installed in mind that each wall PANEL has only one or two finished edges and the rest are unfinished cut edges. panels must be installed so that the smooth finished edges will be showing. Be sure to read instructions for trim and accessories before installing wall trimming, shaping, drilling, or cutouts, use standard wood cutting tools such as jig saws, circular saws, drill bits, and belt sanders. Fine to medium tooth finish blades work best for cutting. Make faucet holes with an electric drill and a normal hole saw bit or by using a jigsaw or circular saw.
5 Belt sanders work well for an exact ) Apply Silicone Adhesive to PANEL (or Wall) in 2" diameter rings, 3/8" thick, positioned about 8" apart (see sketch). ) Run another bead along the perimeter of the PANEL (or the wall board) about 1" in from the edge. This bead will help support the area along the edge of the PANEL between the silicone rings. ) Press the PANEL against the wall. The rings will flatten out and act like suction cups. Bracing may be needed while silicone cures. Identify, inspect, and dry-fit the wall panels . It may be necessary to remove the plastic to properly inspect the wall PANEL .
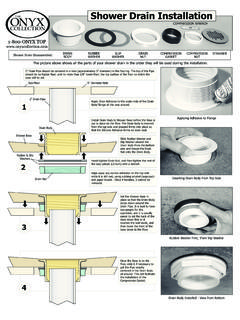
6 Do any necessary trimming of the panels before applying any adhesive. For the back PANEL , there should be about 1/8" of clearance on each side to allow for expansion. This clearance will be covered by the side PANEL . Side panels are sent 1/8 taller than the back PANEL to allow for exact sizing. Side panels should fit tightly against the back PANEL to allow for minimal , KS 66407(800) 669-9867 Fax: (800) INSTALLATION Videosavailable on our websiteUse our Color Match seamfill silicone for all seams between wall panels , between panels and the base, and around any accessories and.
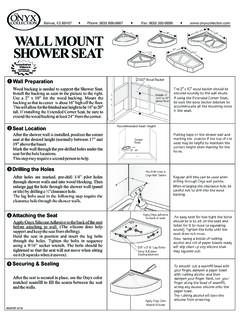
7 Where the edges of the onyx wall panels meet the drywall, you can use painter's tape on the drywall and then apply a small bead of our color match seamfill silicone to the small gap (silicone can not be painted so it is important to not get any silicone on the drywall).WPI-0818 Can be applied to PANEL or wallsWall StudSheetrockAnchor(no Wall Stud)Onyx PanelBracket or Shower FrameScrew(with Anchor)ClearanceHolein PanelHole inBracketPilot HoleScrew(with wall stud)Other Helpful Suggestions & SolutionsInstall Caddywith Adhesive& SeamfillInstalling Recessed Shower CaddiesMounting Shower Doors and ShowerAccessoriesWALL PANEL INSTALLATIONB elvue, KS 66407(800) 669-9867 Fax.
8 (800) Lay PANEL flatApply weightand/or heatas neededWarped PanelIf you are installing a recessed Soap or Shampoo Caddy, keep track of the locations of the wall studs so there is not a conflict when cutting the hole for the holes for recessed caddies after the PANEL is installed and fully supported by the recessed caddy includes instructions and a template for the exact cut-out check for stud location before cutting the PANEL . If there are no studs in the intended area for the caddy, but the exact stud location is not known, begin with a small hole and then measure over to the stud for the exact the mounting instructions that come with each drilling holes in the Onyx Wall PANEL , always make the hole slightly larger than the fastener in order to avoid stress on the anchors must be used because the screw location cannot be aligned with a wall stud.
9 Make the clearance hole in the Onyx PANEL large enough for the head of the anchor to fit through so it can anchor securely into the wall board behind the PANEL . (see sketch) clearance holes through the Onyx panels are very important. Fasteners should pass through a clearance hole in the Onyx and never screw directly into the Onyx. Always secure fasteners to anchors or wood backing as seen in the to do if a PANEL is not flat:If a wall PANEL has a bend in it, it can be flattened by simply laying it on a flat surface overnight. To flatten the PANEL faster, gradually apply a little weight and/or heat (normally heat is not necessary, but if it is, an electric blanket or hair dryer will work well).
10 Try to get the temperature up to 90 PANEL should flatten within a few minutes. Cutting or Notching panels :Always put a radius on the inside corner when notching a PANEL . The rounded corner will greatly reduce the chance of the PANEL cracking during INSTALLATION . In cooler temperatures, use extra caution when cutting and notching panels because the panels do not flex as well when cold. Warming the PANEL will make it more flexible and easier to Care During INSTALLATION : panels are packaged with a protective plastic wrap on them. Take this off to inspect PANEL before installing.