Transcription of Wireless Router Setup Manual
1 Wireless Router Setup Manual NETGEAR, Inc. 4500 Great America Parkway Santa Clara, CA 95054 USA. November 2007. 208-10148-01. Trademarks NETGEAR and the NETGEAR logo are registered trademarks, and RangeMax and Smart Wizard are trademarks of NETGEAR. Inc. Microsoft, Windows, and Windows NT are registered trademarks of Microsoft Corporation. Other brand and product names are registered trademarks or trademarks of their respective holders. Statement of Conditions In the interest of improving internal design, operational function, and/or reliability, NETGEAR reserves the right to make changes to the products described in this document without notice. NETGEAR does not assume any liability that may occur due to the use or application of the product(s) or circuit layout(s) described herein.
2 2007 by NETGEAR, Inc. All rights reserved. ii Contents Getting to Know Your Wireless Router .. 1. Unpacking Your New Wireless Router .. 1. What You Need Before You Begin .. 8. Updating Your Router Firmware .. 9. Two Setup Methods: Smart Wizard Setup or Manual Setup .. 9. Smart Wizard Setup .. 9. Manual Setup .. 10. Product Registration, Support, and Documentation .. 15. Accessing the Wireless Router after Installation and Checking for New Firmware .. 16. Setting Up and Testing Basic Wireless Connectivity .. 18. Implementing Appropriate Wireless Security .. 20. Help with Troubleshooting .. 21. Basic Troubleshooting .. 21. Troubleshooting Connectivity Using the Ping Utility .. 26. Default Configuration .. 29. Default Configuration Settings.
3 29. Restoring the Default Password and Configuration Settings .. 32. Related 33. Contents iii iv Contents Getting to Know Your Wireless Router Congratulations on your purchase of the NETGEAR RangeMax Dual Band Wireless -N. Router WNDR3300. Before you begin installing your Router , check the package contents (see Unpacking Your New Wireless Router ). Become familiar with the front and back panels of your Router especially the status lights and the important information on the Router label (see Bottom Label on page 8). Unpacking Your New Wireless Router The product package should contain the following items: The Wireless Router A snap-on stand for your Wireless Router An AC power adapter (varies by region). A yellow Ethernet cable The Resource CD, which includes: The Smart Wizard Installation Assistant ( ).
4 A PDF version of this Manual A link to the online Reference Manual Warranty and Support Information cards If any of the parts are incorrect, missing, or damaged, contact your NETGEAR dealer. Keep the carton, including the original packing materials, in case you need to return the product for repair. To prepare your Router for installation: 1. Carefully peel off the protective film covering the sides of your Router . Getting to Know Your Wireless Router 1. , November 2007. Wireless Router Setup Manual 2. Set up your Wireless Router by inserting the Router into the stand supplied with your Router . Figure 1. 3. Place your Router in an area suitable for installation (near an AC power outlet and accessible to the Ethernet cables for your wired computers).
5 2 Getting to Know Your Wireless Router , November 2007. Wireless Router Setup Manual Router Front Panel Figure 2. You can use the status lights on the front of the Wireless Router to verify various conditions. Table 1. Status Light Descriptions Item Function Activity Description 1 Power On green solid Power is supplied to the Router . Blinking The unit is starting up, or the restore factory settings button is being pushed to restore the factory default settings. Off Power is not supplied to the Router . 2 GHz On amber a The unit is operating in Legacy G mode at GHz Mode (5 GHz Mode [item 3] is also on). On greenb The unit is operating in 11n mode at GHz (5 GHz Mode [item 3] is off). Blinking Data is being communicated over the Wireless network.
6 3 5 GHz On blue c The unit is operating in 11n mode at 5 GHz Mode ( GHz Mode [item 2] is also on, amber). Off 11n mode at 5 GHz is off ( GHz Mode [item 2] is on, green). Blinking Data is being communicated over the Wireless network. Getting to Know Your Wireless Router 3. , November 2007. Wireless Router Setup Manual Table 1. Status Light Descriptions (continued). Item Function Activity Description 4 Internet Amber off No Ethernet cable is connected to the modem . Amber on The Ethernet cable connection to the modem is good. Amber blinking Packets are being transmitted and received from a modem or other network device, but no IP address has been received. Green off No IP address has been received. On IP address has been received.
7 Blinking IP address has been received, and data is being transmitted and received. 5 LAN Green The LAN port has detected a 100 Mbps link with an attached device. Amber The LAN port has detected a 10 Mbps link with an attached device. a. On amber (default setting) signifies a 5 GHz interference-free Wireless -N and legacy GHz network. NETGEAR. recommends this if you have Dual Band clients (Dual Band Wireless -N laptops, Dual Band Wireless -N adapters) and/or b/g laptops to connect. b. On green signifies a GHz Wireless -N network. NETGEAR recommends this if you have only GHz Wireless -N clients (most adapters are GHz, if not specified as Dual Band) AND/OR b/g laptops to connect. c. On blue signifies a 5 GHz interference-free nework.
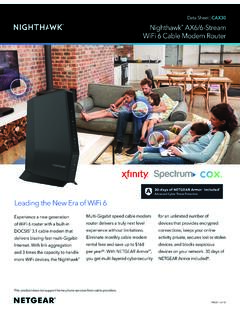
8 For more information on modes, see To change modes if you notice interference: on page 19, and the online Reference Manual , available on the Resource CD. 4 Getting to Know Your Wireless Router , November 2007. Wireless Router Setup Manual Router Back Panel The rear panel of the WNDR3300 Router contains the items in the list that follows the figure. 1 2 3 4. Figure 3. The back of the Wireless Router includes: 1. Four local (LAN) 10/100 Mbps Ethernet ports for connecting the Router to local computers 2. Internet (WAN) Ethernet port for connecting the Router to a cable or DSL modem 3. Restore factory settings button 4. AC power adapter outlet Getting to Know Your Wireless Router 5. , November 2007. Wireless Router Setup Manual Top Panel Figure 4.
9 The top of the Wireless Router includes a dome that performs two functions: 1. Antenna display lights. The lights identify the activity of the eight internal antennas, flashing to show which combination of antennas is receiving the strongest signals. These status lights are off by default but can be turned on. To turn the antenna display lights on or off: a. Push the dome for less than 2 seconds, then release. If lights are off, they will turn on. b. Push the dome for less than 2 seconds, then release. If lights are on, they will turn off. 2. Wi-Fi Protected Setup (WPS). The dome acts as a push-button for the Router to enable WPS. security with other WPS-enabled devices. Pushing on the dome for over 5 seconds opens a 2- minute window for the Router to connect with other WPS-enabled devices.
10 Before using these WiFi Protected Setup (WPS) push-button procedures, verify that your device (a notebook, adapter, or other device) supports WPS. If you do not have any other WPS-enabled devices, there is no need to open the 2 minute period when security will be disabled, or to configure your Router security for WPS. To connect to another device using WPS: a. Open the networking utility of the device that supports WiFi Protected Setup (WPS) and follow the utility's instructions for when to proceed to step b. 6 Getting to Know Your Wireless Router , November 2007. Wireless Router Setup Manual b. Push the Wireless Router 's dome for 5 seconds, then release. The dome lights should begin to blink. While the Router is in WPS enable mode (a maximum of 2 minutes), Wireless security is not enabled.