
Complete Dovetail Jig Instructions
For half blind dovetail joints you will be using the 1/2" x 14º dovetail bit. Depth of cut will be 9/16" from the base of your router. Included on the half blind template is a gauge for setting this height (Fig. 3). Adjusting for joint tightness will be covered later in these instructions. A shop-built base allows for quick setup in the ...
Download Complete Dovetail Jig Instructions

Information
Domain:
Source:
Link to this page:
Documents from same domain

Installation Instructions: Hinge Kit
go.rockler.comInstallation Instructions: Hinge Kit ... Dimensions given with these instructions are based on the size of the universal Invisidoor (for a standard
42826 Steam Box - go.rockler.com
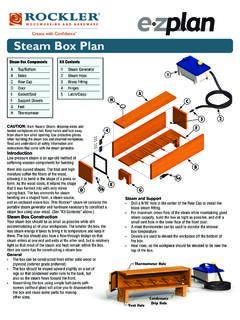
go.rockler.comH 4 E 5b 5a F 3 C 2 1 A B D G Vent Hole Thermometer Hole Condensate Drip Hole Steam Box Plan Kit Contents 1 Steam Generator 2 Steam Hose 3 Brass Fitting 4 Hinges 5 Latch/Clasp
BUILD IT WITH PROJECT PLAN OUTFEED TABLE
go.rockler.comShelving Jig and 1/4" Bit Set 32991. OUTFEED TABLE | PAGE 4 d d 3. ADD STABILITY – AND MOBILITY 4. BUILD THE DRAWERS Assemble the risers for the leveling feet and glue them to the bottom of the case. Attach the leveling feet to the risers with screws. Casters can
CNC Shark Quick-Start Guide
go.rockler.com1. The CNC Shark has three stepper motors, one for each axis of movement: X, Y and Z. Serial cables extending from the motors are marked as such and must be connected to the corresponding ports on the back of the Control Box (i.e., X to X, Y to Y and Z to Z). Be sure to make these connections before supplying power to the Controller Box. 2.

Lift Top Coffee Table - Rockler Woodworking and Hardware
go.rockler.com13. Using the Rockler One-Handed Bar Clamp to hold the jig to the bottom panel surface 14. Drill dowel hole using the 3/8” bit included n Rockler 3/8”DowelingJig 15. Use a vise or the Rockler Sure-foot F-style clamp to hold the doweling jig against the edge of the side panels 16. Drill into the surface of the side panel.

Full-size Deluxe Murphy Bed Plan - Rockler Woodworking and ...
go.rockler.comLocate the center on each end of the solid-wood Leg Support Rail (13) by drawing diagonal lines from corner to corner. Drill a 7/32" hole 11 ... the Female Metal Pivots (29) toward the back of the .

Queen-size Deluxe Murphy Bed Plan
go.rockler.comRead these instructions completely and watch the video included with your Murphy bed hardware before beginning assembly. Note that, because of ... Cut the rounded corners with a jigsaw and sand smooth. Apply Veneer Edge Banding (48) along the top edges and radiused ends. Trim excess. Fig. 1 - Inner Bed Frame 20" 1 1 1 1 2 2 2 1 1 1 1 1 1 1 1 1 ...
Library Ladder Assembly Instructions
go.rockler.comAssembly Instructions Congratulations on your purchase of the Library Ladder Hardware Kit! These instructions will guide you through the process of building a 7-step (8 foot) ladder. Familiarity with the instructions will make the process ... Drill a 7/16" hole for mounting the Aluminum Decorative Spindle (5). 3.
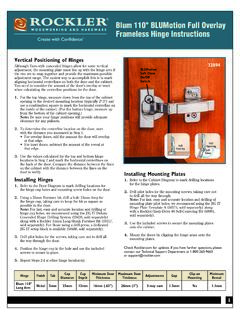
Blum 110 Blumotion Full Overlay Frameless Hinge …
go.rockler.comwith a Rockler/Insty-Drive #6 Self-Centering Bit (68991, sold separately). 3. Use the included screws to secure the mounting plates onto the cabinet. 4. Mount the doors by clipping the hinge arms onto the mounting plates. Hinge Finish Tab Cup Diameter Cup Depth Minimum Door Thickness Maximum Door Thickness Adjustments Gap Clip-on Mounting ...
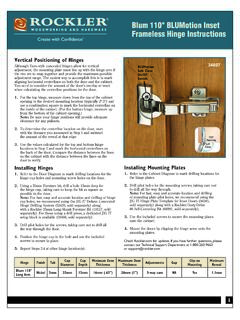
Blum 110° BLUMotion Inset Frameless Hinge Instructions
go.rockler.comsold separately) along with a Rockler/Insty-Drive #6 Self-Centering Bit (68991, sold separately). Use the included screws to secure the mounting plates onto the cabinet. 4. Mount the doors by clipping the hinge arms onto the Hinge Finish Tab Cup Diameter Cup Depth Minimum Door Thickness Maximum Door Thickness Adjustments Gap Clip-on Mounting ...
Related documents

TECHNICAL SPECIFICATION TIKKA T3 LITE
cdn1.tikka.fiOPTICAL SIGHT ATTACHEMENT 17mm dovetail rail METAL PARTS SURFACE FINISHING Blued metal parts STOCK Black synthetic stock TRIGGER MECHANISM Single stage trigger, adjustable pull 1 to 2kg (2 to 4 lbs) (Optional set trigger) SAFETY Two stage safety ACCESSORIES Manual SAKO LTD., P.O.BOX 149, 11101 RIIHIMÄKI, FINLAND,

INSTRUCTION MANUAL - Amazon Web Services
celestron-site-support-files.s3.us-east-1.amazonaws.comThe NexStar SE dovetail quick-release bracket allows you to adjust the optical tube for proper balancing or to remove the tube for storage To adjust or remove the tube from the base, simply loosen the quick-release clamp knob and slide the tube back towards the rear cell of …

OPTICS - Leapers
leapers.com2. Dovetail rail’s recessed stop pin holes.Turn the Cam Lever in the opposite direction to close the spring loaded locking plate, locking the QD mount base to the Picatinny rail. 3. Should the QD mount base be loose, unlock the Cam Lever and use the included Hex Wrench to adjust the Hex Screw found within the Cam Lever Housing. Turning

BEFORE YOU BEGIN – SURFACE PREPARATION BEFORE YOU …
s7d2.scene7.comfront panel and the dovetail on the side panel on both the left and right sides of the shed. DO NOT ENGAGE THE SNAPS. M Install Left Door Panel (K) inserting the lower hinge pin into Front Left Floor (A) socket, lift the left end of the Gable (M) enough to insert the top hinge

TUNE GUITAR TO PITCH BEFORE TAKING MEASUREMENTS.
www.martinguitar.com2. Break loose the neck dovetail bolts by half a turn 3. Make adjustment by accessing the intonation setscrew through the sound hole. Turning the setscrew clockwise will cause the guitar to play flat, turning it counterclockwise the guitar will play sharp. Note that one full rotation of the set screw will impact intonation by 2-3 cents 4.

Instruction Manual - Meade Instruments
www.meade.com9. Dovetail Receiver (Not Visible) 10. Altitude Setting Circle and Lock 11. Optical Tube (OTA) 12. Dew Shield 13. Dust Cap (Not Shown) 14. Mount Body 15. Control Panel 16. Azimuth Setting Circle 17. Tripod Base with Mounting Knob 18. Tripod Leg 19. Accessory Tray Mounting Screw 20. Accessory Tray 21. Inner Support Struts 22. Tripod Leg Locks 23 ...