INSTALLATION INSTRUCTIONS ASWC-1 ASWC-1 Axxess …
wheel control wire: Connect the Kenwood/JVC steering wheel control wire to the Brown wire of the ASWC-1. Isolate and tape the Brown/White wire, it will not be used. Note: Some of the newer Kenwood radios will auto detect as a JVC. If this is the case, manually set the radio type, refer to the Changing Radio Type section (pp. 12-13). D. For XITE ...
Download INSTALLATION INSTRUCTIONS ASWC-1 ASWC-1 Axxess …
Information
Domain:
Source:
Link to this page:
Documents from same domain

Cutin - Metra Online
www.metraonline.com23˛˝˙ˆˇˆ˘ˇ ˆ ˙ 3 From the 22-pin Chrysler harness • Connect the Yellow wire to the radio’s 12-volt battery or memory wire. • Connect the Black wire to the radio’s ground wire.
GMOS-04 Table of Contents GM Data Interface …
www.metraonline.comGMOS-04 2 Applications BUICK Century 2004-2005 LaCrosseSilverado 2005-2009 Rainier 2004-2007 Regal 2004 Rendezvous 2002-2007 Terraza 2005-2007 CADILLAC
INSTALLATION INSTRUCTIONS FOR PART 99-9700 …
www.metraonline.com99-9700 4 Harley Road Glide 2015-up Disassembly 1. Remove the lower torx screws on either side holding the wind deflector wings (only the lower two

www.metraonline.com
www.metraonline.com2 23˛˝˝3˙˙23˝ˆˇ˙˘˘˘ ˘˘˘ 3 DASH DISASSEMBLY 1. Unsnap and remove trim from around top center to passenger side dash. (Figure A) 2. Unsnap panel from outside edge of
INST99-7315 - Metra Online
www.metraonline.com99-3051 1 Disconnect the negative battery terminal to prevent an accidental short circuit. 1 Remove (2) screws from center AC vent and remove vent. (Figure A)
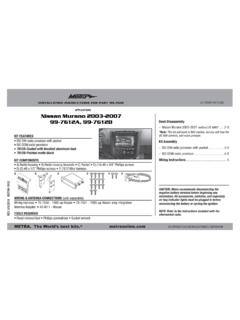
APPLICATIONS Nissan Murano 2003-2007 99 …
www.metraonline.com99-7612 ® 1. Desenganche y quite el panel de moldura que rodea la pantalla, incluyendo los controles del aire acondicionado. (Figura A) 2. Quite los (2) tornillos Phillips
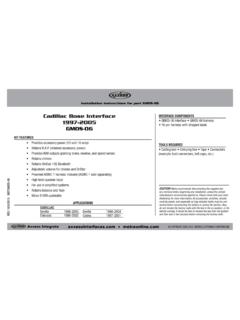
Cadillac Bose Interface INTERFACE COMPONENTS …
www.metraonline.comGMOS-06 3 • Connect the 16-pin harness with stripped leads into the interface. • Connect the GMOS-06 harness into the interface, and then into the vehicle.
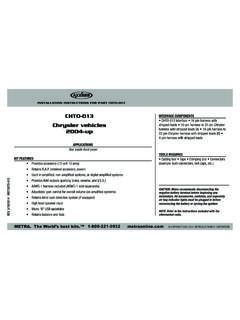
Chrysler vehicles 2004-up - Metra Online
www.metraonline.comCHTO-013 2 From the 16-pin harness • Connectthe (2) Red wires to the ignition/accessorywire ofCHRYSLER the aftermarketradio. • Connect the Orange/White wire to the illumination wire of the aftermarket

Honda Accord 2003-2007 Table of Contents 99 …
www.metraonline.comKit Preparation 3 Clip leg locations (Figure A) 1. Secure the (2) panel clip legs to the radio housing trim panel with the (4) #4 x 3/8” Phillips pan-head screws supplied, and then attach the panel clips. (Figure A)

95-7605 - Metra Online
www.metraonline.com2 95-7605 DASH DISASSEMBLY Unclip and remove the trim panel at the bottom of the clock panel then remove the (1) Phillips screw exposed below it. (Figure G)
Related documents
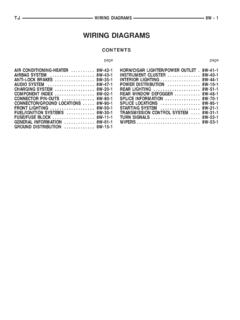
WIRING DIAGRAMS - uCoz
gershon.ucoz.comEach wire shown in the diagrams contains a code which identifies the main circuit, part of the main circuit, gage of wire, and color (Fig. 1). CIRCUIT FUNCTIONS All circuits in the diagrams use an alpha/numeric code to identify the wire and its function. To identify which circuit code applies to a system, refer to the Circuit Identification ...

Simple Analysis for Brushless DC Motors Case Study: Razor ...
web.mit.eduA single wire carrying current in a uniform magnetic field (Figure 1) sees a force exerted on it, called the Lorentz force: F IL B , where I is the vector current flowing through the wire (direction is important), L is the length of the wire, and B is the magnetic field vector. The right-hand rule defines the direction of the
Operation ManualComputerized Sewing Machine - Brother
download.brother.comThe wire which is coloured brown must be connected to the terminal which is marked with the letter ‘L’ or coloured red or brown. 2 ... Do not touch the hand wheel, thread take-up lever, needle, or other moving parts. 2. Remember to turn off the power switch and unplug the cord when:

PIP5369B Service 4wd Message C0398
static.nhtsa.govmissing weather pack connections, and wire crimping. For issues related to Transfer Case Range Position Sensor position that is intermittent then inspect circuits 7477, 7478, 7479 between the transfer case control module and the sensor. Look for terminal tension, backed out terminals, corrosion, missing weather pack connections, and wire crimping.

Hand and Power Tools - Occupational Safety and Health ...
www.osha.govwire must be attached to a known ground. The third prong must never be removed from the plug. Double-insulated tools are available that provide protection against electrical shock without third-wire grounding. On double-insulated tools, an internal layer of protecti ve insulation completely isolates the external housing of the tool.

Wheel end bearing and seal installation guide - SKF
www.skf.coma wire or place it on a metal plate at the bottom of the container or tank. 4. Rinse the bearing in clean solvent (ig. 5). Dry it thoroughly. Natural ... wheel, tighten the adjusting nut until there is a slight bind and all bearing surfaces are in contact. 7. Back off the adjusting nut 1/16 to 1/8 turn, or to the nearest locking

EM385-1-1 Section 16 TOCFINAL - United States Army Corps ...
www.usace.army.milEM 385-1-1 30 Nov 14 16-2 h. Operators of equipment with a maximum manufacturer -rated hoisting/lifting capacity of 2,000 pounds (907 kg) or less, are exempt from the operator qualification or certification