Transcription of 1 INTRODUCTION TO PICAXE SYSTEM
1 1 introduction to THE PICAXE SYSTEM revolution copyright 2001-12 Revolution Education Lt : INTRODUCTION TO THEPICAXE SYSTEMA PIC microcontroller is oftendescribed as a computer-on-a-chip .It is an integrated circuit that containsmemory, processing units, and input/outputcircuitry in a single are purchased blank and then programmed with a specific controlprogram. Once programmed the microcontroller is build into a product to make theproduct more intelligent and easier to an example, a microwave oven may use a single microcontroller toprocess information from the keypad, display user information onthe seven segment display, and control the output devices(turntable motor, light, bell and magnetron).One microcontroller can often replace a number ofseparate parts, or even a complete electronic of the advantages of using microcontrollers in aproduct design are: increased reliability through a smaller part count reduced stock levels, as one microcontroller replacesseveral parts simplified product assembly and smaller end products greater product flexibility and adaptability since features are programmedinto the microcontroller and not built into the electronic hardware rapid product changes or development by changing the program and not theelectronic hardwareApplications that use microcontrollers include household appliances, alarm systems,medical equipment, vehicle subsystems, and electronic instrumentation.
2 Some moderncars contain over thirty microcontrollers - used in a range of subsystems from enginemanagement to remote locking!In industry microcontrollers are usually programmed using the assembler or C programming languages. However the complexity of these languages means that it is notrealistic for younger students to be able to successfully use these languages within KS3 or4 TO THE PICAXE SYSTEM revolution copyright 2001-12 Revolution Education Lt : PICAXE SYSTEMThe PICAXE SYSTEM is an easy-to-program microcontroller SYSTEM that uses a simpleBASIC language, which most students can learn very quickly. The PICAXE systemexploits the unique characteristics of the new generation of low-cost FLASH memorybased microcontrollers. These microcontrollers can be programmed over and over againwithout the need for an expensive PIC power of the PICAXE SYSTEM is its simplicity. No programmer, eraseror complicated electronic SYSTEM is required - the microcontroller is programmed (with asimple BASIC program or flowchart) via a 3-wire connection to the computers serialport.
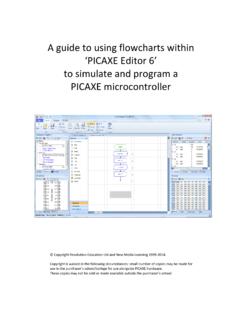
3 The operational PICAXE circuit uses just 3 components and can be easilyconstructed on a prototyping breadboard, strip-board or PCB main features of the PICAXE SYSTEM are as follows: low-cost, simple to construct circuit multiple inputs, outputs and analogue channels rapid download via USB cable free, easy to use Programming Editor software simple to learn BASIC language extensive free manuals and online support forum 3 INTRODUCTION TO THE PICAXE SYSTEM revolution copyright 2001-12 Revolution Education Lt : 1 THE PICAXE SYSTEMThe PICAXE SYSTEM consists of three main components:The Programming Editor softwareThis software runs on a computer and allows you to use the computer keyboard to typein programs in a simple BASIC language. Programs can also be generated by drawingflowcharts. Alternately the Logicator software may be used to simulate completeelectronic circuits, programmed via AXE027 USB CableThis is the cable that connects the computer to the PICAXE SYSTEM .
4 The cable onlyneeds to be connected when downloading programs. It does not have to be connectedwhen the PICAXE is running because the program is permanently stored on thePICAXE chip even when the power supply is removed!Power SupplyUse battery packs (3xAA cell = isrecommended) or a regulated 5V DC powersupply PICAXE chip and boardThe PICAXE microcontroller chip runs program that have been downloaded to the chip needs to be mounted onan electronic board that provide connectionto the microcontroller electronic board can be designed by theuser on a piece of stripboard or printedcircuit board, or a pre-made interface or tutorial board may be used for speed andconvenience. This course presumes use of a PICAXE -18M2 (18 pin) microcontrollermounted on the tutorial - Programming the program on the computer using the Programming Editor the download cable from the computer to the the battery pack to the the Programming Editor software to download the program.
5 The downloadcable can then be removed after the program will start running on the PICAXE automatically. However the program canalso be restarted at any time by pressing the reset switch. !" # $ %&'() 4 INTRODUCTION TO THE PICAXE SYSTEM revolution copyright 2001-12 Revolution Education Lt : BoardsThree main types of PICAXE18 project / tutorial boards are availableTutorial Board (AXE049)This is a tutorial board containing switches, sensors, a seven segment display andoutput drivers. This is the board described in these Project Board (CHI030)This is a project board that provides 8 digital (on/off) outputs via a darlington Power Project Board (CHI035)This is a project that provides 4 digital outputs (via FET drivers) and 2 reversible motoroutputs. # $# *+,+ -.*+,+ - # !" # $ %&'() 5 INTRODUCTION TO THE PICAXE SYSTEM revolution copyright 2001-12 Revolution Education Lt : the Tutorial BoardAs supplied new, the tutorial board requires the battery clip to be connected BoxLocate the battery clip, and fold the bare wire back over the insulation on each the red wire in the socket marked V+ and the black wire in the socket marked 0V.
6 Tighten the screw so that the insulation and bare wire are both trapped in thesocket this provides a stronger joint than just trapping the bare use the battery box (3 AA cells required) with the tutorial board. DO NOTuse a 9V PP3 ResistThe tutorial board is manufactured using a wave soldering technique. To prevent soldersticking to the spare holes (for optional components) a peelable solder resist layer isprinted on the base of the board. This peelable resist must be peeled off before theoptional components may be soldered in TO THE PICAXE SYSTEM revolution copyright 2001-12 Revolution Education Lt : a Sample ProgramThe following program switches output 7 on and off every second. When youdownload this program the decimal point on the seven segment display on thetutorial board should flash on and off every :high 1000low 1000goto mainThis program uses the high and low commands to control output pin 7, and uses thepause command to make a delay (1000 ms = 1 second).
7 The last goto main command makes the program jump back to the label main: at thestart of the program. This means the program loops forever. Note that the first time thelabel is used it must be followed by the colon (:) symbol. This tells the computer theword is a new the PICAXE cable to the computer serial port. Note which port it isconnected the Programming Editor View>Options to select the Options screen (this may automatically appear). on the Mode tab and select on the Serial Port tab and select the serial port that the PICAXE cable isconnected to. Click OK in the following program:main:high 1000low 1000goto main(NB note the colon (:) directly after the label main and the spaces between thecommands and numbers) sure the PICAXE circuit is connected to the serial cable, and that the batteriesare connected ( recommended). PICAXE >Run. A download bar should appear as the program the download is complete the program should start running automatically the decimal point LED on output 7 should flash on and off every TO THE PICAXE SYSTEM revolution copyright 2001-12 Revolution Education Lt : Software InstructionsToolbar short-cuts:To download/run a the download cable is connected to the PICAXE and the computer s that the power supply / battery is connected to the sure the Programming Editor software is in the correct mode (look for PICAXE -18 in the statusbar at the bottom left of the screen).
8 Run (or the toolbar icon)To save a File - Save (or the toolbar icon) in a <OK>To open a saved File - (or the toolbar icon) a filename from the list by clicking on <OK>To start a new File - NewTo print a File - (or the toolbar icon) you want each program line printed to have a number, make sure the Print LineNumbers box is <OK>8 INTRODUCTION TO THE PICAXE SYSTEM revolution copyright 2001-12 Revolution Education Lt : 2 - USING SYMBOLSS ometimes it can be hard to remember which pins are connected to which devices. The symbol command can then be used at the start of a program to rename the inputs andoutputs. Note this program assumes connection of an external buzzer to output pin dp = 7 rename output7 dp (decimal point)symbol buzzer = 1 rename output1 buzzer main: make a label called main high dp LED onlow buzzer buzzer offwait 1 wait 1 secondlow dp LED offhigh buzzer buzzer onwait 1 wait 1 secondgoto main jump back to the startRemember that comments (an explanation after the apostrophe ( ) symbol) can makeeach line of a program much easier to understand.
9 These comments are ignored by thecomputer when it downloads a program to the PICAXEA label ( main: in the program above) can be any word (apart from keywords such as switch ), but must begin with a letter. When the label is first defined it must end with acolon (:). The colon tells the computer that the word is a new program uses the wait command. The commands wait and pause both create timedelays. However wait can only be used with whole seconds, pause can be used forshorter time delays (measured in milliseconds (1000th of a second)).Wait can be followed by a number between 1 and can be followed by a number between 1 and is also a good programming technique to use tabs (or spaces) at the start of lineswithout labels so that all the commands are neatly aligned. The term white-space isused by programmers to define tabs, spaces and blank lines, and the correct use of white-space can make the program listing much easier to read and :Some early BASIC languages used line numbers rather than labels for goto commands.
10 Unfortunately this line number SYSTEM can be inconvenient to use, becauseif you modify your program by later adding, or removing, lines of code you then have tomodify all the line numbers within the goto commands accordingly. The label SYSTEM ,as used in most modern BASIC languages, overcomes this problem TO THE PICAXE SYSTEM revolution copyright 2001-12 Revolution Education Lt : brain of the PICAXE SYSTEM is the 18 pin PICAXE18M2 microcontroller. Althoughmicrocontrollers are relatively cheap (some microcontrollers cost less than 1)microcontrollers are very complex devices containing many thousands of transistors,resistors and other electronic PICAXE microcontroller stores it s program in non-volatile FLASH memory. Thismeans it does not loose the program when the power is removed from the circuit whenthe battery is re-connected the program will start again. However when you wish toreprogram the PICAXE a new program can be downloaded this erases the old programand writes the new program into the memory.