Transcription of DAQ Getting Started Guide (Multilingual)
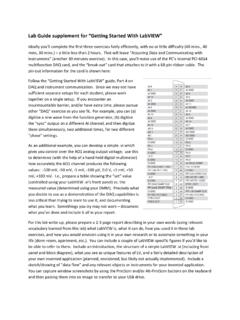
1 DAQ Getting Started Guide This document contains English, French, German, Japanese, and Korean language instructions. Ce document contient des instructions en anglais, fran ais, allemand, japonais et cor en. Dieses Dokument ist mehrsprachig und enth lt einen englischen, franz sischen, deutschen, japanischen und koreanischen Teil. This Guide describes how to install and configure the NI-DAQmx driver software for Windows and your NI data acquisition (DAQ) device, and confirm the device is operating properly. For Linux installation instructions, refer to the NI-DAQmx for Linux Readme, available at For instructions on configuring Traditional NI-DAQ (Legacy), refer to the Traditional NI-DAQ (Legacy). Readme, accessible from Start All Programs National Instruments NI-DAQ after you have installed the software.
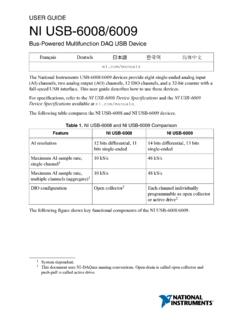
2 NI-DAQ Software National Instruments measurement devices, such as the M Series multifunction I/O (MIO) DAQ devices, are packaged with NI-DAQ driver software, an extensive library of VIs, ANSI C, and .NET functions you can call from your application software, such as NI LabVIEW, NI LabWindows /CVI , Microsoft Visual Studio .NET, or NI LabVIEW SignalExpress to program your NI device. Driver software has an application programming interface (API), which is a library of VIs, functions, classes, attributes, and properties for creating applications for your device. With NI-DAQ and later, there are two NI-DAQ drivers, each with its own APIs and configuration. NI-DAQmx is the latest NI-DAQ driver with advantages over Traditional NI-DAQ (Legacy). DAQ Assistant a graphical way to configure virtual channels and measurement tasks for your device, and to generate NI-DAQmx code based on your virtual channels and tasks, for use in LabVIEW, LabWindows/CVI, Measurement Studio, VI Logger, LabVIEW SignalExpress, and Measurement & Automation Explorer (MAX).
3 Increased performance, including faster single-point analog I/O and multithreading NI-DAQmx simulation for most supported devices for testing and modifying applications without plugging in hardware; refer to the NI-DAQ Readme for NI-DAQmx-supported devices that do not have NI-DAQmx simulated device capability Simpler, more intuitive APIs for creating DAQ applications using fewer functions and VIs than earlier versions of NI-DAQ. Traditional NI-DAQ (Legacy) is an older driver with outdated APIs for developing data acquisition, instrumentation, and control applications for older National Instruments DAQ devices. You should use Traditional NI-DAQ (Legacy) only in certain circumstances. Refer to the NI-DAQ Readme for more information about when to use Traditional NI-DAQ (Legacy), including a complete list of supported devices, operating systems, and application software and language versions.
4 If you must use Traditional NI-DAQ (Legacy), it is available at Step 1. Install Application Software Install your NI application software. NI-DAQmx is supported in LabVIEW, LabWindows/CVI, and Measurement Studio versions or later, LabVIEW SignalExpress or later, or the LabVIEW. Real-Time Module or later. If you have an existing application written with an earlier version of your application software or NI-DAQ, make a backup copy of the application. You then can upgrade your software and modify the application. Step 2. Install NI-DAQ. Install your driver software before installing new hardware devices so Windows can detect your device. Do not install NI-DAQ if your existing applications include unsupported components, which are listed in the NI-DAQ Readme. Caution NI-DAQ or later cannot exist on the same system with versions of NI-DAQ previous to version 1.
5 Insert CD 1. The NI-DAQ installer should open automatically. If not, select Start Run. Enter x:\ , where x is the letter of the CD drive. For troubleshooting instructions, refer to the Hardware Installation/Configuration Troubleshooter at 2. Install the software. Install Software copies the software and/or documentation files onto your hard drive. NI-DAQ software documentation is installed when you install the driver software. View Readme File opens the readme file. Browse CD opens the device documentation so that you can find, view, and print documents without installing them. The NI-DAQ installer detects the NI software installed on the system and automatically selects the latest versions of the driver, application software, and language support files from the CDs. Verify that the installer detected and selected the correct support files and version number.
6 If you install NI application software after installing NI-DAQ, you must run the NI-DAQ installer again to install the correct application software support. 3. Follow the prompts. Windows Vista users may see access and security messages during installation. Accept the prompts to complete the installation. 4. As the NI-DAQ installer completes, several dialog boxes are displayed. Click Next to complete the installation. 5. The last dialog box opens with the following options. Restart Later to install more NI software or documentation. Install online documentation for supported devices and accessories, including PDF and help files describing device terminals, specifications, features, and operation. Insert the Device Documentation CD 2 and open the installer screen. Select Install Device Documentation.
7 If you are using a MXI-3 link from a PC to control a PXI chassis, exit and install the MXI-3 software, available at , before using the DAQ device. Shut Down or Restart if you are ready to install your device. Restart if you are using a system running the LabVIEW Real-Time Module. Download NI-DAQ to the target using MAX. Refer to the Measurement & Automation Explorer Remote Systems Help by selecting Help Help Topics Remote Systems in MAX. DAQ Getting Started Guide 2 Step 3. Unpack the Devices, Accessories, and Cables Remove the device from the package and inspect the device for loose components or any sign of damage. Notify NI if the device appears damaged in any way. Do not install a damaged device. For safety and compliance information, refer to the device documentation, available at manuals or accessible from Start All Programs National Instruments NI-DAQ Browse Device Documentation after you install it.
8 The following symbols may be on your device. This icon denotes a caution, which advises you of precautions to take to avoid injury, data loss, or a system crash. When this symbol is marked on the device, refer to the Read Me First: Safety and Radio-Frequency Interference document, shipped with the device, for precautions to take. When this symbol is marked on a product, it denotes a warning advising you to take precautions to avoid electrical shock. When this symbol is marked on a product, it denotes a component that may be hot. Touching this component may result in bodily injury. Step 4. Install the Devices, Accessories, and Cables If you have more than one DAQ device to install, install them all now using the following procedure for your device type. If your system includes SCXI modules to connect to DAQ devices, first install the DAQ components.
9 Caution Follow proper ESD precautions to ensure you are grounded before installing hardware. Refer to your device specifications document for important safety and compliance information. You can test NI-DAQmx applications without installing hardware by using an NI-DAQmx simulated device. Refer to the Measurement & Automation Explorer Help for NI-DAQmx by selecting Help Help Topics NI-DAQmx in MAX for instructions on creating NI-DAQmx simulated devices and importing NI-DAQmx simulated device configurations to physical devices. CompactDAQ. Complete the following steps to install a C Series I/O module: 1. Power off the CompactDAQ chassis. 2. If you are not using any mounting accessories, attach the provided rubber standoffs to the back of the CompactDAQ chassis. Attach a ring lug to a 14 AWG ( mm) wire.
10 Connect the ring lug to the ground terminal on the side of the chassis using the ground screw. Attach the other end of the wire to the system safety ground. Additionally, attach a wire with a ring lug to all other C Series I/O module cable shields. You must connect this wire to the ground terminal of the chassis using the ground screw. Caution If hazardous voltages are present, special safety guidelines apply. Refer to the C Series module user Guide before continuing. Hazardous voltage is a voltage greater than V or 60 VDC. to earth ground. 3. Squeeze both C Series I/O module latches, insert the I/O module into an empty module slot, and press until both latches lock the module in place. Refer to the C Series I/O module user Guide for more information, such as signal connections, safety precautions, and module ratings.