Transcription of Atomic Alarm Clock - AcuRite
1 Atomic Alarm Clock Instruction Manual CONTENTS Unpacking Instructions .. 2 Package Contents .. 2 Product Registration .. 2 Features & 3 Clock 4 Atomic Clock .. 5 Set the Time & Date .. 5 Placement Guidelines .. 6 Using the Alarm 7 Troubleshooting .. 8 Care & 9 9 FCC Information .. 9 Customer Support ..10 models 13131A3 / 13131W2 / 75065 Questions? Contact Customer Support at (877) 221-1252 or visit SAVE THIS MANUAL FOR FUTURE REFERENCE. Archived Products Congratulations on your new AcuRite product. To ensure the best possible product performance, please read this manual in its entirety and retain it for future reference. Unpacking Instructions Remove the protective film that is applied to the LCD screen prior to using this product. Locate the tab and peel off to remove.
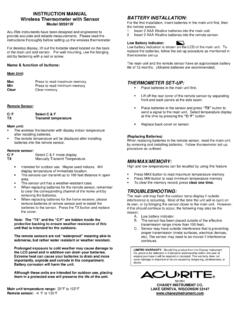
2 Package Contents 1. Alarm Clock 2. Instruction Manual IMPORTANT PRODUCT MUST BE REGISTERED TO RECEIVE WARRANTY SERVICE PRODUCT REGISTRATION Register online to receive 1 year warranty protection Register a Product 2 9 Features & Benefits 21 10 FRONT 1. SNOOZE/LIGHT Button 2. Atomic Clock 3 Sets itself to the correct 4time and automatically updates for Daylight 5 Saving Time. 3. AM/PM Indicator 4. Time Zone Indicator 5. " Alarm ON" Indicator Icon 6. Date 7. Day of the Week 8. Current Indoor Temperature 9. Menu Selection 10. Atomic Signal Strength 11 12 13 14 67 8 SIDE/BOTTOM 11. SET Clock Button 12. Button For setup preferences. 13. Button For setup preferences. 14. Alarm ON/OFF Button 15. C/ F Button Press to select C or F temperature units. 16. RESET Button Full reset to factory defaults.
3 17. Battery Compartment Cover 15 16 17 3 SETUP Clock Setup Install or Replace Batteries 1. Remove the battery compartment cover. 2. Insert 3 x AA alkaline batteries into the battery compartment, as shown. Follow the polarity (+/-) diagram in the battery compartment. 3. Replace the battery cover. Install or Replace Batteries 3 AA alkaline batteries PLEASE DISPOSE OF OLD OR DEFECTIVE BATTERIES IN AN ENVIRONMENTALLY SAFE WAY AND IN ACCORDANCE WITH YOUR LOCAL LAWS AND REGULATIONS. BATTERY SAFETY: Clean the battery contacts and also those of the device prior to battery installation. Remove batteries from equipment which is not to be used for an extended period of time. Follow the polarity (+/-) diagram in the battery compartment. Promptly remove dead batteries from the device. Dispose of used batteries properly.
4 Only batteries of the same or equivalent type as recommended are to be used. DO NOT incinerate used batteries. DO NOT dispose of batteries in fre, as batteries may explode or leak. DO NOT mix old and new batteries or types of batteries (alkaline/standard). DO NOT use rechargeable batteries. DO NOT recharge non-rechargeable batteries. DO NOT short-circuit the supply terminals. 4 Atomic Clock (RCC) AcuRite Atomic clocks use a radio-controlled signal (RCC) to synchronize to the correct time broadcast by the National Institute of Standards and Technology (NIST) Radio Station WWVB, located near Fort Collins, Colorado. WWVB broadcasts the current time and date with split-second accuracy. The Atomic Clock and calendar will maintain the correct time and date, and automatically update for Daylight Saving Time to provide the most accurate timekeeping standard possible.
5 Please note: Signal reception is normally better at night and when the weather is clear. The Atomic signal generally takes a few hours to synchronize, so it is important to manually set the time and date after powering on the Clock . Set the Time & Date Press and hold the SET Clock button, located on the side of the Clock , to enter SET MODE. Once in SET MODE the preference you are currently setting will blink on the Clock . To adjust the currently selected (flashing) item, press and release the or buttons (press and HOLD to fast adjust). To save your adjustments, press and release the SET Clock button to adjust the next preference. The preference set order is as follows: TIME ZONE (PST MST CST EST) AUTO DST ON/OFF* CALENDAR YEAR CALENDAR MONTH CALENDAR DATE Clock HOUR Clock MINUTE You will automatically exit SET MODE if no buttons are pressed for 45 seconds.
6 Enter SET MODE at any time by pressing AND HOLDING the SET Clock button. *If you live in an area that observes Daylight Saving Time, DST should be set to ON, even if it is not currently Daylight Saving Time. 5 Alarm Clock Placement Place Alarm Clock in a dry area free of dirt and dust. To help ensure an accurate indoor temperature measurement, be sure to place the Clock away from heat sources or vents. Important Placement Guidelines To ensure accurate temperature measurement, place out of direct sunlight and away from any heat sources or vents. To maximize Atomic signal reception, place unit away from large metallic items, thick walls, metal surfaces, or other objects that may limit radio communication. To prevent wireless interference, place unit at least 3 ft (.9 m) away from electronic devices (TV, computer, microwave, radio, etc.)
7 6 OPERATIONU sing the Clock Set the Alarm Time Press AND HOLD the Alarm ON/OFF button for 5 seconds to enter Alarm SET MODE. To adjust the currently selected (flashing) item, press and release the or buttons (press and HOLD to fast adjust). To save your adjustments, press and release the Alarm ON/OFF button to adjust the next preference. The preference set order is as follows: Alarm Clock HOUR Alarm Clock MINUTE You will automatically exit Alarm SET MODE if no buttons are pressed for 60 seconds. Enter Alarm SET MODE at any time by pressing and holding the Alarm ON/OFF button for 5 seconds. Alarm Clock ON/OFF function To Turn Alarm on: Press and release the Alarm ON/OFF button until the icon and the words Alarm ON appear on the Clock To Turn Alarm off: Press and release the Alarm ON/OFF button.
8 The icon will disappear and the words Alarm OFF will appear on the Clock . SNOOZE function When the Alarm is sounding, press the "SNOOZE/LIGHT" button to activate the SNOOZE function for 8 minutes. There is no limit to the amount of times the SNOOZE function can be activated. Momentary Backlight Press the "SNOOZE/LIGHT" button to activate the momentary backlight for 5 seconds. 7 Troubleshooting Clock is too dark, hard to read or doesn t work Verify that the batteries are installed correctly. Batteries may need to be replaced. The optimum viewing angle for this product is from slightly above it. Reset the unit by pressing the reset button, located in the battery compartment. This resets the Alarm to the original factory settings. Time and date will need to be entered after a reset.
9 Inaccurate temperature Verify the Clock is placed out of direct sunlight and away from any heat sources or vents (see page 6). Atomic signal or time syncing problems For additional troubleshooting, please visit: If your AcuRite product does not operate properly after trying the troubleshooting steps, visit or call (877) 221-1252 for assistance. 8 Care & Maintenance Clock Care Clean with a soft, damp cloth. Do not use caustic cleaners or abrasives. Keep away from dust, dirt and moisture. Clean ventilation ports regularly with a gentle puff of air. Specifications TEMPERATURE RANGE 32 F to 99 F, 0 C to 37 C POWER 3 x AA alkaline batteries FCC Information This device complies with part 15 of FCC rules. Operation is subject to the following two conditions:1- This device may NOT cause harmful interference, and2- This device must accept any interference received, including interference that may cause undesired : Changes or modifications to this unit not expressly approved by the party responsible for compliance could void the user s authority to operate the : This equipment has been tested and found to comply with the limits for a Class B digital device, pursuant to Part 15 of the FCC rules.
10 These limits are designed to provide reasonable protection against harmful interference in a residential installation. This equip-ment generates, uses and can radiate radio frequency energy and, if not installed and used in accordance with the instructions, may cause harmful interference to radio communications. However, there is no guarantee that interference will not occur in a particular installation. If this equipment does cause harmful interference to radio or television reception, which can be determined by turning the equipment off and on, the user is encouraged to try to correct the interference by one or more of the following measures: Reorient or relocate the receiving antenna. Increase the separation between the equipment and the receiver. Connect the equipment into an outlet on a circuit different from that to which the receiver is connected.