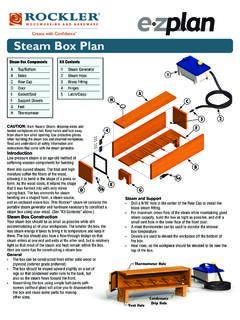
Transcription of BUILD IT WITH PROJECT PLAN OUTFEED TABLE
1 OUTFEED TABLEBUILD IT WITHROCKLERPROJECT PLANBUILDQUESTIONS? Go to or call 800-279-4441An OUTFEED TABLE for your TABLE saw is a great upgrade, and this design provides mobility, storage and worktop space!Stock # Item20054 4' Universal T-Track (2)22209 T-Track Intersection Kit57302 JIG IT Universal Drawer Slide Jig48022 18" Drawer Slides (4)57987 Auto-Adjust Jig Clamp32991 JIG IT Shelving Jig w/Bit Set33860 Nickel Shelf SupportsStock # Item 38865 3" Caster Set (2)81239 HD Lifting Leveler (2)34807 Hinges (1 pack)52127 Pulls (4)56737 Knob (1)59544 3/4" x 24" x 60" Baltic Birch Plywood (2)
2 Plywood and lumber for case and drawersAll items subject to changes in TABLE | PAGE 2 OUTFEED TABLE PARTSMATERIAL LISTT x W x L1 Cabinet Sides (2) 3/4" x 19" x 27"2 Cabinet Top and Bottom (2) 3/4" x 19" x 531 4"3 Vertical Divider (1) 3/4" x 181 2" x 261 4"4 Back Panel (1) 1/2" x 261 4" x 531 4"5 Side Edge Banding (2) 3/4" x 3/4" x 27"6 Top, Bottom 3/4" x 3/4" x 521 2" Edge Banding (2)7 Divider Edge Banding (1) 3/4" x 3/4" x 251 2"8 Leveler Support Brackets (6) 3/4" x 37 8" x 5"9 Leveler Support Braces (12) 3/4" x 37 8" x 41 2"10 Shelf (1) 3/4" x 171 2" x 191 2"11 Shelf Edge Banding (1) 3/4" x 3/4" x 191 2"12 Top Drawer Sides (2) 1/2" x 4" x 173 4"13 Top Drawer Front 1/2" x 4" x 31" and Back (2)14 Second Drawer Sides (2) 1/2" x 41 4" x 173 4"15 Second Drawer Front 1/2" x 41 4" x 31" and Back (2)16 Third Drawer Sides (2) 1/2" x 61 2" x 173 4"17 Third Drawer Front 1/2" x 61 2" x 31" and Back (2)18 Bottom Drawer Sides (2) 1/2" x 81 2" x 173 4"19 Bottom Drawer Front 1/2" x 81 2" x 31" and Back (2)20 Drawer Bottoms (4)
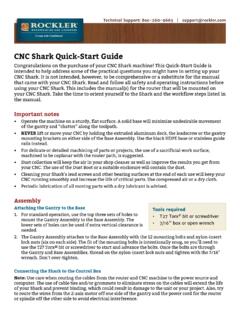
3 1/2" x 173 4" x 301 2"21 Top Drawer Face (1) 3/4" x 41 4" x 313 4"22 Second Drawer Face (1) 3/4" x 43 4" x 313 4"23 Third Drawer Face (1) 3/4" x 63 4" x 313 4"24 Bottom Drawer Face (1) 3/4" x 83 4" x 313 4"25 Door Stiles (2) 3/4" x 3" x 251 4"26 Door Rails (2) 3/4" x 3" x 14"27 Door Center Stile (1) 3/4" x 21 8" x 20"28 Door Panels (2) 1/2" x 61 8" x 197 8"29 Plywood Top (2) 3/4" x 24" x 60"T x W x L111022345566789111818192024252526292627 2828 Exploded ViewOUTFEED TABLE | PAGE 31. MAKE THE CABINET CASEA. Cut the cabinet sides to size.
4 Then cut 3/4" wide x 3/8" deep rabbets in the outside edges of the top and bottom. These rabbets will receive the Cut a 3/4" wide x 3/8" deep dado in the top and bottom to receive the vertical Glue, assemble and clamp the case. If desired, use mechanical fastenersB. Cut a 1/2" wide x 3/8" deep rabbet for the 1/2" back panel along the back edges of the top, bottom and DRILL SHELF PIN HOLESUse the Rockler JIG IT Shelving Jig with Self-Centering Bit to drill shelf pin holes in the left side panel and center divider. These shelf pins will support the adjustable shelf, which will go in the left cavity.
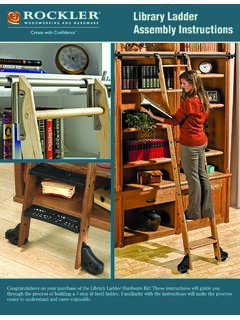
5 1110223455667891112131415161718192021222 32425 Rockler JIG IT Shelving Jig and 1/4" Bit Set 32991 OUTFEED TABLE | PAGE 4d d 3. ADD STABILITY AND MOBILITY4. BUILD THE DRAWERSA ssemble the risers for the leveling feet and glue them to the bottom of the case. Attach the leveling feet to the risers with screws. Casters can also be installed to the underside, but make sure that the locking tab clears the leveling foot s Support Brace and Bracket(Front View)Drawer Front and Back (Top and Front View)Note: The overall dimensions vary according to drawer.
6 Be sure to follow dimensions in the Material of Cabinet (Bottom View)Drawer slide locations1102345567891112131415161718192 021222324253/4"3/4"5/8"3/4"115/16"11/2"1 5/16"3/4"3/8" deep3/8" deep1/2"10234567111226141516171319202122 2324253/4"3/4"3/4"115/16"Flush to back edgeFlush to back edge of Edge BandingPosition the two center #8 s under the Vertical Divider1/8"1/2"1/4"3/8"75/16"31/4"21/2"2 01/8"1/8"891/2"1/4"1/2"Drawer slide locations1102345567891112131415161718192 021222324253/4"3/4"5/8"3/4"115/16"11/2"1 5/16"3/4"3/8" deep3/8" deep1/2"10234567111226141516171319202122 2324253/4"3/4"3/4"115/16"Flush
7 To back edgeFlush to back edge of Edge BandingPosition the two center #8 s under the Vertical Divider1/8"1/2"1/4"3/8"75/16"31/4"21/2"2 01/8"1/8"891/2"1/4"1/2"Drawer slide locations1102345567891112131415161718192 021222324253/4"3/4"5/8"3/4"115/16"11/2"1 5/16"3/4"3/8" deep3/8" deep1/2"10234567111226141516171319202122 2324253/4"3/4"3/4"115/16"Flush to back edgeFlush to back edge of Edge BandingPosition the two center #8 s under the Vertical Divider1/8"1/2"1/4"3/8"75/16"31/4"21/2"2 01/8"1/8"891/2"1/4"1/2"A. Cut a 1/2" wide x 1/4" deep rabbet on both ends of the drawer fronts and backs.
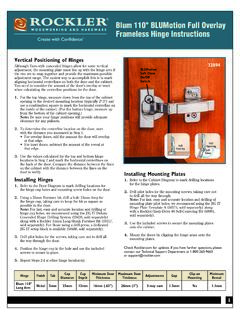
8 These rabbets will receive the drawer a " wide x " deep rabbet on the bottom edge of the drawer fronts, backs and sides to receive the drawer bottoms. Apply glue to all rabbets and assemble and clamp the drawers. Measure the diagonals to ensure the assemblies are Drawer Exploded ViewOUTFEED TABLE | PAGE 5d d 5. INSTALL THE DRAWER SLIDES6. MAKE THE DOORA. Cut grooves in the inside edge of the door rails, inside edge of the outside stiles, and both long edges of the center stile. Then spin the pieces end for end and make a second pass to center the grooves.
9 Test the fit of the plywood panel. Move the fence slightly closer to the dado stack if the groove needs to be wider. The doors feature frame-and-panel construction. The 1/2" plywood panels should fit snuggly in the grooves that capture the panels. These grooves are cut to the correct width and centered by using a dado stack that is not as wide as the panel and running each piece twice, spinning the stock end for end after each pass. Install a 3/8" wide dado stack, set the height to 1/4", and set the fence 3/16" away from the edge of the dado the drawer slides.
10 In the case, use the Rockler Universal Drawer Slide Jig to position each slide in the correct location and hold it in place while driving the JIG IT Universal Drawer Slide Jig57302 Rockler 6" Auto-Adjust Jig Clamp57987 Door Rail(Front View)Door Exploded ViewDrawer slide locations1102345567891112131415161718192 021222324253/4"3/4"5/8"3/4"115/16"11/2"1 5/16"3/4"3/8" deep3/8" deep1/2"10234567111226141516171319202122 2324253/4"3/4"3/4"115/16"Flush to back edgeFlush to back edge of Edge BandingPosition the two center #8 s under the Vertical Divider1/8"1/2"1/4"3/8"75/16"31/4"21/2"2 01/8"1/8"891/2"1/4"1/2"11023456789111212 1313141516171819202122232425252626272828 OUTFEED TABLE | PAGE 6d 6.