Transcription of CLOSER TO REALITY - Saitek
1 CLOSER TO REALITYWITH Saitek S PRO FLIGHT RANGEYOUR COMPLETE COCKPIT SOLUTION // FIPDIGITAL LCD DISPLAYPERFECT CONTROLSYOKE SYSTEMAND QUADRANTBIPBACKLIT INFORMATION PANELENGLISHINTRODUCTION 4 INSTALLATION 5 TROUBLESHOOTING 6 FRAN AISD MARRAGE 9 INSTALLATION 10D PANNAGE 11 DEUTSCHERSTE SCHRITTE 15 INSTALLATION
2 16 FEHLERBEHEBUNG 17 ITALIANOAVVIO 20 INSTALLAZIONE 21 RISOLUZIONE PROBLEMI 22 ESPA OLPRIMEROS PASOS 25 INSTALACI N 26 RESOLUCI N DE PROBLEMAS 27
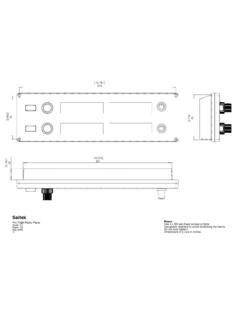
3 INTRODUCTIONThe switch Panel features realistic switches and controls which interact in real time with Microsoft Flight Simulator X to make your flying experiences more capot (pour les appareils h lices)Triebwerksverkleidung ffnen/schlie en (Propellerflugzeug)Apertura/chiusura cofano (per aerei a elica)Cubierta abierta/cerrada (para aviones de h lices)ENGINE START/STOP FUNCTIONSF onctions Moteur d marrer/arr terFunktionen zum Starten/Stoppen des TriebwerksFunzioni start/stop motoreFunciones de iniciar/parar el motorCOWL OPEN/CLOSE (FOR PROP AIRCRAFT)MISC BATTERY, COCKPIT AND DE-ICE FUNCTIONSF onctions batterie divers, cockpit et d givrageVerschiedene Batterie-, Cockpit- und EnteisungsfunktionenFunzioni Misc battery, cruscotto ed eliminazione ghiaccioFunciones varias de bater a, cabina del piloto y descongelaci nLIGHT SYSTEMS ON/OFFSyst me d' clairage on/offLichtsysteme ein/ausAccensione/spegnimento luciSistemas de luz encendidos/apagadosGEAR UP/DOWN AND LED INDICATORV itesse plus/moins et DIODE d'indicationGang hoch-/herunterschalten und LED-AnzeigeCarrello su/gi e indicatore LEDM archa arriba/abajo e indicador LED (diodo emisor de luz)NLRINSTALLATIONYou can fix the switch Panel to your desk using the velcro strips.
4 If you already own a Saitek Pro Flight Yoke System, you can also mount the switch Panel on top of the Yoke unit using the screws : To fix the Pro Flight switch Panel to the Pro Flight Yoke System, first remove the switch Panel from the mounting bracket, screw the bracket to the top of the Yoke System and then re-attach the switch Panel to the front of the the switch Panel s USB cable into one or your PC s free USB ports (or Saitek Pro Flight Yoke USB hub).INSTALLATION FOR WINDOWS 8, , 7, AND VISTA. INCLUDES ALL 32- AND 64-BIT VERSIONSIMPORTANT: PLEASE INSTALL DRIVERS BEFORE INSTALLING SOFTWAREDRIVER INSTALLATION1. Visit to download the latest drivers and software for your operating system. 2. With device disconnected, follow the onscreen instructions to complete the installation. 3. At the Driver Setup screen, only when prompted, insert USB cable into one of your computer s USB ports, then click INSTALLATION1.
5 In the Software Setup screen, click Next and a pop-up box will ask if you want to trust software 5 ENGLISH123 from Saitek . Click yes, then click After installation, you have the option to Run Profile Editor, which will show you the programming environment. To skip the Profile Editor now, uncheck the box and click Finish to complete you have installed the switch Panel software, the switch Panel buttons and controls should be automatically configured to control their functions in FSX software. If your FSX software does not recognise the switch Panel, unplug the USB cable and plug it back FSX appears not to load, this is because it is waiting for a prompt. To view the prompt window, select it either by pressing Alt + tab or by clicking on the prompt on the Windows Taskbar. The prompt reads Microsoft Flight Simulator security warning : will happen once after install. Click Run and when asked would you like to designate this module?
6 , click yes and FSX will continue to Pro Flight switch Panel will not register automatically if you have installed the Pro Flight switch Panel before installing FSX. To register the Pro Flight switch Panel with FSX, click on the Launch the Flightsim X plugin manually icon to re-run the LIMITED WARRANTYMad Catz warrants this product to be free from defects in materials and workmanship for the warranty period. This non-transferable, two- (2) year limited warranty is only to you, the first end-user purchaser. If a defect covered by this warranty occurs AND you provide proof of purchase, Mad Catz, at its option, will repair or replace the product at no Mad Catz two- (2) year limited warranty is available to North American and European customers. Your sole and exclusive remedy is repair or replacement of your Mad Catz product. In no event shall Mad Catz liability exceed the original purchase price of the product.
7 This warranty does not apply to: (a) normal wear and tear or abusive use; (b) industrial, professional or commercial use; (c) if the product has been tampered with or AMERICA AND EUROPETo receive warranty service, you must:1. Obtain a Return Authorization Number from Mad Catz Technical Support via ONE of the following methods:6a. Submit a Ticket at Call the Mad Catz Tech Support Center nearest you: - North America: 1-800-659-2287 (USA) or 1-619-683-2815 (outside USA)- United Kingdom: 01633 928072- Europe (outside UK): +44(0) 1633 883110- France: 01 82 88 01 80- Germany: 089-21094818- Spain: 93 181 63 94 Once you have your unique Return Authorization Number, do the following:1. Ship the product to Mad Catz at your expense for Enclose a copy of the original sales receipt showing a purchase Enclose a full return address with daytime and evening phone SUPPORTO nline Support: American telephone, available Monday through Friday (excluding holidays): 1-800-659-2287 (USA only) or 1-619-683-2815 (outside USA).
8 United Kingdom telephone, available Monday through Friday (excluding bank holidays): 01633 telephone (outside UK), available Monday through Friday (excluding bank holidays): +44(0) 1633 & IC WarningThis device complies with part 15 of the FCC Rules and Industry Canada licence-exempt RSS stan-dard (s). Operation is subject to the following two conditions: (1) This device may not cause harmful interference, and (2) this device must accept any interference received, including interference that may cause undesired operation. Any Changes or modifications not expressly approved by the party responsible for compliance could void the user s authority to operate the equipment. FCC Radiation Exposure Statement: This equipment complies with FCC radiation exposure limits set forth for an uncontrolled environment. This transmitter must not be co-located or operating in conjunction with any other antenna or trans-7 ENGLISH mitter.
9 IC RF Exposure Statement:The device meets the exemption from the routine evaluation limits in section of RSS 102 and compliance with RSS-102 RF exposure, users can obtain Canadian information on RF exposure and Industry Canada regulations, this radio transmitter may only operate using an antenna of a type and maximum (or lesser) gain approved for the transmitter by Industry Canada. To reduce potential radio interference to other users, the antenna type and its gain should be so chosen that, the equivalent isotropically radiated power ( ) is not more than that necessary for successful communication. CAUTIONS - Use this unit only as To prevent fire or shock hazard, do not expose this unit to rain or moisture. Do not use within 30 of any water such as swimming pools, bathtubs, or To avoid electrical shock, do not disassemble. Refer servicing to qualified personnel Never insert objects of any kind, other than authorized items, into the product as they may touch dangerous voltage points or short out parts that could result in fire or electrical Stop using this unit immediately if you begin to feel tired or if you experience discomfort or pain in your hands and/or arms while operating the unit.
10 If the condition persists, consult a Do not attempt to operate the unit in any way except with your hands. Do not bring the unit in contact with your head, face, or near the bones of any other part of your Avoid prolonged use of this unit. Take breaks every 30 Route all cords so that they are not likely to be walked on or tripped over. Make sure that cords are not placed in a position or areas where they may become pinched or Do not wrap cords around any part of anyone s Do not allow children to play with This product contains small parts that may cause choking if swallowed. Not intended for use by children under 3 years of age. EU DECLARATION OF CONFORMITY:As required, certain of these products have been tested and conform to the requirements of the European Union Directives 2002/95/EC, 2002/96/EC, and 2004/108/EC. Authorized signatory of the manufacturer is Mad Catz, Inc.

