Transcription of Getting started with your - indianprairielibrary.org
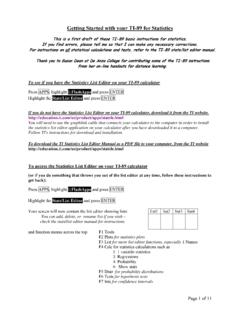
1 Getting started with your Connecting your Silhouette CAMEO. 1 Check Included Items The Silhouette CAMEO comes with the items shown in the following list. Check that all the items have been included before starting. If you are missing any items listed below, please contact Silhouette CAMEO A/C adapter and USB cable electronic cutting tool power cable Silhouette Studio Instructional DVD 12 cutting mat blade with software ratchet cap Take the Silhouette CAMEO from the box and remove the three strips of packing tape and foam support as indicated by the following diagrams. These strips of tape and foam are used to hold the moving parts of the Silhouette in place during shipment. remove tape remove foam 1 Getting started with Silhouette CAMEO. 2 Install the Silhouette Studio Software PC Installation 1. Insert the included Silhouette Studio CD into the CD drive of your computer. 2. Proceed through the installation process by following the on-screen prompts.
2 If the installation window does not automatically appear, browse to the CD drive in My Computer and double-click the program to run it. 3. If a New Hardware Found dialog box appears, follow the recommended instructions to accept your system's installation of the Silhouette driver. Mac Installation 1. Insert the included Silhouette Studio CD into the CD drive of your computer. 2. Drag and drop the Silhouette Studio application icon into the applications folder to install Silhouette Studio . 3 Connect the Silhouette CAMEO. Once the Silhouette Studio software is installed, connect the Silhouette CAMEO to the power supply. Then connect the Silhouette to your computer with the included USB cable as shown in the diagram. 1 2. power Turn the machine on by pressing the power button. If your PC displays a New Hardware Found dialog box, follow the recommended instructions to accept your system's installation of the Silhouette driver. Getting started with Silhouette CAMEO 2.
3 How to Cut with your Silhouette CAMEO. Opening the Silhouette Studio Software Locate the Silhouette Studio icon on the desktop, or in the Start Menu on your PC (in the Applications folder on a Mac ). Double-click the icon to run the application. Once Silhouette Studio has loaded, you will notice a blank 12 x 12 page on your screen. If you would like to change the page dimensions or orientation, you will find the page setup options already opened in a panel on the right-hand side of the screen. To access these page setup options in the future, click the Page Settings button in the options toolbar in the upper right-hand corner of the window. NOTE: To change the measurement units from the system to the metric system, choose File -> Preferences (Silhouette Studio -> Preferences on a Mac ). Under the Measurements section of the preferences dialog box you will find several different units of measure. 3 Getting started with Silhouette CAMEO.
4 Send to Silhouette Zoom In Fill Pattern Line Color Rotate Save to SD Card Print Undo Zoom to Selected Area Fill Gradient Line Style Move Scale Replicate Auto Trace Open Save Paste Redo Zoom Out Drag Zoom Fill Color Cut Style Modify Offset Copy Cut Fit to Window Options Home Text Align Page Tools New Drawing Cut Settings Registration Marks Select Tool Grid Settings Point Edit Tool Line Tool Rectangle Tool Rounded Rectangle Ellipse Tool Page Options Panel Polygon Tool Curved Shape Tool Freehand Tool Text Tool Eraser Tool Knife Tool Drawing Area Library Online Store Show Library Show Library and Drawing Area Group Ungroup Select All Silhouette Studio . Delete Send to Back Offset Color Preference Deselect All Duplicate Bring to Front Weld Getting started with Silhouette CAMEO. 4. Drawing Text To cut letters or words using any font on your computer, choose the text tool from the toolbar on the left-hand side of the screen. with the text tool selected, click anywhere on the page to begin typing.
5 After clicking on the page with the text tool, a blinking cursor will appear. Begin typing any letters/. words/phrases you choose. While you are typing/editing text, the text options panel will appear on the right-hand side of the screen. In this panel you can change the font, text size, weight, justification, character spacing and line spacing. Use the mouse to highlight your text before making adjustments to the font, size, weight, etc. To finish typing your text, click anywhere off the page. This will end the text editing mode and deselect the text. If you need to make a change to the text, double-click the text on the page using the Select Tool (found on the left-hand toolbar). To move your text around the page, click and drag it to a new location. To resize your text, select the text and then click and drag one of the corner control handles. To rotate your text, select the text, then click and drag the green circle displayed above the object.
6 5 Getting started with Silhouette CAMEO. Drawing Simple Shapes Silhouette Studio has built-in functions to draw simple shapes such as circles, squares, rectangles, lines, polygons, and freehand line art. Each of these tools can be found in the toolbar on the left-hand side of the Silhouette Studio window. Lines To draw a line, choose the Line Tool on the left-hand toolbar. Either click and drag with the mouse to draw a line, or click once to start the line and click a second time to end. Hold SHIFT while creating a line to make a perfectly vertical, horizontal, or 45 line. Rectangles/Squares To draw a rectangle, choose the Rectangle Tool from the left-hand toolbar. Either click and drag with the mouse to draw a rectangle, or click once to set one corner and click a second time to set the opposite corner. Hold SHIFT while creating a rectangle to make a perfect square. Hold ALT (OPTION on Mac ) to draw the rectangle from the center instead of one corner.
7 Hold SHIFT + ALT (SHIFT + OPTION on Mac ) to draw a perfect square centered on your original click. Getting started with Silhouette CAMEO 6. Cutting your Design Preparing the Cutting Mat Remove the non-stick liner from the cutting mat. Position your paper or other media on the cutting mat according to the diagram shown in Silhouette Studio . If you don't see an image of the cutting mat under your document on the screen, click the Page Setup button in the options toolbar in the upper right-hand corner of the window. Position your image on the screen where you want it to cut on the mat. Be sure to keep your design within the red margins on your page. 7 Getting started with Silhouette CAMEO. Preparing the Silhouette to Cut Turn the Silhouette CAMEO on by pressing the power button and waiting for the machine to start up. Once it is ready, use the up and down arrow buttons on the Silhouette to scroll through the menu system on the LCD display until you reach the menu selection Load cutting mat.
8 White rollers Feed the cutting mat into the Silhouette by lifting the Silhouette lid, placing the mat centered between the white rollers, and pressing the Enter button (while Load cutting mat is selected on the LCD. display). Adjusting the Rollers for Smaller Media By adjusting the white rollers on the main roller shaft, the Silhouette CAMEO can cut the following media sizes: A4, letter, 12 , 13 . Locate the release lever on the right side and turn it clockwise. Twist the sliding roller so the pinchers are NOT in the notches. Slide the roller to the desired media size and twist again to lock the pinchers into place. Return the release lever to the upright position to lock it in place. Getting started with Silhouette CAMEO 8. Prepare the blade plunger by removing the protective covering and adjusting the blade to the appropriate number setting for the material you plan to cut. Refer to Silhouette Studio for recommended blade settings for different materials.
9 Blade setting Material 1 Thin materials such as vinyl and smooth heat transfer material 2-3 Medium-weight materials such as paper, cardstock and flocked heat transfer material 4-6 Thicker materials such as textured cardstock and pattern papers 7-10 Thick materials such as canvas To adjust the blade setting, place the grey ratchet cap on the end of the blade so the arrow on the cap lines up with the red line on the blade. Turn the ratchet to the desired number. ratchet cap blade numbered blade setting Unlock the blade holder by turning the lock lever counter-clockwise. Place the blade housing in the blade holder and turn the lock lever clockwise to secure the blade. Be sure the blade housing is pressed completely into the holder. blade blade holder loosen fasten lock lever 9 Getting started with Silhouette CAMEO. Cutting Click the Send to Silhouette button on the toolbar at the top of the screen, or choose File -> Send to The Send to Silhouette panel (A) will appear on the right side of the screen and an illustration of the cutting mat will appear beneath your workspace.
10 (A) (B) Cut Settings button Select Change Settings Media Type Cut Page Cut Settings Send to Silhouette Click the change settings link to access the cut settings panel (B). Within the Cut Settings panel, you will notice a list of common media types including various weights of paper, vinyl, and other materials. Choose the appropriate media type from the list. If the media you are cutting (or a similar media) does not appear in the list, you can choose Custom from the list and manually adjust the speed and thickness for the Silhouette. Generally, thicker materials require a higher thickness and intricate designs require a slower cutting speed. Once you have chosen the appropriate cut settings, click the Send to Silhouette button at the bottom of the right panel. Click the Cut Page link to begin cutting. Once the Silhouette is done cutting, the LCD display will read Unload media . Press Enter to unload the cutting mat. Carefully peel away your cutout design.