Transcription of Intrusive Reflow of Lead-free Solder Paste
1 Intrusive Reflow of Lead-free Solder Paste There is renewed interest in Intrusive Reflow of thru-hole components with the advent of Lead-free Solder processes. The objective of this study is to develop a stencil design/printing process to apply Solder Paste in and around the thru-hole and achieve acceptable thru-hole Solder joints. BY William E. Coleman, PHOTO STENCIL, and George Oxx, FLEXTRONICS Intrusive Reflow refers to the process of printing Solder Paste in and around the thru-hole, placing thru-hole and SMT components, and reflowing both simultaneously. Interest in this process is driven by requirements to retrofit wave soldering equipment for conversion to Lead-free or buying Lead-free wave soldering equipment, and difficulty in achieving good wetting of leads and thru-hole barrels using Lead-free Solder .
2 The Experiment Resistor, DIP, and pin header thru-hole devices; 6-, 8-, and 15-mil-thick stencils; and 63- and 93- mil-thick boards were used. Overprinting - using stencil apertures larger than the annular ring - can increase Solder volume for thru-hole; printing Solder Paste into the thru-hole is another method. X-ray analysis allows researchers to determine the percent of Solder Paste filling the thru-hole. High-magnification photographs enable post- Reflow evaluation of remaining flux amounts. Solder Paste is printed on and around the hole, and Paste forced into the barrel of the thru-hole. A. 45 -angle fillet was assumed in calculating the Solder Paste volume required.
3 It is worthwhile to try to fill the hole as much as possible with Solder Paste , as the volume of Solder Paste filling the hole during print helps reduce the volume of Solder Paste delivered by the stencil aperture alone. To estimate how much Solder Paste is required to meet this requirement, use: V = TS (LO WO). + VH = 1/S {TB (AH - AP) + (FT + FB) + VP}, wherein V is the required volume of Solder Paste ;. VP is Solder volume left on the top and/or bottom pad; S is Solder Paste shrink factor; AH equals a cross-sectional area of the thru-hole; AP is a cross-sectional area of the thru-hole pin; TB. measures the thickness of the board; FT + FB gives you the total fillet volume required; TS is stencil thickness; LO measures the length of overprint aperture; LP is pad length; WO equals the overprint aperture width; and VH refers to the Solder Paste filling the hole during print.
4 Design Parameters The Paste volume supplied by the aperture is the aperture area the stencil thickness. The Paste volume in the thru-hole is the area of the hole board thickness. This is the Paste volume for 100% hole fill. The amount of Paste in the hole can be almost 3 the Paste printed by the aperture on a flat surface, so achieving as much hole fill as possible is key. In calculating the aperture sizes, a 50% hole fill was assumed. When there is room, as with resistor and DIP thru- hole components, a large overprint is possible to give sufficient Solder volume at 50% hole fill. However, the pin header is a fully populated array; maximum aperture size is 80 80 mils.
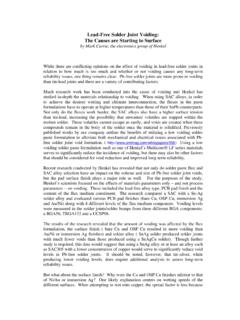
5 Reaching as close to 100% hole fill with Solder Paste on pin header assemblies is crucial. Figure 1. Cross section of a plated thru hole. A full factorial design of experiment (DoE) examined four variables with two levels each, determining the best printer setup to achieve maximum hole fill with printed Solder Paste . With an 8-mil-thick stencil, 120-mil-thick board, and SAC Solder Paste , two different squeegee pressures, strokes, angles, and speeds were used. After printing, the amount of hole fill achieved by the Paste was measured with X-ray images. Results show that, for maximum hole fill with Solder Paste , screen-printing parameters should be 45 blade angle, /sec.
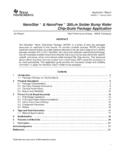
6 Squeegee speed, and two strokes (called a double print). Pressure was not a major contributor. Figure 2A. Main effects plot for a 48 mil hole pin header. Figure 2a shows the main effect plot for the 48-mil-hole pin header versus speed, angle, and number of passes. The responses for each type of component and percent of hole fill with wet Paste were overlaid to identify the set point for Reflow . This plot (Figure 2b) of the individual plated thru-hole (PTH) components' statistical analysis was used to establish set points for the Reflow screening DoE. In Figure 2b, squeegee pressure (12 lbs. for a 12 squeegee blade), and the squeegee angle (45 ), were held constant.
7 Squeegee stroke and speed provided variables. In Figure 2c, one squeegee stroke was performed and the angle was kept at 45 , verifying the - /sec. speed limitation. A double squeegee stroke would allow faster printing speed. Figure 2B. Squeegee pressure and angle were held constant. C. Plot for screening set points: pressure vs. speed. Lead-free Intrusive Reflow Test These printing parameters were used in printing all the 63- and 93-mil-thick thru-hole boards with the exception of stroke count - one stroke was used instead of two, as it still enabled 100%. wet- Paste hole fill for the 63-mil board. This provides better processing conditions for fine-pitch components co-located with thru-hole on a typical board.
8 All three stencil thicknesses were used in the Intrusive Reflow test. The aperture sizes for alternating and standard pin headers remained the same across all stencils. The apertures for the resistors and DIPs were adjusted according to stencil thickness. The thicker stencils required less overprint; therefore using smaller apertures. X-ray images documented the Paste percentage in and around the thru-hole area post-print, pre- component placement, post-placement, and post- Reflow . The boards have OSP high-temperature surface finishes, and were reflowed once prior to printing to simulate double-sided board processing conditions.
9 X-ray pictures for the 63-mil-thick board with alternating headers show that wet- Paste hole fill is 100% for the 6-mil-thick stencil. While the pin pushed Paste out of the hole, especially for the 36-mil-hole/24-mil-pin combination, Reflow allows Solder to pull back onto the pin. Positive top and bottom fillets formed. Tests and X-ray images showed similar results for the DIP thru-hole device for the 6-mil stencil and 63-mil board. With a 63-mil board and 8-mil stencil, results mirror those shown with the 6-mil stencil, with slightly more positive fillets from additional Solder volume. However, both stencils had acceptable results: sufficient fillets for the alternating pin heads.
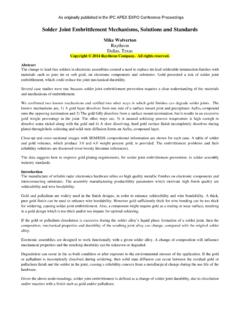
10 With a 63-mil-thick board and 15-mil-thick stencil, X-ray again shows properly formed fillets. Without a pin inserted into the hole, a Solder ball formed on top. The various stencil thicknesses generated typical results. Thicker stencils provide more hole fill for the 93-mil-thick board, whereas the 6-mil stencil provided 100% hole fill for the 63-mil-thick board. Figure 3a and 3b show Solder ball formations after Reflow . These were caused by placing the header in backwards with zero stand-off. This mistake illustrates the importance of having sufficient stand-offs, allowing Solder to pull back onto the pins and into the barrel during Reflow .