Transcription of Loading Paper - Ricoh
1 For safe and correct use, be sure to read the Safety Information in "Read This First" before using the information not in this manual, refer to the HTML/PDF files on the supplied PaperGetting StartedUser GuideTABLE OF CONTENTSM anuals for This of Getting StartedBefore You to Read the of to Names and Functions of to to the Names and Functions of the Control to the Names and Functions of the Control Panel On/Off the On the Off the the Printer Configuration Screens Using the Control Printer Settings from the [Menu] Printer Settings from the [User Tools] Web Image the top Loading PaperPaper Loading Size Type Paper into Paper Loading Paper Larger than A4 or 81/2 Paper into the Bypass Orientation-Fixed Paper or Two-Sided of on Envelopes with Windows (PCL 6/PostScript 3).
2 57 Printing on Envelopes with Windows (PCL 5e/5c)..571 Printing on Envelopes with Mac OS a Paper a Paper Envelope Settings Using the Control TroubleshootingWhen a Panel Tone Checking the Indicator Lamps, Status Icons, and Messages on the Control Printer Status and the Indicator Lamp for the [Check Status] Key Is Lit or USB Connection Messages Are Messages (Displayed on the Control Panel)..72 Alert Messages (Printed on Error Logs and Reports)..83 When You Cannot the Data In Indicator Does Not Light Up or Printing You Cannot Print Misfeeds Occur Printed Image is Different from the Image on the Printer Is Not Functioning Jammed Misfeed Message (A1).
3 119 Paper Misfeed Message (A2)..121 Paper Misfeed Message (B)..122 Paper Misfeed Message (B) (C)..125 Paper Misfeed Message (Y1) or (Y2)..130 Paper Misfeed Message (Z1)..132 Paper Misfeed Message (Z2).. for This MachineRead this manual carefully before using this to the manuals that are relevant to what you want to do with the machine. The method for viewing the manual depends on the manual. Adobe Acrobat Reader /Adobe Reader must be installed in order to view the manuals as PDFfiles. A Web browser must be installed in order to view the HTML GuideSummaries are provided below for the operating instructions regarding the basic usage of thismachine, frequently used functions, and troubleshooting when an error message This FirstBefore using the machine, be sure to read the "Safety Information" section of this manual.
4 Itdescribes the regulations and environmental Installation GuideDescribes procedures from unpacking the machine to connecting it to a InstructionsProvides detailed information about the operation of the machine in HTML format. The followingare the main topics of the manual: Getting Started Setting Up the Printer Loading Paper Printing Configuring and Managing the Printer Troubleshooting Maintenance and Specifications VM Card Extended Feature SettingsSecurity GuideThis manual is for administrators of the machine. It explains security functions that you can use toprevent unauthorized use of the machine, data tampering, or information leakage. For enhancedsecurity, we recommend that you first: Install the Device Certificate.
5 Enable SSL (Secure Sockets Layer) Encryption. Change the user name and password of the administrator using Web Image details, see "Before Using This Printer", Security sure to read this manual when configuring the enhanced security functions or user andadministrator Installation GuideExplains how to install and configure the of ManualsManual NamePrinted ManualProvidedPDF ManualProvidedHTML ManualProvidedUser GuideNoYesNoRead This FirstYesNoNoQuick Installation GuideYesNoNoOperating InstructionsNoNoYesSecurity GuideNoYesNoDriver Installation GuideNoYesNo Operating Instructions and Driver Installation Guide are available in English, German, French,Italian, Spanish, Dutch, and Getting StartedThis section describes the symbols used in the manuals supplied with the printer, available options, andnames and functions of You StartHow to Read the ManualsSymbols used in the manualsThis manual uses the following symbols:Indicates points to pay attention to when using the machine, and explanations of likely causes of papermisfeeds, damage to originals, or loss of data.
6 Be sure to read these supplementary explanations of the machine's functions, and instructions on resolving symbol is located at the end of sections. It indicates where you can find further relevant information.[ ]Indicates the names of keys on the machine's display or control the key sequence order you should perform using the control :Select [Host Interface] Press [OK](Select [Host Interface], and then press the [OK] key.)(mainly Europe and Asia)(mainly North America)Differences in the functions of Region A and Region B models are indicated by the two symbols. Readthe information indicated by the symbol that corresponds to the region of the model you are using. Fordetails about which symbol corresponds to the model you are using, see page 8 "Model-SpecificInformation".
7 7 DisclaimerContents of this manual are subject to change without prior the maximum extent permitted by applicable laws, in no event will the manufacturer be liable for anydamages whatsoever arising out of failures of this machine, losses of the registered data, or the use ornon-use of this product and operation manuals provided with sure that you always copy or have backups of the data registered in this machine. Documents ordata might be erased due to your operational errors or malfunctions of the no event will the manufacturer be responsible for any documents created by you using this machine orany results from the data executed by manufacturer shall not be responsible for any damage or expense that might result from the use ofparts other than genuine parts from the manufacturer with your office good output quality, the manufacturer recommends that you use genuine toner from illustrations in this manual might be slightly different from the IP addressesIn this manual, "IP address" covers both IPv4 and IPv6 environments.
8 Read the instructions that arerelevant to the environment you are InformationThis section explains how to identify the region to which your printer is a label on the rear of the printer, located in the position shown below. The label contains detailsthat identify the region to which your printer belongs. Read the Getting Started8 The following information is region-specific. Read the information under the symbol that corresponds tothe region of your printer.(mainly Europe and Asia)If the label contains the following, your printer is a Region A model: CODE XXXX -27 220 240 V(mainly North America)If the label contains the following, your printer is a Region B model: CODE XXXX -17 120 127 V Dimensions in this manual are given in two measurement units: metric and imperial.
9 If your printer isa Region A model, refer to the metric units. If your printer is a Region B model, refer to the of OptionsThis section provides a list of options for this printer and the names commonly used in this nameDescriptionPaper Feed Unit PB1060250-sheet Paper feed unitPaper Feed Unit PB1070500-sheet Paper feed unitMemory Unit Type N1 moduleHard Disk Drive Option Type P1 Hard Interface Unit Type OWireless LAN interface boardIEEE 1284 Interface Board Type AIEEE 1284 interface boardSD card for NetWare printing Type P1 NetWare cardBrowser Unit Type P1 Browser unitXPS Direct Print Option Type P1 XPS cardVM CARD Type WVM cardBefore You Start9 The browser unit is available for SP 4520DN Getting Started10 Guide to Names and Functions of ComponentsGuide to Components Do
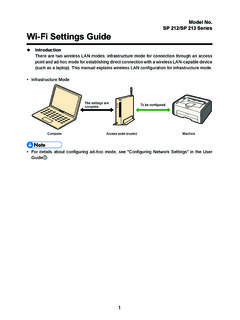
10 Not obstruct the machine's vents. Doing so risks fire caused by overheated : Front view231456781514131211910 CYN0011. Front coverOpen to access the inside of the printer and remove jammed here to replace the print cartridge and the drum to Names and Functions of Components112. Tray ExtensionPull this fence to prevent Paper from falling Standard trayOutput is stacked here with the print side Control panelFor details, see page 16 "Guide to the Names and Functions of the Control Panel". For SP 4520 DNYou can adjust the display with your hands. Adjust the angle of it to see Ventilation holesPrevent Memory coverRemove this cover to install the optional SDRAM module and hard Front cover open buttonPush this button to open the front Paper size dialUse this dial to specify the Paper size.