Transcription of MFC-J3530DW / MFC-J6530DW Quick Setup Guide - Brother
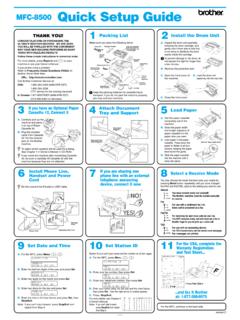
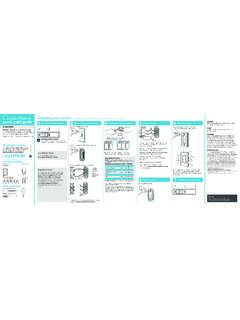
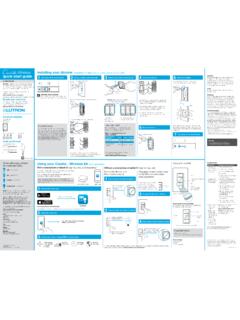
1 Secure Network AccessYour machine s default password is on the label on the back of the machine (preceded by "Pwd"). We strongly recommend you change it to protect your machine from unauthorised Most of the illustrations in this Quick Setup Guide show the MFC-J6530DW . Save all packing materials and the box in case for any reason you must ship your machine. You must purchase the correct interface cable for the interface you want to cableWe recommend using a USB cable (Type A/B) that is no more than 5 metres (Network) cableUse a straight-through Category5 (or greater) twisted-pair cable for 10 BASE-T or 100 BASE-TX Fast Ethernet plain A4 paper1 Unpack the machine and check the componentsThe components included in the box may differ depending on your the paper tray completely out of the machine as shown by the the paper the telephone line the socket marked LINE and Guide the cord out the back of the the scanner the scanner the machine has finished the initial cleaning process, follow the Touchscreen instructions to configure the machine s settings.
2 Check print quality Set Brother LCD Message defaults Print the installation sheetOpen the ink cartridge cover, and then remove the orange protective part from the turning the machine on, you may need to set your country or language (depending on your machine). If required, follow the Touchscreen the paper in the the power cord. The machine will power on the paper not exceed this mark (bbb).NOTEIf you are sharing one telephone line with an external telephone, connect it as shown can adjust the control panel angle to read the Touchscreen more the Touchscreen instructions to store the orange protective part inside the machine. If you must transport the machine, remove the ink cartridges and replace this out the paper support until it locks into push the paper tray completely into the Extension telephoneb. External telephoneQuick Setup GuideMFC-J3530DW / MFC-J6530 DWRead the Product Safety Guide first, then read this Quick Setup Guide for the correct installation the power cord6 Install the inbox ink cartridges4 Select your country or language (Initial Setup only)7 Machine settingsD01 DFJ001-01 UKVersion D(for UK)(for others)Inbox Ink Cartridges* Black Ye ll ow Cyan Magenta*Ink cartridges contain approx.
3 65% yield of replacement High Yield cartridges. Quick Setup GuideProduct Safety GuideBrother Installation DiscTelephone Line CordMaintenance SheetPower Cord1. Press [Settings] > [All Settings] > [Initial Setup ] > [Local Language].2. Press your Press .8 Select your language (if needed and only for certain models)9 connect the telephone line cordIf you are not using your machine as a fax, go to latest manuals are available at the Brother Solutions our FAQ videos for help with setting up your Brother the date and timeFollow the Touchscreen instructions to set the date and shake just the black ink cartridge horizontally 15 times as shown, before inserting it into the the Touchscreen instructions to unpack and install the ink machine will prepare the ink tube system for printing.(Example for UK)(Example for UK)12 2018 Brother Industries, Ltd. All rights FAQs, Troubleshooting, and to download software and manuals, visit a device to connect to your machine11 connect your computer12 Alternative wireless setup13 Print or scan using your mobile deviceD01 DFJ001-01If you cannot find this information, ask your network administrator or wireless access point/router Setup is not successful, restart your Brother machine and your wireless access point/router, and repeat 12 Find your SSID (Network Name) and Network Key (Password) on your wireless access point/router and write them in the table provided the SSID (Network Name) for your access point/router and enter the Network Key (Password).
4 When the wireless Setup is successful, the Touchscreen displays [Connected].Go to 11 to install to 13 to install (Network Name)Network Key (Password)ComputerMobile DeviceGo to 11 and follow the to 12 and follow the ComputerFor Mobile DeviceCan t connect ? Check the following: Brother regularly updates firmware to add features and apply bug check for the latest firmware, visit if you do not have a wireless access point/router, you can connect your device and your machine directly. For additional wireless network support, go to SupportCenter is a mobile app that provides the latest support information for your Brother the App Store or Google Play to networkWired networkUSB connectionRestart your wireless access point/router (if possible).If still not successful, go to 12 Disconnect the still not successful, visit for FAQs and your machine and computer, and then go to 11Go to your machine, and press > [ Setup Wizard] > [Yes].
5 Download and install our free application Brother iPrint&Scan from a mobile application store, such as the App Store, Google Play or Windows Phone Store using your mobile Wireless Support: appsYou can print from and scan to your mobile device using various instructions, see the Online User s : XXXXXXXN etwork key: XXXXF inishedFinishedNOTEYour mobile device and machine must be connected to the same wireless the installation disc into your CD/DVD drive, or download the Full Driver & Software Package at:For Windows : Macintosh: you are using a recently released operating system on your computer, visit the above websites for updated driver and software the on-screen instructions and Windows : If the Brother screen does not appear automatically, go to Computer (My Computer/This PC). Double-click the CD/DVD-ROM icon, and then double-click Macintosh: For full driver functionality, we recommend choosing the CUPS driver when adding a Wired Network Connection and USB Connection:Locate the correct port (based on the cable you are using) inside the machine as shown.