Transcription of NI-XNET Hardware Selectable Interface
1 GETTING STARTED GUIDE. NI 9860. NI-XNET Hardware Selectable Interface Fran ais Deutsch . This document explains how to connect to the NI 9860. Note Before you begin, complete the software and Hardware installation procedures in your chassis documentation. Note The guidelines in this document are specific to the NI 9860. The other components in the system might not meet the same safety ratings. Refer to the documentation for each component in the system to determine the safety and EMC ratings for the entire system. Safety Guidelines Operate the NI 9860 only as described in this document. Hot Surface This icon denotes that the component may be hot. Touching this component may result in bodily injury. Caution Do not operate the NI 9860 in a manner not specified in this document.
2 Product misuse can result in a hazard. You can compromise the safety protection 2 | | NI 9860 Getting Started Guide built into the product if the product is damaged in any way. If the product is damaged, return it to NI for repair. Safety Guidelines for Hazardous Locations The NI 9860 is suitable for use in Class I, Division 2, Groups A, B, C, D, T4 hazardous locations; Class I, Zone 2, AEx nA IIC T4. and Ex nA IIC T4 hazardous locations; and nonhazardous locations only. Follow these guidelines if you are installing the NI 9860 in a potentially explosive environment. Not following these guidelines may result in serious injury or death. Caution Do not disconnect I/O-side wires or connectors unless power has been switched off or the area is known to be nonhazardous.
3 Caution Do not remove modules unless power has been switched off or the area is known to be nonhazardous. Caution Substitution of components may impair suitability for Class I, Division 2. NI 9860 Getting Started Guide | National Instruments | 3. Caution For Division 2 and Zone 2 applications, install the system in an enclosure rated to at least IP54. as defined by IEC/EN 60079-15. Special Conditions for Hazardous Locations Use in Europe and Internationally The NI 9860 has been evaluated as Ex nA IIC T4 Gc equipment under DEMKO Certificate No. 12 ATEX 1202658X and is IECEx certified. Each NI 9860 is marked II 3G and is suitable for use in Zone 2 hazardous locations, in ambient temperatures of -40 C Ta 70 C. If you are using the NI 9860.
4 In Gas Group IIC hazardous locations, you must use the device in an NI chassis that has been evaluated as Ex nC IIC T4, Ex IIC. T4, Ex nA IIC T4, or Ex nL IIC T4 equipment. Caution You must make sure that transient disturbances do not exceed 140% of the rated voltage. Caution The system shall only be used in an area of not more than Pollution Degree 2, as defined in IEC 60664-1. Caution The system shall be mounted in an ATEX/IECEx-certified enclosure with a minimum 4 | | NI 9860 Getting Started Guide ingress protection rating of at least IP54 as defined in IEC/EN 60079-15. Caution The enclosure must have a door or cover accessible only by the use of a tool. Wiring the NI 9860. The NI 9860 has two ports for connecting to NI-XNET CAN/LIN.
5 Transceiver Cables (required to connect to the CAN/LIN bus). and a two-position connector for use with an external power supply. For more information about transceiver cables, refer to the NI-XNET CAN/LIN Transceiver Cables page on The NI 9860 requires an external power supply of +9 to +30 V to power the transceiver cables. Supply power to the NI 9860 VSUP. connector on the module front panel using the supplied power cable. The exposed lead wires at the end of the power cable are routed as follows: black wire COM, red wire VSUP. The power cable lead wires may be daisy-chained to the controller power port when the controller supply voltage is in the appropriate range. NI 9860 Getting Started Guide | National Instruments | 5. Note Power on VSUP is required for transceiver cable operation.
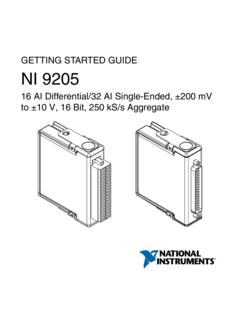
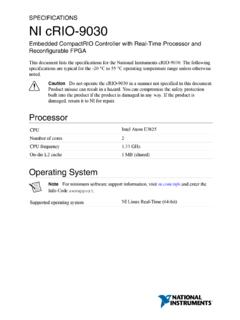
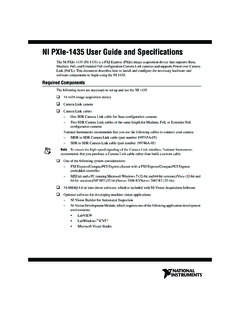
6 Note When using more than four transceiver cables with your CompactRIO chassis, refer to the NI-XNET . CAN/LIN Transceiver Cables page on for mounting guidelines to limit the thermal impact to your CompactRIO system. The following figure shows the NI 9860 with Port 1 connected to an NI-XNET CAN HS/FD Transceiver Cable and the two-position connector connected to the power cable. The breaks in the cables represent additional cable length. 6 | | NI 9860 Getting Started Guide Figure 1. NI 9860 with Power and Transceiver Cables Attached NI 9860 Hardware Overview The NI 9860 is a two-port C-Series module based on the XNET. architecture. Users can choose the physical bus protocol by plugging in the corresponding transceiver cable. The NI 9860.
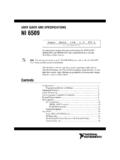
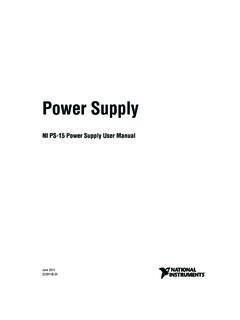
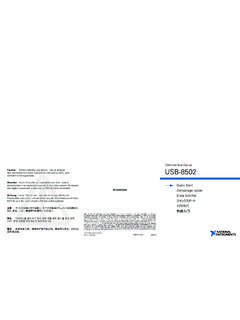
7 NI 9860 Getting Started Guide | National Instruments | 7. supports hot-swapping of transceiver cables and can detect and identify transceiver cable types. For more information about transceiver cables, refer to the NI-XNET CAN/LIN Transceiver Cables page on Figure 2. NI 9860 Hardware Overview Transceiver Port 1 Controller Cable Transceiver Port 2 Controller Cable Vsup Ext Pwr +. Pwr Sup Supply _. COM Required 8 | | NI 9860 Getting Started Guide Inserting and Removing the NI-XNET . Transceiver Cable The NI-XNET Transceiver Cable connects to a host device with an active latching connector. To connect the NI-XNET . Transceiver Cable to a host device, push the connector assembly into the host receptacle until the internal latch snaps into position.
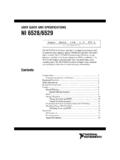
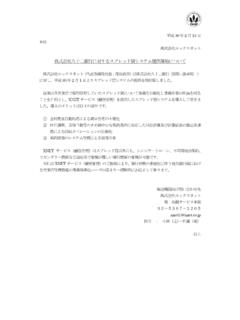
8 The latch emits an audible click when engaged. To remove the NI-XNET Transceiver Cable, push the lock ejector forward to disengage the latch and simultaneously pull the NI-XNET . Transceiver Cable, as shown in the following figure. NI 9860 Getting Started Guide | National Instruments | 9. Figure 3. Inserting and Removing the NI-XNET Transceiver Cable Push Lock Ejector Forward Pull Transceiver Cable Inserting and Removing the Power Cable The NI 9860 connects to the provided power cable with an active latching connector. To connect the power cable, push the end of the power cable into the two-position connector until the internal latch snaps into position. The latch emits an audible click when engaged. 10 | | NI 9860 Getting Started Guide To remove the power cable, push the lock ejector down to disengage the latch and simultaneously pull the power cable away from the module, as shown in the following figure.
9 Figure 4. Removing the NI 9860 Power Cable Push Lock Ejector Down Pull Power Cable NI 9860 Getting Started Guide | National Instruments | 11. NI 9860 Specifications The following specifications are typical for the range -40 C to 70 C unless otherwise noted. NI-XNET Host Port Connector .. type NI-XNET Hardware Selectable Interface port Port .. supported transceiver NI-XNET transceiver cables cable types (CAN/LIN). Note For more information about transceiver cables, refer to the transceiver cable operating instructions. Power Requirements Power consumption from chassis .. Active mode 1 W max Sleep mode .. 5 mW max 12 | | NI 9860 Getting Started Guide External Power Supply1 (VSUP).. Voltage input range 9 to 30 VDC (measured at the NI 9860 power connector).
10 Power consumption .. W max (active mode). Caution Do not connect VSUP to a DC mains supply or to any supply requiring a connecting cable longer than 3 m (10 ft). A DC mains supply is a local DC. electricity supply network in the infrastructure of a site or building. Total .. thermal dissipation W max (active mode). on module Physical Characteristics To clean the module, wipe it with a dry towel.. Weight Approx. 144 g ( oz). 1 Required to power NI-XNET Transceiver Cables. NI 9860 Getting Started Guide | National Instruments | 13. Safety Voltages Connect only voltages that are within the following limits: V.. SUP to COM 30 VDC max, Measurement Category I.. Chassis ground to COM 30 VDC max, Measurement Category I. Measurement Category I is for measurements performed on circuits not directly connected to the electrical distribution system referred to as MAINS voltage.