Transcription of RF - Homebrewing a 6 Meter Yagi
1 RF - Homebrewing a 6 Meter yagi By Zack Lau, W1VT Six meters is a great band for home built Yagis. The elements are reasonably small, but not so small that building tolerances are critical. With careful construction and detailed instructions, it is certainly feasible to build no-tune Yagis up to 432 MHz, but I have my doubts about 903 Yagis made out of aluminum rods and tubing. This is especially true if you factor in misinterpretations made when copying someone else's design. At the other end of the spectrum, tuning is often necessary to compensate for environmental effects. Many people can't mount a 40 Meter antenna far enough away from other objects to eliminate detuning effects. See for yourself how bad this is with a 2 Meter mobile station and an SWR Meter --then scale things up dimensionally by a factor of 20. Thus, for proper performance, low-frequency antennas often need to be tuned in-place. When they're moved, retuning is often required. Most 6 Meter Yagis are horizontally polarized and cover only the SSB/CW portion of the band.
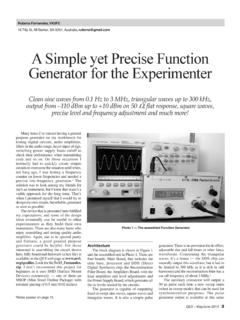
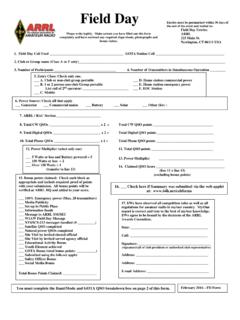
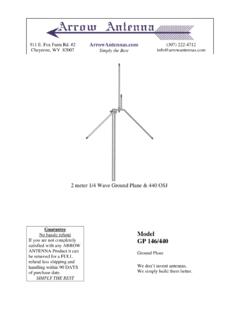
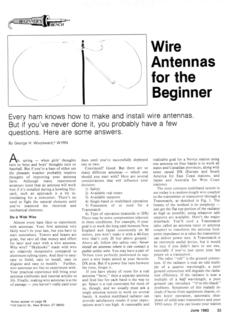
2 Building for horizontal polarization is much simpler with small Yagis, because interaction with vertical supports is minimized. While it might be nice to cover the entire band, the typical sacrifice in antenna performance hasn't justified the work involved in coming up with a clever design. At least I haven't seen anyone publish such a design. Photo 1--Driven element of the yagi . Fig 1--Hardwood element mounting block and Lexan plate. These days the electrical design of antennas is easy. There are plenty of yagi designs and computer modeling programs out there. I picked this design out of Lawson's yagi Antenna Design because it has good gain and pattern for just four I wanted few elements for portable work--more elements mean more assembly/disassembly time. That's a big factor when you are surrounded by black flies and other obnoxious insects. An extra element or two does give you a bit more design flexibility. You can often get the beam to work well over a wider bandwidth with more elements, while keeping the boom length constant.
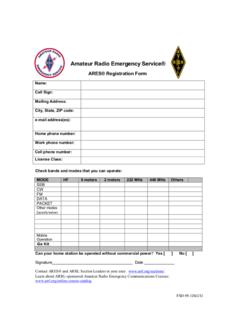
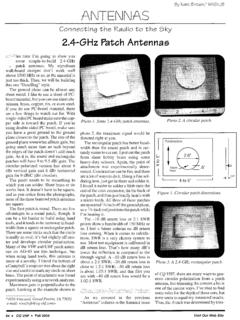
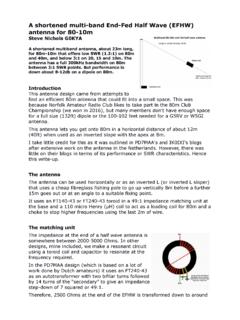
3 Extra bandwidth helps the antenna to work well despite the effects of rain, though few Yagis work well when covered with ice. You don't get more gain by adding more elements, however, maximum gain is pretty much a function of boom length. This is why W5UN's 24-foot-boom yagi for 2 Meter EME has just 11 elements. They just aren't needed for this particular According to yagi Analyzer, the simple program that comes with The ARRL Antenna Book,3 the antenna has dBi of free-space gain with the unwanted lobes suppressed by 20 dB--a reasonably clean pattern. I like to use dBi because it is relatively unambiguous. DBd measurements are problematic because some people just subtract dB from the isotropic-gain reference number, while others reference an actual dipole in the same location. Thus, one who is modeling antennas over ground can get dBd numbers that vary by as much as 6 dB, due to ground gain effects and definition differences. Fig 2--Custom saddle dimensions. Photo 2--Machined clamp to match 1 inch mast.
4 Photo 3--Machined element To simplify the electrical design, I used insulated elements spaced inch above the boom. This makes the boom interaction minimal, so it isn't necessary to factor in a boom correction. Many element-mounting methods allow the boom to interact with the elements, requiring the elements to be slightly longer than predicted by computer modeling programs. I did a bit of research on the best material for the mounting plates; Lexan seems to be the best choice. Lexan is the same stuff used for bulletproof windows, so it doesn't shatter like cheaper plastics. Unlike acrylic, it is UV resistant. UV resistance is important for anything you intend to put out in the sunshine for long periods--unless you want something that self destructs. Lexan has disadvantages: It lacks optical clarity and costs more than other plastics. I used oak blocks to attach the elements to the mounting plates, as shown in Fig 1. A 1 inch "bullet" drill makes tight fitting holes in the blocks.
5 After pounding the tubing through the blocks, I painted the wood for weather protection. The paint also serves to glue the blocks to the tubing, though the fit was so tight that this isn't necessary. To make field assembly easier, I decided to pin the element clamps to the boom. This requires precision drilling of the boom, lest you end up with elements that aren't in the same plane. A square boom is much easier to drill correctly, but I haven't really looked for a source of telescoping square tubing. Two of the element pins also hold the three boom sections together. It's more traditional to use U bolts and saddles, but many people have problems with the elements rotating out of alignment. This results from using "universal" saddles, which aren't matched to the tubing being used. You can get much better performance by machining saddles that maximize the contact area. I've made them out of 1 inch square tubing to fit standard 1 inch mast sections. It may be a little easier to make them out of channel stock.
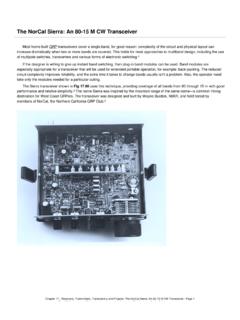
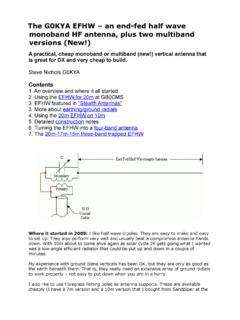
6 This is a tedious process with a round file, but a lot cheaper than using a miniature milling machine with a rotary table. Fig 2 shows the basic design of the saddles. I've also made some wooden versions using a Forstner bit (designed for cutting clean holes), but haven't thoroughly tested them. clamp. Fig 3-- inch tubing clamp construction steps. Here's another significant mechanical problem: What's the best way to make portable elements that fit inside a small car? Fortunately, aluminum tubing is conveniently sold in sizes that telescope tubing works quite well for this purpose. The challenge is joining them together. I did it the hard way, slotting the tubing and making custom clamps out of aluminum plate. I've made the slots with a bandsaw, but I get much better results with a metal reinforced wood fixture that guides a hacksaw blade. A fixture using a miter box and backsaw might work even better. Fig 3 shows an element clamp I've designed. I make them out of scraps of inch 6061-T6 aluminum plate.
7 Number 8 stainless-steel wing nuts work quite well; they allow quick assembly by hand. (I've also tried #6 hardware, but it is a little too small. I needed a flat washer to reduce the friction when using the smaller #6 hardware.) A version using #10 hardware might be advisable for someone with bigger fingers. If the wing nuts get lost, it is still possible to use the clamps, by unscrewing the 1 inch screws and screwing them in backwards with an Allen wrench. Keep an Allen wrench handy by taping it to the boom. You could simply drill holes in the assembled elements and put screws through the holes. The disadvantage is that you can't tweak the lengths, but that isn't a problem if you are copying a design that doesn't need adjustments. Adjustment-free antennas make quite a bit of sense for portable work, since it isn't unusual for things to shift during transport. You don't want to waste time figuring out the proper settings. To help identify the element pieces quickly, I color coded them by painting the element tips.
8 I also painted the boom to assist in putting the elements in the proper location. Colored tape also works, as long as you don't have to slide a clamp or U-bolt over it. Tape can stop a clamp's movement or get shredded in the process. Paint will probably be scratched up the first time you use the antenna--so don't worry too much about how it looks. You can also use stainless-steel hose clamps in place of my machined versions. If you go this route, it's a good idea to use clamps made entirely of stainless steel; some clamps have parts that rust. Photo 4--Element clamp holding tubing together. Fig 4-- l/4 matching section. In keeping with the idea of a simple design, I used a l/4 of somewhat exotic RG-83 coax to feed a split driven element, as shown in Fig 4 (before coiling to form the balun). I'm not sure if anyone besides Times Microwave makes this coax, but it is available from the Because the antenna is balanced, I provide a balun by making a two-turn coil out of the matching section.
9 To accommodate the large #10 center conductor of RG-83, I used a 9913 N male connector on one end and drilled out the center pin of a female UG-23/U connector for the other. Many standard N connectors are designed for #11 or #13 wire and won't fit without modification. Some people have filed down the center conductor of the coax to fit such connectors. Alternatively, one could parallel connect two lengths of 75 coax (connecting both the shields and center conductors at both ends) to make W coax. This does shift the optimum feedpoint impedance, however, from to 28 . A perfectionist might want to tweak the electrical design of the yagi a bit to fit this. The driven-element connection is simpler--I swaged a pair of terminal posts to some brass strips and some unclad fiberglass circuit board. The brass strips are then attached to the driven element with #4-40 screws. The coax is taped to the fiberglass to provide strain relief for the soldered connections to the terminal strips.
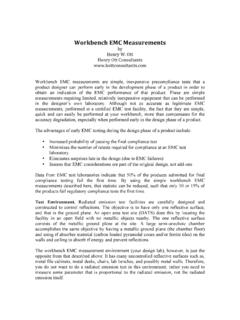
10 For the other end, I made an L bracket out of brass to hold a UG-58A/U panel jack. I soldered the shield to the brass and the center conductors to the center pin. Like the driven-element con-nection's insulator, I made the brass L long enough to securely tape the coax and provide strain relief. Fig 5--Driven-element mounting-plate details. Fig 6--4 element 6 Meter yagi made out of inch wall 6061-T6 aluminum tubing. Tubing dimensions are outer diameters. Table 1--Taper Schedule (inches) < < OD OD Ref 24 DE 24 DIR1 24 DIR2 24 See Fig 6 for details. Table 2--Measured SWR Solid-dielectric coax seems to be reasonably consistent in terms of velocity factor, so the trimming often necessary with other types may not be necessary. Still, there's a good way of accounting for discontinuities such as coax connectors: Substitute a 24 resistor for the driven element and use an antenna analyzer to figure out what frequency the matching network is cut for--and then re-cut it to the proper length.