Transcription of SAITEK X45 DIGITAL JOYSTICK AND THROTTLE
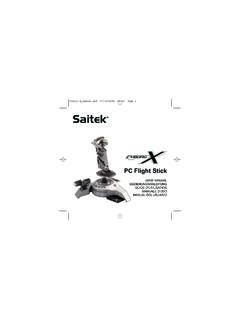
1 SAITEK X45 DIGITAL JOYSTICK ANDTHROTTLEUSER MANUALMANUEL D UTILISATIONBEDIENUNGSANLEITUNGMANUALE D USOMANUAL DEL USUARIOPS1U+ - X45 Manual 30/01/2004 08:42 Page 1 THROTTLE (Reverse Angle)2 x Rotary Controls4-way Hat SwitchRudder ControlThrottle Rudder System2 x Fire Buttons4-wayHat SwitchThrottle Control with DetentsRudder Control2 x Rotary ControlsMouse controller/8-way Hat Switch3 x Mode Status LEDsControl Commands on BaseJoystick Head'Pinkie' LED Indicator Missile Launcher 2 x 8-way Hat SwitchJoystick 4 x Fire ButtonsMissile Launcher2 x 8-way HatSwitchesPinkie Switch Control Commands on BasePS1U+ - X45 Manual 30/01/2004 08.
2 42 Page 2 GETTING STARTEDIn order for this product to function correctly please install the drivers on the CD supplied with this product. INSTALLATION FOR USERS OF WINDOWS XPA) Drivers Only For Typical UsersThe software on the CD supplied with this product has been thoroughly tested and complies with all Microsoft standards. However, we recommendthat prior to installing any 3rd party software you create a restore point to return to should you encounter any XP users can do this by clicking on Startfollowed by Programs, then Accessories,System Tools and finally on System Restore.
3 In thewindow that appears select Create a restore pointand then click on Next. You will be prompted to supply a name for this you then encounter any difficulties during the installation process you can follow the same path to restore your PC to its pre-installed your computer switched on, close down any programs that are currently running and insert the SAITEK Smart Technology CD into your CD-ROM the Introduction Screen appears, click Install Softwareto the Welcome screen appears, click Nextto continue. (If the CD does not run automatically, select Start from the Windows Taskbar, thenRunand type D:\ click OK- where D:\ is letter of your CD-ROM drive).
4 4 After reading the Disclaimer, select theI accept the terms of the Disclaimeroption and click Nextto the Driver Setupscreen, plug in your controller and click on Next. 6At the Driver Setupscreen, click Nextto test your controller. 7 When the SAITEK Controller screen appears, try out all your controller s buttons and controls to show that it is working properly. When you havefinished, click OK. 8At the Software Setupscreen, select Do not install the SST programming Software and clickNext. The programming Software can beinstalled at a later date by following instruction (B).
5 Below9At the Registrationscreen, select Check this box to register now and follow the on-screen instructions, or you can choose to select this optionlater. 10 Click on Finishto complete the + - X45 Manual 30/01/2004 08:42 Page 3B) Drivers and programming Software For Advanced Users1 Follow points 1 7 of the install procedure in A),then at the Software Setupscreen, select Install the SST programming Software and the following Software Setupscreen, click Nextand follow the on-screen instructions. At this point you will be asked to install such features asthe SAITEK Magic Mouse,HID-compliant mouse, SAITEK Magic Keyboard andHID Keyboard Device(these are what XP calls the variouselements of your SAITEK controller).
6 Continue to click on Nextand Finishto accept the installation until the Registration screen appears. 3At the Registrationscreen, select Check this box to register now and follow the on-screen instructions, or do not select this option and completion of the installation, you have the option to Run Profile Editor, which will give you a view of the 3D programming environment. Ifyou do not wish to see the Profile Editor at this point, just uncheck the box and click on Finishto complete the installation. INSTALLATION FOR USERS OF WINDOWS 2000A) Drivers Only For Typical Users1 With your computer switched on, close down any programs that are currently running and insert the SAITEK Smart Technology CD into your CD-ROM the Introduction Screen appears, click Install Softwareto the Welcomescreen appears, click Nextto continue.
7 (If the CD does not run automatically, select Startfrom the Windows Taskbar, thenRun and type D:\ and click OK - where D:\is letter of your CD-ROM drive). 4 After reading the Disclaimer, select the I accept the terms of the Disclaimeroption and click Next to the Device Driver Installationscreen, click on Nextand follow the on-screen instructions. 6 When prompted, plug your controller s USB connector into your computer, then click on Configure. 7 When the Controller Propertiesscreen appears, click Nextto view the Testscreen. 8 Now try out all your controller s buttons and controls to show that it is working properly.
8 When you have finished, click OK. 9At the programming Software screen, select Typical Userand click Next. 10 At the Registration screen, select Registerand follow the on-screen instructions or select Register Laterand click Next. 11 Click on Finishto complete the installation. B) Drivers and programming Software For Advanced Users1 Follow points 1 7 of the install procedure in A), then at the programming Softwarescreen, select Advanced Userand click Next. 2At the Programmable Controller Driversscreen, click Updateand follow the on-screen instructions. PS1U+ - X45 Manual 30/01/2004 08:42 Page 43 Then at the Installation of programming software successfulscreen, click Next.
9 4At the Registration screen, select Registerand follow the on-screen instructions or select Register Laterand click Next. 5 Upon completion of the installation, you have the option to Run Profile Editor, which will give you a view of the 3D programming environment. Ifyou do not wish to see the Profile Editor at this point, just uncheck the box and click on Finishto complete the FOR USERS OF WINDOWS 98 AND MEA) Drivers Only For Typical Users1 With your computer switched on, close down any programs that are currently running and insert the SAITEK Smart Technology CD into your CD-ROM the Introduction Screen appears, click Install Softwareto the Welcomescreen appears, click Nextto continue.
10 (If the CD does not run automatically, select Startfrom the Windows Taskbar, thenRunand type D:\ click OK).4 After reading and accepting the Disclaimer, click Nextto continue. Note: For your controller to work, you must have a minimum of Microsoft DirectX installed on your computer. The installer will automaticallyrecognize if this software needs to be added, and will allow you to install it directly from the SAITEK Product Companion CD, if you are asked to install Microsoft DirectX , click Installand follow the on-screen instructions, and then restart your computer when sure that you leave the SAITEK CD in the drive when restarting.