Transcription of TM-S1000 Start Here
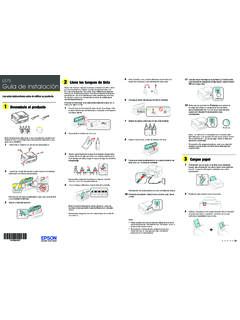
1 Start Here 1 Unpack . 2 Pull out both pocket guide 3 Install the USB. and ASF/SF guide. driver. 1 Unpack . Remove plastic insert. (only for the multi feed models) 3 Place on a stable, flat surface that extends beyond the For the multi feed models, scanner (with guides fully extended) in all directions. Note: remove the plastic insert. CAUTION: Note: Be sure that the guides are extended completely before Make sure that the power is not supplied to the scanner. Do not install scanner in a dusty environment. Do not install scanner using. where it can be subject to bumps or jolts during operation. These may cause defective readings. 1 Start the TM-S1000 Utility included on the Utilities & Documents CD.
2 Part Names 2 Make sure you have all the parts shown here. LED indicators Click If any parts are missing, contact your reseller. Insert Multi feed models Single feed models Document scanner Document scanner AC Adapter C *1. Auto sheet feeder (ASF) Sheet feeder (SF). Utility & Documents CD *2. Main pocket Main pocket Franker cover CAUTION: Sub pocket Sub pocket*. Franker cover open lever Starting the TM-S1000 Utility causes the USB. Franking Power switch driver to be installed. CaptureOne (Scanner) USB cable cartridge cover Do not Start the TM-S1000 Utility with the Power switch scanner connected to a host computer. Scanner cover Scanner cover *1: AC cable may not be included with the scanner.
3 USB cable securing hook Note: *2: The following items are included on the CD: Scanner cover Scanner cover Do not open franking cartridge package until you TM-S1000 Driver TM-S1000 Utility open lever open lever 2 When the next screen is displayed, are ready to install. TM-S1000 Utility User's Manual Pocket guide ASF guide Pocket guide SF guide finish the TM-S1000 Utility. User's Manual * The one pocket model does not have a Sub pocket. (PDF in 4 languages: English, French, USB connector Power supply connector Portuguese, and Spanish). 4 Connect the USB cable to the scanner. 6 Connect the scanner to the 7 Install the franking 8 Insert checks.
4 Computer via the USB cable. cartridge. Note: CAUTION: te Da $. Use only the USB cable included with the Note: 89. 0. For the multi feed models, if the checks are 567. scanner. 34. 12. CAUTION: C: 80. 47. 23. inserted without being aligned, they may not C:1. Hook the USB cable on the USB cable securing If the scanner is connected to a host computer before hook (colored blue in the illustration) to prevent installing the USB driver, the Found New Hardware Keep franking cartridges out of reach of children. be fed at all, or a paper jam or incorrect the cable from falling off. Wizard will be displayed. In that case, cancel the Use carefully because ink can permanently stain feeding of multiple checks may occur.
5 Wizard and go back to Step 3 to install the USB driver. clothing. For the single feed models, if more than one Use only Seiko Epson cartridges. Others may Insert checks straight down with the check is inserted, a paper jam or incorrect have poor quality or damage the scanner. feeding of multiple checks may occur. side on which magnetic characters Be sure to let go of the check(s) before the Use up the cartridge before the expiration date printed on the box. Dispose of used cartridges in are printed facing outside. scanner starts feeding. Do not open covers during processing. For the multi feed models: Align the 5 Connect the DC cable to the scanner.
6 Accordance with local regulations. checks neatly on the bottom-right Note: before inserting. Checks should not be wrinkled, torn, stapled, 1 Make sure the power switch is For the single feed models: Insert clipped or multi-sheet. turned off and the AC cable is checks one by one after each check For the multi feed models, up to 100 checks not connected to the AC outlet. is ejected to a pocket. can be inserted in the ASF guide. Note: 1 Connect the USB cable to the computer's USB port. Always disconnect the AC cable from the AC power outlet before connecting/disconnecting the DC cable 9 Remove ejected checks. to/from the scanner. 2 Turn on the scanner power switch.
7 1 Pull the franker cover open lever to open the franker cover. When checks are ejected, remove them. 2 Insert the connector 3 Plug the AC cable Note: of the DС cable into into the AC outlet. 2 Hold the top of the cartridge, and Do not eject more than the maximum number of checks to the the power supply carefully push it until it clicks into pockets. (Main Pocket: 100 sheets. Sub Pocket: 50 sheets.). Otherwise, a paper jam may occur. connector (stamped Power switch place. Depending on your application, some checks may be 24V). delivered to the sub pocket. (except for the one pocket model). is a trademark of Epson America, Inc. Copyright 2009.
8 LED Indiсators Specifications Important Safety Information EMC and Safety Standards Applied POWER LED. POWER LED. Operating CPU 30/60 dpm models without using IQA or single feed This section presents important information intended to ensure safe and WARNING. ERROR LED. environment models: Pentium 4 GHz or more effective use of this product. Read this section carefully and store it in an The connection of a non-shielded interface cable to this scanner will Comes on when the invalidate the EMC standards of this device. DOCUMENT LED Multi feed models using IQA or 90 dpm model without accessible location. scanner power is on. using IQA: Pentium 4 GHz or more You are cautioned that changes or modifications not expressly approved by Seiko Epson Corporation could void your authority to operate the ERROR LED Memory 30/60 dpm models without using IQA or single feed Key to Symbols equipment.
9 Models: 256 MB or more above the minimum OS The symbols in this manual are identified by their level of importance, as Comes on when the system requirements defined below. Read the following carefully before handling the product. CE Marking scanner is off line (and Multi feed models using IQA or 90 dpm model without The scanner conforms to the following Directives and Norms: when the scanner cover or franker cover is open.) using IQA: 512 MB or more above the minimum OS Directive 2004/108/EC. Flashes when an error occurs or when waiting for document removal. system requirements EN 55022 Class B. (See "Troubleshooting" for more information.) HDD Free space of more than 30 MB (with the driver WARNING: EN 55024.)
10 Installed) IEC 61000-4-2. DOCUMENT LED Warnings must be followed carefully to avoid serious bodily injury. IEC 61000-4-3. Processing speed 30 dpm, 60 dpm, or 90 dpm depending on the model. Comes on when the scanner is ready to process documents in the ASF (only for the multi feed models) IEC 61000-4-4. /SF or while the scanner is processing documents. Image Scanner CIS (Contact Image Sensor) IEC 61000-4-5. Flashes when the scanner is waiting for document insertion. IEC 61000-4-6. Resolution 200 200 dpi, 120 120 dpi, 100 100 dpi CAUTION: IEC 61000-4-8. Gradation 256-level gray scale, 2 values (Black and White) IEC 61000-4-11. Cautions must be observed to avoid minor injury to yourself or damage Power Switch Data format Gray scale: TIFF, JPEG, BMP, Raster Black and White: TIFF (CCITT Group4), BMP to your equipment.


![HIWIN Linear Guideways Catalogue [PDF] - Padia Enterprise](/cache/preview/e/3/f/3/b/5/7/9/thumb-e3f3b579c6138d3e67e53362ade3e466.jpg)