Transcription of GIMP® TEXT EFFECTS - University of Maine at …
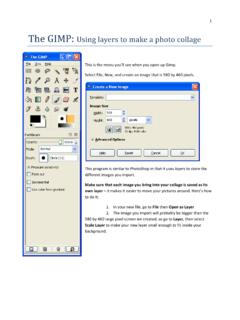
1 Add an Emboss effect to Text Text EFFECTS Page 1 of 10 GIMP TEXT EFFECTS or Text EFFECTS : Emboss Completed Project ADD AN EMBOSS effect TO TEXT GIMP is all about IT (Images and Text) OPEN GIMP Step 1: From the Menu Bar, select File | At the Create a New Image dialog box, in the Image Size section, select a width: and height: for your image. Click the + sign to the left of Advanced Options and select a background color for the image. I selected 600 pixels x 200 pixels with a white background. Add an Emboss effect to Text Text EFFECTS Page 2 of 10 Add your name and a description of the image in the Comment: text box.
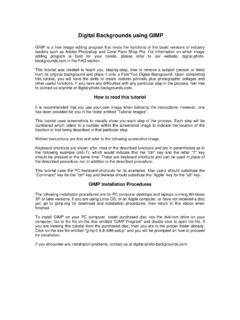
2 A new image canvas displays in the GIMP workspace with image information in the Title Bar and a Background layer displays in the Layers palette to the right of the image window. Step 2: From the Toolbox, select the Text Tool . Text tool options display below the Toolbox. Click the Font: icon and select a wide font. I selected Arial Rounded MT Bold. Select a font size by typing the size in the font text box or by clicking the up or down arrows to change the font size. I selected 140 px. Click the Color: down arrow to select a text color. Select a color from the palette, type the R-G-B color equivalent, or type a Html notation: Black is 000000.
3 Click the OK button. Step 3: Click on the image canvas. At the GIMP Text Editor, type Emboss and click the checkbox to the left of Use selected font to turn on that option. Add an Emboss effect to Text Text EFFECTS Page 3 of 10 Click the Close button. The typed text is inserted on the image canvas, and a new layer named Emboss displays above the Background layer in the Layers palette. Step 4: With the Emboss layer selected in the Layers palette, select the Move tool in the Toolbox and move your cursor into the image window. When the Move tool is selected, the Move options display below the Toolbox.
4 Click in the radio button to the left of Move the active layer. This changes the cursor to an up-pointing white arrow with a diamond and four squares. Add an Emboss effect to Text Text EFFECTS Page 4 of 10 Before selecting the Move the active layer option from the options box, the cursor had two shapes one when it was positioned on the image window and one when it was positioned on the image text. Now the cursor has only one shape. Selecting the Move the active layer option makes it easier to move the entire layer. Step 5: Click on the text and drag it to the desired position on the image canvas.
5 Note there is no roving border (marching ants) on the image canvas. Step 6: With the Emboss layer selected, right click and select Alpha to Selection . Marching ants now display around only the text. This means that only the text is selected -- not the entire layer Step 7: With the Emboss layer selected in the Layers palette, right click and select New At the New Layer dialog box, type pattern fill as the name for the new layer and click the OK button. A new layer named pattern fill displays above the Emboss layer in the Layers palette. Add an Emboss effect to Text Text EFFECTS Page 5 of 10 With the pattern fill layer selected in the Layers palette, click the Bucket Fill Tool in the Toolbox.
6 The Bucket Fill options display below the Toolbox. Select Pattern fill: in the Fill Type and click the Pattern fill icon and select a pine woodgrain. You can click the View as list icon at the bottom of the of the Pattern Fill palette: to list the patterns in a list view. Scroll and select Pine (100 x 100). Step 8: From the Menu bar, select Edit | Fill with Pattern. The text is filled with the pine pattern. You could also click inside the text on the canvas as the Bucket Fill Tool is selected in the Toolbox. Step 9: To duplicate the pattern fill layer, right click on the pattern fill layer in the Layers palette and select Duplicate Layer.
7 A new layer named pattern fill copy displays above the pattern fill layer in the Layers palette. Double click the name "pattern fill copy and type outline and press the Enter key. Add an Emboss effect to Text Text EFFECTS Page 6 of 10 Step 10: With the outline layer selected in the Layers palette, from the Menu bar, select Select | Shrink. At the Shrink Selection dialog box, type 1 and click the OK button. The Marching Ants move in one pixel from the image border. Step 11: Press the Delete key on the keyboard. This clears the current selection. Step 12: To brighten the outline, from the Menu bar, select Colors | Brightness-Contrast.
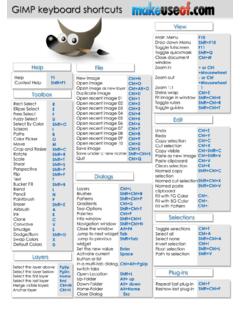
8 At the Brightness-Contrast dialog box, drag the brightness thumb indicator all the way to the right, and click the OK button. Add an Emboss effect to Text Text EFFECTS Page 7 of 10 Step 13: With the outline layer selected in the Layers palette, click the Mode: down arrow and select Overlay. Step 14: In the Layers palette, select the Emboss layer. From the Menu Bar, select Filters |Light and Shadow | Drop Shadow. At the Script Fu: Drop Shadow dialog box, select as shown: Step 15: With the Emboss layer selected in the Layers palette, right click and select Duplicate Layer.
9 A new layer named Emboss#1 displays above the Emboss layer (below the pattern fill layer) in the Layers palette. Note: If you are not able to complete the following step, you may not have downloaded the Text effect plugin as explained on the Text effect section of our course Web page. From the Menu bar, select Script-Fu | Layer EFFECTS | Bevel and At the Script Fu: Bevel and Emboss dialog box, click the Style: down arrow and select Emboss from the list. Change the Depth: to 5 and the Size: to 5. Click the OK button. Add an Emboss effect to Text Text EFFECTS Page 8 of 10 Notice the other options in the Style: dropdown.
10 You can select an Inner or Outer Bevel or a Pillow Emboss. You may want to select Edit | Undo and experiment with the other layer EFFECTS before continuing. Step 16: Press Select | None or use the shortcut keys Ctrl+Shift+A to remove the Marching Ants. Step 17: Click in the Background layer in the Layers palette. Click the FG Color icon in the Toolbox and select a dark brown (I used 593e1a) and click the OK button. From the Menu bar, select Edit | Fill with FG Color or select the Bucket Fill Tool from the Toolbox, select the FG color fill option from the Fill type options, and click in the white area of the canvas.