Transcription of GIMP® WEB 2.0 BUTTONS - Computer Information …
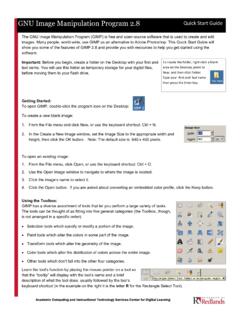
1 BUTTONS : Glossy button with a Gradient Effect Web BUTTONS Page 1 of 12 GIMP WEB BUTTONS or Web BUTTONS : Glossy button with a gradient effect WEB BUTTONS : GLOSSY button WITH A GRADIENT EFFECT GIMP is all about IT (Images and Text) OPEN GIMP Step 1: To begin a new GIMP project, from the Menu Bar, select File | At the Create a New Image dialog box, select a size and background color for your new image. I selected 500 x 500 pixels with a white background. You will need to click the + sign beside Advanced Options to expand the menu. Click the Fill with: down arrow and select white. Click the OK button . BUTTONS : Glossy button with a Gradient Effect Web BUTTONS Page 2 of 12 A new canvas displays in the GIMP document window, Information about the new image displays in the Title Bar, and a layer named Background displays in the Layers palette.
2 Step 2: With the Background layer selected in the Layers palette, click the Create a new layer icon at the bottom of the Layers palette. Step 3: At the New Layer dialog box, type button in the Layer name text box, and click the OK button . A new layer named " button " displays above the background layer in the Layers palette. Step 4: From the Toolbox, select the Rectangle Select tool . In the Rectangle Select options below the Toolbox, click the Rounded corners: checkbox and drag the Radius: thumb indicator to approximately 15 to give the rectangle rounded corners. BUTTONS : Glossy button with a Gradient Effect Web BUTTONS Page 3 of 12 Note: The larger the Radius: the more rounded the corners of the rectangle become. Step 5: Click in the image canvas and draw a rectangle approximately 200 pixels x 70 pixels. The dimensions of the rectangle display in the Document Window status bar below the image.
3 Step 6: You will need to select a Foreground color and a Background color in two different shades (one darker and one lighter). Click the Foreground color icon and select a bright turquoise; I chose 09d0fb. Click the Background color icon and select a lighter shade of turquoise. I selected b9eef9. The darker color will be the border of the button . Step 7: From the Menu bar, select Edit | Fill with FG Color. The rectangle is filled with dark turquoise. BUTTONS : Glossy button with a Gradient Effect Web BUTTONS Page 4 of 12 Step 8: With the " button " layer selected in the Layers palette, right click and select New At the New Layer dialog box type border and click the OK button . A new border layer displays above the " button " layer in the Layers palette. Step 9: From the Menu bar, click Select |Shrink and at the Shrink Selection dialog box, type 1 and click the OK button .
4 The marching ants on the button move in one pixel. Outside the marching ants is the border of the button . Step 10: To add a gradient fill to the button , from the Toolbox, click the Blend tool . In the Blend options that display below the Toolbox, click the Gradient: icon and select FG to BG (RGB) and click the checkbox to the right of the gradient icon to reverse the gradient to BG to FG. (lighter to darker) Click at the bottom of the button in the horizontal center and drag up to the vertical middle of the button . As you drag you will see the number of pixels display in the Status bar. You can drag up to about one half of the height of the button . Note: The distance displays in the status bar at the bottom of the image window. Since the button is 75 pixels in height, you will want to drag to about -38 pixels. BUTTONS : Glossy button with a Gradient Effect Web BUTTONS Page 5 of 12 Step 11: To add a glow effect to the top of the button , with the "border" layer selected in the Layers palette, click the Create a new layer icon in the Layers palette and at the Create a new layer dialog box, type glow as the layer name and click the OK button .
5 Step 12: Click the Rectangle Select icon from the Toolbox and make sure that the Rounded corners option and a Radius: of are still selected in the Rectangle Select options. Click and drag a smaller rectangle inside the larger rectangle covering the top half of the button . Note: You can drag the rectangle to position it after drawing the rectangle. Step 13: Change the Foreground color to white. Select the Blend Tool from the Toolbox and click the Gradient icon and change from FG to Transparent. Remove the checkmark from the Reverse checkbox. Drag the gradient from the top horizontal center of the top rectangle to the bottom horizontal center of the top rectangle. BUTTONS : Glossy button with a Gradient Effect Web BUTTONS Page 6 of 12 Note: You could also use the Fuzzy Brush Tool to create a similar effect. Drag the thumb on the Scale indicator to the right to increase the size of brush pointer.
6 Step 14: To remove the marching ants, from the Menu bar, click Select | None. Step 15: With the "glow" layer selected in the Layers palette, drag the Opacity: thumb indicator to the left to smooth the glow effect. This allows more of the underlying layer to show through the top layer and makes the white less vivid. Step 16: With the "glow" layer selected in the Layers palette, click the Create a new layer icon in the Layers palette and at the Create a new layer dialog box, type blur as the Layer name: and click the OK button . Step 17: If the Foreground color is not white, click the FG color icon in the Toolbox and select white. Step 18: There are several ways to add a straight, horizontal line on a button . Two methods are described below: BUTTONS : Glossy button with a Gradient Effect Web BUTTONS Page 7 of 12 Pencil Tool: Click on the Pencil tool in the Toolbox, and in the Pencil options below the Toolbox, click the Brush: icon and select Circle (03).
7 Draw a straight line below the glow effect on the button extending to the edges of the smaller rectangle as shown below: Note: To draw a straight line using the Pencil Tool, click where you want the line to begin, hold down the Shift key and click where you want the line to end. Just be sure there the ghost line is straight before you click at the end. Paths Tool: From the Toolbox, select the Paths Tool and click where you want the line to begin; release and click where you want to the line to end. Release the mouse and drag the second anchor point to straighten the line. From the Menu bar, select Edit | Stroke At the Stroke Path dialog box, click the Line width: arrows and change the line width to This is the same size that you selected for the Brush circle. BUTTONS : Glossy button with a Gradient Effect Web BUTTONS Page 8 of 12 Note: The FG color in the Toolbox will be the color for the line.
8 Notice that you can change the line style or stroke with a pattern. Click the Stroke button . Step 19: To blur the white line, with the blur layer selected in the Layers palette, right click and select Alpha to Selection to select the line object. From the Menu bar, select Filters |Blur | Gaussian Blur. At the Gaussian Blur dialog box, select a horizontal and vertical blur radius (which is how many pixels wide the blur covers). I selected 10. Click the OK button . From the Menu bar, click Select |None to remove the marching ants. BUTTONS : Glossy button with a Gradient Effect Web BUTTONS Page 9 of 12 Step 20: To emphasize the button border, right click the " button " layer in the Layers palette and select Alpha to Selection to select the button object. From the Menu bar, select Filters | Light and Shadows | Drop At the Script Fu Drop Shadow dialog box, select and X and Y offset how far to the right and bottom of the rectangle you want the shadow to extend.
9 The Blur radius: determines how dispersed the color of the shadow is. I selected 3, 3, 10 and left the Opacity at 80%. Click the OK button . The outside of the button is emphasized. Step 21: Now you can add text to the button . Select the "blur" layer in the Layers palette. Click on the Text tool in the Toolbox. In the Text options, select a Font, Size, and Color. I BUTTONS : Glossy button with a Gradient Effect Web BUTTONS Page 10 of 12 selected Rockwell Bold Italic, Size 30, and a white color. Click on the "blur" layer in the Layers palette and click on the face of the button and type Join in the Gimp Text Editor. Click the Close button . Step 22: If the text is not positioned correctly, click the Move tool from the Toolbox . In the Move options below the Toolbox, click the radio button for Move the active layer. Drag to position the text on the button .
10 Step 23: Select the blur layer in the Layers palette and click the Text Tool and use the same Text options to add the text Free. Position as shown below: Click the "Background" layer in the Layers palette. Repeat Step 23 adding the word for between Join and Free . Change to a smaller point size. BUTTONS : Glossy button with a Gradient Effect Web BUTTONS Page 11 of 12 To position the text on the button , click each text layer in the Layers palette and click the Move Tool in the Toolbox and drag the text to the desired location. Step 24: From the Toolbox, select the Crop tool and draw a rectangle shape around the completed button . To adjust the crop selection, place your cursor in a drag handle on any corner and change the size of the selection. Step 25: Click on the button to remove the extra white background around the image. Step 26: Click on the Visibility icon to the left of each of the text layers in the Layers palette to hide the text.