Transcription of GNU Image Manipulation Program 2.8 Quick Start …
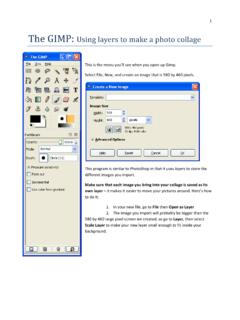
1 Academic Computing and Instructional Technology Services-Center for Digital Learning GNU Image Manipulation Program The GNU Image Manipulation Program (GIMP) is free and open-source software that is used to create and edit images. Many people, world-wide, use GIMP as an alternative to Adobe Photoshop. This Quick Start Guide will show you some of the features of GIMP and provide you with resources to help you get started using the software. Important: Before you begin, create a folder on the Desktop with your first and last name. You will use this folder as temporary storage for your digital files, before moving them to your flash drive. Getting Started: To open GIMP, double-click the Program icon on the Desktop: To create a new blank Image : 1. From the File menu and click New, or use the keyboard shortcut: Ctrl + N. 2. In the Create a New Image window, set the Image Size to the appropriate width and height, then click the OK button. Note: The default size is 640 x 400 pixels.
2 To open an existing Image : 1. From the File menu, click Open, or use the keyboard shortcut: Ctrl + O. 2. Use the Open Image window to navigate to where the Image is located. 3. Click the Image s name to select it. 4. Click the Open button. If you are asked about converting an embedded color profile, click the Keep button. Using the Toolbox: GIMP has a diverse assortment of tools that let you perform a large variety of tasks. The tools can be thought of as fitting into five general categories (the Toolbox, though, is not arranged in a specific order): Selection tools which specify or modify a portion of the Image . Paint tools which alter the colors in some part of the Image . Transform tools which alter the geometry of the Image . Color tools which alter the distribution of colors across the entire Image . Other tools which don t fall into the other four categories. Learn the tool s function by placing the mouse pointer on a tool so that the tooltip will display with the tool s name and a brief description of what the tool does, usually followed by the tool s keyboard shortcut (in the example on the right it is the letter R for the Rectangle Select Tool).
3 To create the folder, right-click a blank area on the Desktop, point to New, and then click Folder. Type your first and last name then press the Enter key. Quick Start Guide Academic Computing and Instructional Technology Services-Center for Digital Learning Specific Tool Help: To get specific help for on the function of a particular tool, begin by holding down the Shift key and pressing the F1 key. The mouse cursor will display a question mark. Click on a tool and the GIMP Help Browser will appear with more in-depth information about that specific tool. Many tools allow the user to set options for refining how the tool functions. These options are displayed in the Tool Options dialog box, which is located under the Toolbox. When a tool is selected, the options for that tool are shown in that box. If the Tool Options window is not visible, you can access it from the Image menu bar: Windows > Dockable Dialogs > Tool Options. Image Adjustments: Cropping: To crop an Image , activate the Crop tool in the Toolbox, or by pressing the C key (capitalized) while inside the Image .
4 With the tool active, clicking and dragging in the Image will sweep out a crop rectangle. Everything inside the rectangle is marked to keep. With the crop area set, click inside the crop rectangle (any corner of the crop area) to finalize the process. Scaling (resizing): The Scale Image command is used to enlarge or reduce the physical size of the Image . It changes the size of the contents of the Image and resizes the canvas accordingly. You can access this command from the Image menu bar through Image > Scale Image . Set the desired width or height, then click the Scale button (the two measurements are linked together so that the Image resizes the opposite dimension without you having to change both numbers). Automated Color Correction Tools: GIMP provides several automated color correction tools for you to try out when your photos are over- or under-exposed, or if they have color casts due to imperfections in lighting. You can access these tools from the Colors menu bar: Colors > Auto.
5 Any changes made through these automated tools can be reversed using the keyboard shortcut Ctrl + Z. Equalize: This adjustment attempts to spread the colors in the Image evenly across the range of possible intensities. White Balance: This may enhance images with poor white or black balance by removing little used colors and stretch the remaining range as much as possible. Color Enhance: This command increases the saturation range of the colors in the layer, without altering brightness or hue. Normalize: This tool is useful for underexposed images; it adjusts the whole Image uniformly until the brightest point is right at the saturation limit and the darkest point is black. Stretch Contrast: This is like Normalize except that it operates on the red, green, and blue channels independently. It often has the useful effect of reducing color casts. Stretch HSV: Does the same as Stretch Contrast but works in hue, staturation, and value color space, rather than red, green, blue color space.
6 It preserves the hue. Adding Text: The Text tool places text onto an Image . With , you can write your text directly on the Image canvas. The Text toolbar appears once you Start typing text and provides ways for you to change the look of the text in different ways, however you can still use the Text Options dialog box (shown below the Toolbox) to change the font, color and size of your text, and justify it, interactively. Academic Computing and Instructional Technology Services-Center for Digital Learning To move the text on canvas, select the Move tool, click and hold on a specific letter within the text box, and drag to move. You can access the Move tool by through the Toolbox or by using the keyboard shortcut: T. Saving and Exporting Your Images: Saving an Image : By default, GIMP saves images in its native XCF format. This format is suitable for saving images that can be reopened and edited later in GIMP. It is recommended to keep a version of your Image in this format.
7 Exporting an Image : To save the Image in another format, such as .jpg, .png, or .gif, you must export the Image . 1. Click the File menu and click Export or use the keyboard shortcut Ctrl + Shift + E (to open the Export Image window). 2. Name the Image . 3. Double-click on Desktop in the Places box. 4. Double-click on the folder with your name in the Name box. 5. Use the drop-down menu to choose the type of file you want to export the Image as (.jpg, .gif, .png). 6. Click the Export button to export the file to your folder. Adding Your Finished Image File to Moodle: 1. Log into Moodle and enter your course site. 2. With editing turned on, select File from the Add a resource drop-down list. 3. Type a name for this item in the General > Name field. You can also enter a description for the item. For the description to display for the students, check the Display description on course page box. 4. From the Content area, click the Add button. 5. From the File Picker box, click the Upload a file link.
8 6. Click Browse to find your file and select that file by double-clicking on the file s name. 7. Click the Upload this file button. 8. Under Options > Display, select Force download. 9. Click the Save and return to course button. Note: the File function is meant for one file upload only. If you want to upload multiple files at one time, select Folder from the Add a resource menu and then add multiple files into that folder. 2 3 6 5 4 1 Academic Computing and Instructional Technology Services-Center for Digital Learning Accessing the GIMP Help Browser: Attempting to explain how to use all of GIMP s tools and features is beyond the scope of this Quick Start Guide. Fortunately, GIMP has an excellent Help feature that has been installed with the software. Use the Help feature (known as the Help Browser) as your guide when you want to know more about how to work with a tool or perform a specific function. There are two ways to open the Help Browser: 1.
9 Choose Help (from the Help menu ) or press the keyboard shortcut key F1. Scroll down to see the table of contents, or click the arrow in the upper-right corner. 2. Choose User Manual (from the Help menu) to see a list of help categories such as: Basic Concepts, Create, Open and Save Files, etc. Online Resources: To learn more about GIMP, here is a list of helpful Web sites. : GIMP news, tutorials and forums Gimptalk: A GIMP user forum Gimpology: Tutotials for the GIMP GIMP Tricks: YouTube video tutorials 2 1