Transcription of PICAXE DEVELOPMENT BOARD (AXE091)
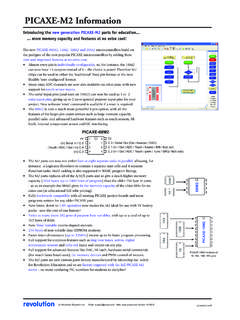
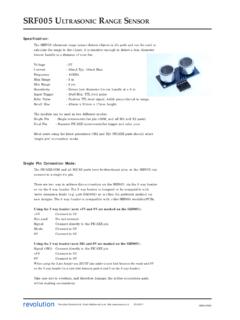
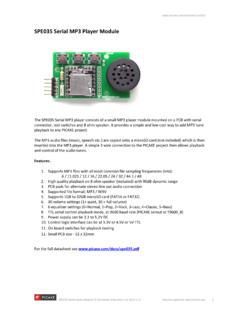
1 PICAXE DEVELOPMENT BOARD ( axe091 )revolutionRevolution Education Ltd. Email: Web: 02 :The PICAXE DEVELOPMENT BOARD allows circuits for any size/revision of PICAXE chip (8 / 14 / 18 / 20 / 28 /40) to be quickly tested using a prototyping breadboard. The DEVELOPMENT BOARD provides power andcomputer download connections, aswell as simple input and output devices for testing datasheet provides circuit information for the PICAXE DEVELOPMENT BOARD only. Please see the mainPICAXE manuals for information on how to use the software and how to build : Supports all 8/14/18/20/2840 pin PICAXE chips. Computer download circuit pre-configured on PCB. Large breadboard area. Regulated power supply or battery powered, with LED power indicator. 3 LED indicator outputs. 3 Digital switch inputs. LDR and preset resistor analogue inputs.
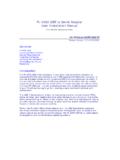
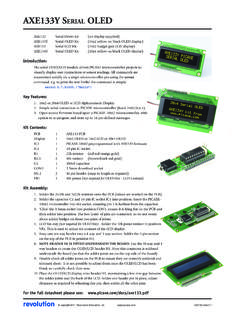
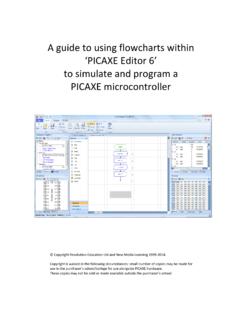
2 DS18B20 digital temperature sensor Infra red sensor and LED output Keyboard connector Serial (inverted and true (MAX202 buffered)) RS232 connectors Sockets for I2C and SPI memory chips (not supplied) Socket and battery connector position for DS1307 Real Time Clock (not supplied)Assembly:The PICAXE DEVELOPMENT BOARD is supplied fully assembled and tested and is supplied with a PICAXE -18M2 microcontroller. Other PICAXE chips may be purchased desired the spacer set provided may be fitted to lift the bottom of the BOARD off the use all 6 spacers to help prevent the BOARD flexing whilst in full datasheet and instructions please Education Ltd. Email: Web: Version 01 PICAXE DEVELOPMENT BOARDO ptional Components (not included)9V Power Supply (UK style plug)PWR009 ADS1307 Real Time Clock ICMIC0553V CR2032 Lithium CellBAT004 Lithium Cell HolderBAT004H-SM25 LCxx SPI EEPROM-Radio Control ServoGBX010PS2 style Computer Keyboard-9 way Serial CableCAB010 PICAXE Circuit Diagram (08 / 14/ 20 pin devices) 3revolutionRevolution Education Ltd.
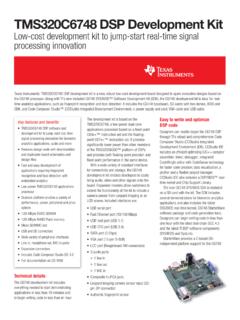
3 Email: Web: Version 01 PICAXE DEVELOPMENT BOARDPICAXE Circuit Diagram (18 pin devices) PICAXE Circuit Diagram (28 / 40 pin devices) !"#4revolutionRevolution Education Ltd. Email: Web: Version 01 PICAXE DEVELOPMENT BOARDU sing the PICAXE DEVELOPMENT BOARD :Important Notes:1. Up to 3 PICAXE chips can be fitted at any one time in the following sockets:- Top socket- either 08 or 14 or 20- Centre socket- 18- Lower socket- either 28 or 402. Only one power source should be connected at any one PICAXE chip polarity (pin 1 to top left) should be observed at all to observe any of these points may result in damage to the PICAXE Input/Output Pin Connections:Every pin of the PICAXE chip is brought out to a numbered position on a headerbeside the IC socket:- top socket for 08 / 14 / 20 pin devices- centre socket for 18 pin devices- lower socket for 28 / 40 pin devicesNote that on the left hand side of the lower socket there are separate header pointsfor the 40 pin (outer row) and 28 pin (inner row) parts.
4 On all other parts theheaders are common for all size following connections are already made via the PCB:08/14/20 pin socket- power and serial download circuit18 pin socket- power and serial download circuit- 4k7 pull up and reset switch on PICAXE reset pin28/40 pin socket- power and serial download circuit- 4k7 pull up and reset switch on PICAXE reset pin- 8 MHz resonatorComputer Connection:Only use the AXE027 PICAXE USB cableor AXE026 serial standard PICAXE 22k/10k downloadcircuit is used on each of the threedownload sockets, aswell as the fourth (inverted N RS232 communication)socket at the bottomof the BOARD .$$$$$ % & & ' %( %(5revolutionRevolution Education Ltd. Email: Web: Version 01 PICAXE DEVELOPMENT BOARDThe 9 way D connector socket is used for True ( T ) RS232 communication, not fornew program Switch:The reset switches only reset PICAXE chips with an external reset pin (18/28/40).))
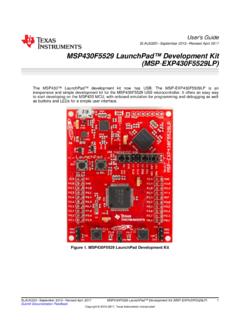
5 To reset the 08/14/20 pin devices you must disconnect and reconnect the battery(or power supply).Power Supply:There are two options on how to provide power to the DEVELOPMENT BOARD , butensure only one option is connected at any one time. The green PWR LED indicatespower to the Battery - connect a (3xAA cell, not supplied) battery box to the screwterminals, ensuring correct polarity. Do not use 6 or 9V battery Power supply - connect a regulated 9V DC power supply with (positivetip) connector (not supplied part PWR009A).Do not use both power options at the same time!The power supply connection is regulated to 5V by the 7805 regulator and reversepolarity protected by a diode. The screw terminal battery connection is notregulated and so connects directly to the PICAXE not use a 9V PP3 battery on this connection.
6 Only use a (not 6V) battery) * ) + , 6revolutionRevolution Education Ltd. Email: Web: Version 01 PICAXE DEVELOPMENT and Output Header Summary:Right hand headerV+Positive power supply0 VGroundKDKeyboard DataKCKeyboard ClockIRRI nfra-red receiverIRLI nfra-red LEDL3 Red LED L3L2 Yellow LED L2L1 Green LED L1 SVOS ervo headerLDRLDR sensorTMPDS18B20 temperature sensorSW3 Switch SW3SW2 Switch SW2SW1 Switch SW1 POTP reset resistorV+Positive power supplyV+Positive power supply0 VGround0 VGroundI2C headerWP24 LCxx EEPROM write protect (pulled low)SDAi2c Data (24 LCxx and DS1307)SCLi2c Clock (24 LCxx and DS1307)OUTDS1307 open collector outputRS232 headerNTXDI nverted polarity transmit (via jack socket)RXDI nverted polarity receive (via jack socket)TTXDTrue polarity transmit (via MAX202 / 9 pin socket)RXDTrue polarity receive (via MAX202 / 9 pin socket)
7 SPI headerCS25 LCxx EEPROM Chip SelectSDO25 LCxx Data OutSDI25 LCxx Data InSCL25 LCxx ClockSeven Segment DisplayA-GLED segments (no resistor provided)DPDecimal point LED (no resistor provided)Common cathode is connected to 0 VBAT Header7revolutionRevolution Education Ltd. Email: Web: Version 01 PICAXE DEVELOPMENT BOARD - .Optional 3V backup supply for DS1307 RTC(note a SM socket may also be fitted under the BOARD )Input and Output Device Information:Keyboard Connector (KD,KC)The 6 pin mini DIN connector provides a connection and power to a computerstyle keyboard (not included). A 4k7 pull-up resistor is included on the data andclock kbin, keyin, keyledInfra-red receiver (IRR)The infra-red receiver circuit including pull up resistors in built onto the BOARD . Theinfra-red signal may be generated via the on- BOARD infra-red LED or an externaldevice like a TV style remote irin, infrain, infrain2 Infra-red LED (IRL)The infra-red LED will light when a positive signal is applied.
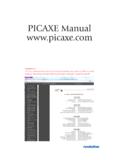
8 The cathode of theLED is connected by a 330R resistor to irout, infraoutOutput LEDs (L1, L2, L3)Three LEDs are provided (L1 to 3). The LED will light when a positive signal isapplied. The cathode of the LED is connected by a 330R resistor to high, low, toggleLDR Analogue Input (LDR)The LDR is arranged with a 10k resistor in a potential divider arangement. The LDRis connected between the input and V+, the resistor between the input and readadc, readadc10 Preset Pot Analogue Input (POT)The preset pot is a 10k device connected directly between the V+ and 0V power wiper of the preset pot is connected to the readadc, readadc10 Digital Input Switches (SW1, SW2, SW3)Three switches are provided. The input is tied low by a 10k resistor, with the switchconnected between the input and V+. Therefore pressing the switch will result in ahigh if thenDS18B20 Temperature Sensor (TMP)The digital temperature sensor (located at the bottom right of the breadboard) andincludes the 4k7 pull up resistor on the data readtemp, readtemp12 Servo header (SVO)The servo header provides a convenient way to connect a radio control style power supply is connected directly to the header (R & B) and the signal wire(Y) is connected to the SVO header.
9 / 0 .- ) .. 1 23* . ) ( 4 04 5 - 6 + 7 8 7 ) 4 -- 9 ( 5 - 6 + 74 ( 5 -(%6 4 3 /- :! )7 8revolutionRevolution Education Ltd. Email: Web: Version 01 PICAXE DEVELOPMENT BOARDC ommands- servo, servoposSPIThe SPI header provides connection to the on- BOARD SPI EEPROM socket, whichmay be fitted with a 25 LCxx series spiout, spiin, hspiout, hspiinRS232 Two methods of RS232 communication are inverted (N) method uses a 10k/22k style circuit to the jack socket. Thisallows the normal PICAXE download cable to be used for serial communication viathe input/output true (T) method uses a MAX202 circuit connected to the 9 way D serial requires a 9 way serial cable part serout, serin, hserout, hserinI2 CThe I2C header provides connection to the on- BOARD I2C EEPROM socket, which may be fittedwith a 24 LCxx series EEPROM, and to theDS1307 RTC socket.
10 The SDA and SCL pinsconnect to both device WP pin connects to the EEPROM WP pin,and is pulled low by a 10k OUT pin connects to the DS1307 OUT that this is an open collector (current sinkonly) type of 3V lithium backup cell may be optionallyconnected to the DS1307 RTC chip. This can beachieved in either of two ways:- by soldering a BAT004H-SM socket to the bottom of the BOARD and inserting a CR2032 (BAT004) cell- making a connection to the BAT header on the top of the boardCommands- hi2cout, hi2cin, readi2c, writei2cPrototyping BOARD (breadboard):The breadboard has 60 sets of vertical 5 hole connection sets (30 top sets and 30bottom sets) for making connections. The vertical sets are not connected across thecentre of the breadboard also has 4 sets of horizontal 25 hole power rails (2 top sets and 2bottom sets).