Transcription of Setup Guide - Ricoh
1 Setup Guide Setting Up the Machine 1. Installing the Software 2. LED Status How to purchase consumables 1 2. 1. Setting Up the Machine 40 cm Power Source / Stromquelle /. ( ) Source d'alimentation / Alimentazione /. 20 cm Str mkilde / Fuente de alimentaci n /. ( inches) Stroombron / Str mkilde / Fonte de alimenta o /. 10 cm 32 80. Fonte de energia / Virtal hde / Str mk lla /. ( inches) 10 Zdroj nap jen / ramforr s / r d o zasilania /. 50 15 G Kayna / Источник питания / уат к з /. /. 45 cm 10 cm 120 V, 60 Hz, 8 A. ( inches) ( inches). 220 - 240 V, 50/60 Hz, 5A. 110 V, 60 Hz, 8 A. DSH050. DSH052 DSH053 DSH054. DSH055 DSH056 DSH057. DSH058 DSH011 DSH059. DSH055 DSH060 DSH014. 1. DSH015 DSH017. DSH018 DSH061. 1. 2. DSH062 DSH063 DSH067. DSH068. Go to page 3 Installing the Software . For OS X, see User's Guide in the provided CD-ROM or our website ( gateway/). For safe and correct use, please be sure to read the Safety Information before using the machine. 2. 2.
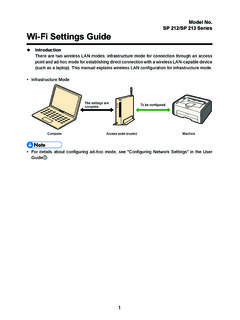
2 Installing the Software Check how the computer is connected Specify how to connect to your computer according to the communication environment of your system. connect by wireless? connect by wired? Yes No use router (access point)? connect by connect by USB interface cable Ethernet interface cable Go to page 4 "Connecting the Machine (USB/Network)". connect via Wi-Fi Direct connect using CD-ROM See Wi-Fi Direct Guide in our website Go to page 5 "Easy Setup ( Using the CD-ROM". support/gateway/). DSH084. To connect using the WPS button, go to page 6 Easy Setup Using the WPS Button . To connect using a PIN code, go to page 7 Easy Setup Using a PIN Code . To set up manually, see User's Guide in the provided CD-ROM or our website ( ). When the Wi-Fi Direct function is enabled, a Wi-Fi Direct compliant device is recognized as a router (access point), and direct communication among Wi-Fi Direct-compliant devices becomes possible. When communicating using the Wi-Fi Direct function, you cannot connect to the Internet at the same time.
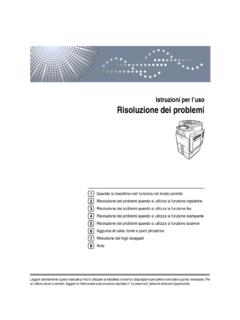
3 Use the machine from a smart device Android iOS. How to use the machine from a How to use the NFC tag smart device (Android smart devices only). For information about using the machine from a When using Android smart devices, download smart device, see the following website or scan and install the Ricoh SP 200 series SOM from the following QR code from your smart device. the following website or QR code, and then touch the NFC tag on the machine with the device. sp200/support/gateway/. DSH069. 3. Connecting the Machine (USB/Network) Windows DSH071 DSH072. 5. Select [USB Connection] or [Network Connection] according to communication environment or your device. The following items are necessary to set up a wired connection. USB interface cable or Ethernet interface cable CD-ROM supplied with the machine 1. Turn on your 2. Insert the provided CD-ROM into the CD-ROM drive of the computer. If your computer does not have a CD-ROM drive, download a Setup file from our website ( support/gateway/).
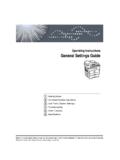
4 6. Follow the instructions in the Setup wizard. 7. Click [Finish] in the [ Setup Complete] dialog box. If the or installer prompt you to restart Windows, reboot your computer. 3. Click [Quick Install]. Setup is completed. 4. The software license agreement appears in the [Software License Agreement] dialog box. After reading the agreement, click [Yes]. 4. Connecting the Machine via Wi-Fi Windows DSH073. 4. The software license agreement appears in the [Software Easy Setup Using the CD-ROM License Agreement] dialog box. After reading the agreement, click [Yes]. The following items are necessary to set up a wireless connection. USB interface cable or Ethernet interface cable Router (access point). CD-ROM supplied with the machine 1. Turn on your computer. 2. Insert the provided CD-ROM into the CD-ROM drive of the computer. If your computer does not have a CD-ROM drive, download a 5. Select [Wireless Connection]. Setup file from our website ( support/gateway/).
5 Or 3. Click [Quick Install]. 6. Follow the instructions in the Setup wizard. 7. Click [Finish] in the [ Setup Complete] dialog box. If the installer prompt you to restart Windows, reboot your computer. Setup is completed. To connect using the WPS button, go to page 6 Easy Setup Using the WPS Button . To connect using a PIN Code, go to page 7 Easy Setup Using a PIN Code . To connect using Wi-Fi Direct, see Wi-Fi Direct Guide in our website ( gateway/). 5. 9. On the [Wireless] tab, select [ Setup with WPS] for Easy Setup Using the WPS Button [Configuration Method]. Before doing the following procedure, install the printer driver according to the procedure on page 4. "Connecting the Machine (USB/Network)". Make sure the Ethernet cable is not connected to the machine. In Steps 10 to 11, configure each setting within two minutes. The following item is necessary to set up a wireless connection. Router (access point) 10. Click [Connect]. 1. Check that the router (access point) is working correctly.
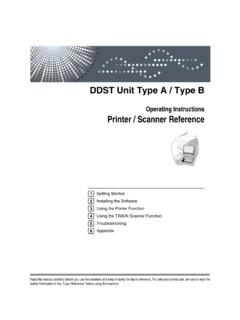
6 2. On the [Start] menu in your computer, point to [All Programs], click [SP 220 Series Software Utilities], and then click [Smart Organizing Monitor for SP 220 Series]. 3. Click [User Tools] tab. 11. Press the WPS button on the router (access point) within two minutes. WPS. 4. Click [Printer Configuration]. CHV607. For details about how to use the WPS button, refer to the manuals for the router (access point). 12. Check the result. Connection has succeeded: he Power indicator lights up. T. 5. Enter the access code, and then click [OK]. Connection has failed: The default access code is Admin . ll the indicators start to flash simultaneously, and after A. 30 seconds, only the Power indicator lights up. Try the connection again. 13. Configuring the Wi-Fi settings is complete. 6. On the [Network 1] tab, select [Active] for [Wireless Function:]. 7. Click [Apply], and then click [OK]. The machine restarts. 8. Repeat steps 3 to 5 to open the [Printer Configuration].
7 Screen. 6. 7. On the [Network 1] tab, select [Active] for [Wireless Easy Setup Using a PIN Code Function:]. Before doing the following procedure, install the printer driver according to the procedure on page 4. "Connecting the Machine (USB/Network)". Make sure the Ethernet cable is not connected to the machine. In Steps 12 to 15, configure each setting within two minutes. To establish a connection using the PIN code, use a computer that is connected to the router (access point). The following item is necessary to set up a wireless 8. Click [Apply], and then click [OK]. connection. The machine restarts. Router (access point). 9. Repeat steps 4 to 6 to open the [Printer Configuration]. 1. Check that the router (access point) is working correctly. screen. 2. Open the PIN code configuration window (web page) for the 10. On the [Wireless] tab, select [ Setup with WPS] for router (access point) on your computer. [Configuration Method]. 3. On the [Start] menu in your computer, point to [All Programs], click [SP 220 Series Software Utilities], and then click [Smart Organizing Monitor for SP 220 Series].
8 11. Select [Wi-Fi Protected Setup with PIN Code] for [One- Touch Connection Setting (WPS)]. 4. Click [User Tools] tab. 12. Click [Get PIN Code] and check the PIN code. 5. Click [Printer Configuration]. Write down the PIN code in case you might forget it. 6. Enter the access code, and then click [OK]. The default access code is Admin . 7. 13. Enter the machine's PIN code (8 digits) on the router (access point)'s web page.(The web page accessed in Step 2). 14. Execute WPS (PIN system) from the router (access point)'s web page. 15. Click [Connect]. 16. Check the result. Connection has succeeded: The Power indicator lights up. Connection has failed: All the indicators start to flash simultaneously, and after 30 seconds, only the Power indicator lights up. Try the connection again. 17. Configuring the Wi-Fi settings is complete. 8. LED Status : On : Flashing (on for one second and off for one second). LED Status Solution Power Alarm Toner / Paper End - - The power is on.
9 The status is normal. - - Importing data. The status is normal. The print cartridge is almost empty. Replace the print cartridge before it - becomes empty. The print cartridge is empty. Replace the print cartridge. - The print cartridge is not set correctly. Set the print cartridge again correctly. The tray has run out of paper. Load paper into the tray. A paper jam has occurred in the Use Web Image Monitor or Smart machine. Organizing Monitor to determine where - the paper jam is, and then remove the jammed paper. The size of paper to print on and the Use Web Image Monitor or Smart size of the paper loaded in the tray do Organizing Monitor to check the paper not match. size settings, and then change either the - A cover is open. size of paper to print on or the size of paper loaded in the tray. Confirm that all the covers are closed completely. Another type of error has occurred. Use Web Image Monitor or Smart - Organizing Monitor to check the error, and then take appropriate measures.
10 A malfunction has occurred. Contact your sales or service representative. For details, see Error and Status Indicate on the Control Panel , User's Guide . How to purchase the consumables For information about consumables, see the following website or scan the following QR code from your smart device. sp200/support/gateway/. 9. Trademark Android is a trademark of Google Inc. IOS is a trademark or registered trademark of Cisco in the and other countries and is used under license. Wi-Fi, Wi-Fi Direct, Wi-Fi Protected Setup , WPA, Wi-Fi Protected Access, WPA2, and Wi-Fi Protected Access 2 are registered trademarks of Wi-Fi Alliance. Linux is a registered trademark of Linus Torvalds in the United States and other countries. Mac OS is a trademarks or registered trademarks of Apple Inc., in the United States and other countries. Microsoft , Windows , Windows Server and Windows Vista are either registered trademarks or trademarks of Microsoft Corporation in the United States and/or other countries/regions.