Transcription of AN 18.6 - SMSC Ethernet Physical Layer Layout …
1 smsc Ethernet Physical Layer Layout guidelines 1 Introduction smsc Ethernet products are highly-integrated devices designed for 10 or 100 Mbps Ethernet systems. They are based on IEEE 10 BASE-T and 100 BASE-TX standards. The IEEE standard for 100 BASE-TX defines networking over two pairs of Category 5 unshielded twisted pair cable or Type 1 shielded twisted pair cable. This application note is intended to assist customers in designing a PCB using smsc 's Ethernet products to interface with an Ethernet network. This document provides recommendations regarding the PCB Layout . This is a critical component in maintaining signal integrity, and reducing EMI. Audience This application note is written for a reader that is familiar with Ethernet hardware design.
2 Overview The following recommendations for the printed circuit board Layout with smsc parts are not the only way to Layout smsc Ethernet QFP/QFN parts. Every board designer will have a preference. Complexity, board space, number and types of devices will dictate routing and placement strategies. For example, the PCB described in this application note has components on both sides of the board. A four Layer board could be realized with components on one side only. The datasheets and reference schematics for smsc Ethernet products should be used as a reference for this Layout design guideline. 2 General Design guidelines The Evaluation Board (EVB) schematics and gerber files are available on the smsc web site.
3 These can be used as a reference for component placement and routing. Good engineering practices should be followed with respect to unused inputs by terminating them with pull-up or pull-down resistors, unless the datasheet, design guide or reference schematic indicates otherwise. Do not attach pull-up or pull-down resistors to any pins identified as reserved (unless explicitly stated in the datasheet). These devices may have special test modes that could be entered inadvertently. Industrial Temperature When designing with the industrial temperature version of the PHY, care needs to be given to the temperature range of the supporting components. If the end application requires industrial temperature support, then the system designer needs to select all pertinent components to be functional in the industrial temperature range.
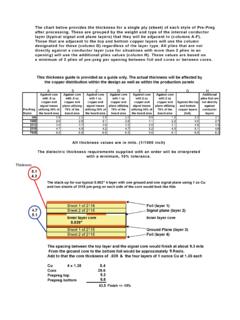
4 smsc 1 Revision (10-27-08). APPLICATION NOTE. smsc Ethernet Physical Layer Layout guidelines Power and Ground Planes The sections below describe typical 2 and 4 Layer board stackups for Ethernet Physical Layer designs. The goal of the 4 Layer designs is to keep the signal routing on outer layers, isolated by the power and ground planes. These power and ground planes also serve the purpose of reference planes for the signal traces. The signal traces should run over continuous reference planes when possible. When 2. Layer board designs are required, it remains necessary that the signal traces run over continuous reference planes when possible. 4 Layer Stackup Top ( Layer 1) Signal with ground plane except where noted.
5 Layer 2 Continuous ground plane. No signals should be routed on this Layer . Layer 3 Power planes with ground planes except where noted. Signals may be routed on this Layer if needed, especially for buried MII/RMII bus and MII/RMII CLK signals. Bottom ( Layer 4) Signal with ground plane except where noted. Decouple ground floods and ground Layer as practical. When signal traces are re-referenced to power island planes, decoupling capacitors ( ceramic) are required between the ground plane and power plane. Signal traces routed on bottom Layer over power islands that are on Layer 3 Layer should have decoupling capacitors ( ceramic) near the trace to enable short (direct) return current paths.
6 When signal traces are re-referenced to power island planes, decoupling capacitors ( ceramic) are required between the ground plane and power plane as shown below in Figure Top (signal) GND Signal GND. Layer 2 (Ground) GND. Layer 3 (Pwr Islands) GND PWR GND. Bottom (signal) GND Signal GND. Figure 4 Layer Stackup Power and Ground Decoupling 2 Layer Stackup Top ( Layer 1) Signal with ground plane except where noted. Bottom ( Layer 2) Ground plane and power islands. A limited number of slow speed signals may be routed on the bottom Layer . Signal traces should be surrounded by ground or ground trace along at least one edge. If ground trace is used, it should be connected to ground plane on this Layer and decoupled to ground plane on top Layer .
7 Revision (10-27-08) 2 smsc APPLICATION NOTE. smsc Ethernet Physical Layer Layout guidelines Decouple ground planes as practical, as shown below in Figure This will allow short (direct). return current paths when signal traces are re-referenced to different power island planes. Top (signal) GND GND. Bottom (power islands) GND PWR1 PWR2 GND. Figure 2 Layer Stackup Power and Ground Decoupling Component Placement Component placement can affect signal quality, emissions, and component operating temperature. Careful component placement can decrease potential EMI problems and simplify the task of routing traces. If the magnetic is a discrete component, then the distance between the magnetic and the RJ-45.
8 Needs to have the highest consideration and be kept to under 25mm (approx. 1 inch) of separation. Refer to Figure Figure Discrete Magnetic and RJ-45 Placement The distance between the PHY and the magnetics needs to be 25mm (approx. 1 inch) or greater. Among PHY vendors, the 25mm (approx. 1 inch) rule is considered good design practice for EMI. considerations. The intention is to isolate the PHY from the magnetics. The crystal oscillator and its resistors and capacitors must be placed within 12mm (approx. 500mils) of the PHY. The power supply decoupling capacitors need to be placed within 7mm (approx. 280mils) of the power supply. smsc 3 Revision (10-27-08). APPLICATION NOTE.
9 smsc Ethernet Physical Layer Layout guidelines Keep the PHY device and the differential transmit pairs at least 25mm (approx. 1 inch) from the edge of the PCB, up to the magnetics. If the magnetics are integrated into the RJ45, the differential pairs should be routed to the back of the integrated magnetics RJ45 connector, away from the board edge. The ohm pull-up resistors on the differential lines, TXP/TXN and RXP/RXN, must be placed within 10mm (approx. 400mils) of the PHY device. This ensures the transmit path is identical between the TX and RX. The signals associated with each port (TX or RX) should be independently matched in length to within 6mm (approx. 240 mils).
10 The strapping resistors need to be located within 20mm (approx. 800mils) of the Ethernet PHY to ensure the voltage into the pin at boot-up is at the correct Vih or Vil level. Design Techniques for EMI Suppression The following techniques may improve EMI margin. Common mode capacitors may be added to the TX+/- and RX+/- signals of the Ethernet PHY. device for high frequency attenuation, as shown below in Figure One end of each capacitor should be connected to the system ground plane, and placed within 10mm (approx. 400mils) of the magnetics. Typical capacitance values should be between 10pF and 22pF. Values higher than 22pF. may negatively impact the TX and RX signalling.