Transcription of CC1111/CC2511 USB HW User’s Guide - Texas Instruments
1 CC1111/CC2511 USB HWUser s Guideswru082bswru082b2/12 Table of this ..34 Definitions ..45 Getting SmartRF04EB as an In-Circuit Emulator (ICE) .. Debug Interface ..77 USB Dongle Hardware Description .. Interface .. Interface .. Purpose I/O Connectors .. Section .. Performance of Dongle Reference Design and Schematics ..109 SOC_DEM Information .. History ..12swru082b3/121 IntroductionThank you for purchasing a development kit for Low Power RF System-on-Chips from Texas this ManualThis manual covers the cc1111 USB Dongle or the cc2511 USB Dongle found in the CC1110-CC1111DK/CC2510-CC2511DK development kits. Both these USB dongles are also available separatelyas the cc1111 EMK868-915 and cc2511 EMK evaluation module manual covers the CC1111/CC2511 USB Dongle hardware component of a USB developmentframework.
2 Please refer to [5] and [6] for a description of the accompanying software library andapplication Device ClassDKDevelopment KitEBEvaluation BoardEMEvaluation ModuleHIDH uman Interface DeviceICIntegrated CircuitICEIn Circuit EmulatorKBKilo Byte (1024 byte)LEDL ight Emitting DiodeLPRFLow Power RFMCUM icro ControllerNCNot connectedRFRadio FrequencyRXReceiveSoCSystem on ChipTITexas InstrumentsTXTransmitUARTU niversal Asynchronous Receive TransmitUSBU niversal Serial Busswru082b4/124 DefinitionsSmartRF04 EBCC1110EM/CC2510 EMEvaluation Board. Main board in the developmentkits, USB interface, LCD, LEDs, pot-meter platform for the Evaluation Modules(EM).CC1110 and CC2510 Evaluation Module are smallmodules for the CC1110 and CC2510 can be plugged into the SmartRF04EB andthey should be used as the reference design forantenna and RF USB DongleSystem-on-Chip Debug Plug-in BoardA reference design for a CC1111/CC2511 basedfull-speed USB dongle with RF interface.
3 Shouldbe used as reference design for antenna and System-on-Chip Debug Plug-In Board. Itprovides an additional physicaldebug/programming interface for theSmartRF04EB. Referred to as SOC_DEM in 1. Kit Hardware Component OverviewSoCSystem on Chip. A collective term used to refer to TexasInstruments ICs with on-chip MCU and RF transceiver. Usedin this document to reference the CC1111/CC2511 and theCC1110 Circuit Emulator. ICE functionality is built into Software Application ExamplesApplication examples using the CC1111/CC2511 USBD ongle together with a CC1110 Firmware LibraryA library of low level USB firmware which is used by all theUSB software 1. Key DefinitionsSee Figure 1 for an overview of the hardware components contained in the CC1110-CC1111DK/CC2510-CC2511DK development kits.
4 Table 1 explains some of the key definitions/abbreviations used in StartedMake sure to install SmartRF Studiobeforeconnecting the SmartRF04EB to a PC. By installing it, therequired Windows drivers will be provided when connecting the USB dongle isnotdelivered with pre-programmed firmware so an external ICE is needed for initialprogramming of the device. The SmartRF04EB or the CC-Debugger can be used to program the USBdongle. The CC1111/CC2511 has a 2 wire debug interface that is used for chip programming anddebugging. When connecting this interface to the SmartRF04EB, the CC1111/CC2511 can beprogrammed from the SmartRF Flash Programmer software [4] and debugged from IAR EmbeddedWorkbench.
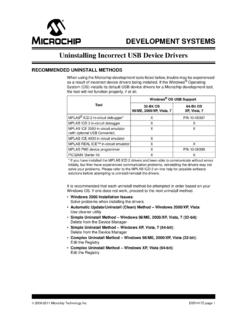
5 To connect the CC1111/CC2511 USB Dongle to the SmartRF04EB, follow these 7 steps:1. Turn off the SmartRF04EB power by moving the power switch shown in Figure 4 to the Remove any evaluation modules (EMs) attached to the Connect the SmartRF04EB to a PC with the supplied USB Connect the System-on-Chip Debug Plug-In Board (SOC_DEM) to the EM connectors (P1 andP2) on the Connect the USB Dongle to the SOC_DEM with the supplied 10 pin cable. The cable should bemounted between the Debug connector on the dongle and the P3 connector on the sure pin 1 on the dongle is connected to pin 1 on the SOC_DEM (truncated corner). Thiscable connects the debug interface and GND between the two devices; however the USB Dongleis not powered through this Power the CC1111/CC2511 USB Dongle.
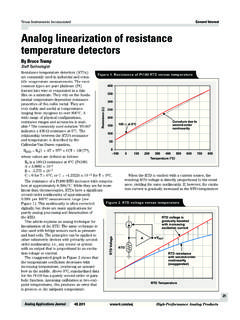
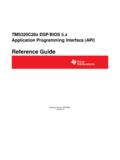
6 To power the dongle there are two options: Powered with a USB CableUse the supplied USB extension cable to connect the USB Dongle to the PC (see Figure2). Powered from the SmartRF04 EBConnect pin 9 on the Test pin connector on USB Dongle to pin 3 (labelled V ) on the I/O B connector on SmartRF04EB to power the dongle from the EB (see Figure 3).The CC1111/CC2511 USB Dongle should only be powered by one of the two sources at a not connect the USB cable to the USB Dongle while it is powered from the SmartRF04EB. TheSOC_DEM has a voltage level converter on the P3 connector, so the SmartRF04EB and the USBD ongle may have a different power supply Turn on the power on the SmartRF04EB (see Figure 4).SmartRF Studio[2]is a PC application for Windows that helps you find and adjust the radio registersettings.
7 Please see [2] for instructions on downloading and installing SmartRF 2. USB Dongle Powered from USB CableFigure 3. USB Dongle Powered from SmartRF04 EBFigure 4. SmartRF04EB Power Switch, Power OnThe CC1111/CC2511 can now be programmed with the SmartRF Flash Programmer software. Thefirmware on the CC1111/CC2511 can also be debugged using the IAR Embedded Workbench see the SmartRF Flash Programmer [2] user manual for more see the CC1110DK/CC2510DK Development Kit user Manual [1] for more information on theSmartRF04EB and how to use the CC1110 SmartRF04EB as an In-Circuit Emulator (ICE)The debug interface on the SmartRF04EB is controlled by the USB MCU. This allows both programmingand an emulator interface over USB, which makes the SmartRF04EB usable as an In-Circuit Emulator(ICE) for the cc1111 use the SmartRF04EB as ICE, the IAR Embedded Workbench software for 8051 architecture(EW8051) must be installed.
8 The Embedded Workbench is an integrated development environment with acomplete tool-chain such as C Compiler, Simulator, and ICE debugger. Please see [1] for instructions onhow to set up the ICE debugger for use as an the SmartRF04EB with a SoC is connected to a PC with the USB port, the debugger in IAREW8051 will connect to it when started. If several SmartRF04 EBs are connected to USB portssimultaneously, a selection window will display the connected evaluation boards, and the user can selectwhich device to Debug InterfaceFor custom PCB s with the cc2511 SoC, it is recommended to include a pin header or test points toallow in-circuit emulation or programming using a SmartRF04EB or other 3rd party programming USB Dongle can be used as a reference.
9 Please see the CC1110/CC2510/ CC1111/CC2511 sectionof the TI web site for an updated list of 3rd party programming note: The SmartRF04EB includes a voltage converter to support programming and debugging ofexternal systems with different voltage than the SmartRF04EB. The debug connector includes two VDDconnections on pin 2 and pin 9. The function is different for these 2 VDD supplies voltage from the external target to the voltage converter. If the target application is selfpowered pin 2 should be connected to VDD to assure that the correct supply voltage is used for thevoltage converter. This pin must always be connected to 9 VDD supplies VDD ( V) from the SmartRF04EB. If the target application is powered from theSmartRF04EB supply during programming and debugging this pin can be connected to VDD.
10 If the targetvoltage differs from , this pin should not be the USB Dongle this pin is not connected. Hence the USB Dongle must be powered from either aseparate USB cable or a separate cable connecting pin 9 on P4 / test pins on the dongle to VDD on theSmartRF04EB. When using SmartRF04EB as emulator for external target debugging any evaluationmodule (EM) must be 5 shows the required signal for a minimum connector layout on external 5. Minimum Debug Connector Pinout (top view)swru082b8/127 USB Dongle Hardware DescriptionFigure 6. cc2511 USB Dongle, (top view)Figure 7. cc2511 USB Dongle, (back view)Figure 8. cc1111 USB Dongle, (top view)Figure 9. cc1111 USB Dongle, (back view)LEDCC2511F32 DebugconnectorGPIO testpinsAlternativedebugconnectorUSBconn ectorButtonPCBantennaLine markingcutaway sectionof the dongleLEDCC1111F32 DebugconnectorGPIO testpinsAlternativedebugconnectorUSBconn ectorButtonChip antennawith PCB trackLine markingcutaway sectionof the dongleswru082b9 InterfaceThe CC1111/CC2511 USB Dongle has one button and one LED that can be used to interact with the LED is connected to pin P1_1.