Transcription of Using Texas Instruments SPICE Models in PSPICE
1 Application Report SLOA070 September 2001 1 Using Texas Instruments SPICE Models in PSPICE Bruce Carter ABSTRACT Texas Instruments provides SPICE Models for operational amplifiers. These SPICE Models , however, are in a generic text format. This note describes how to take these Models and import them into the most widely used simulation program PSPICE . Contents 1 Introduction .. 2 2 Obtaining the SPICE Model .. 2 3 Create a PSPICE Model .. 4 4 Edit the Part Symbol .. 5 5 Simulating With the Part Symbol .. 7 Creating a Simulation Drawing the Schematic.
2 10 Displaying the Simulation Results .. 11 6 12 7 Appendix A: Example SPICE 13 List of Figures 1 Searching for a Part on the Texas Instruments Home Page ..2 2 Search Results .. 2 3 Technical Documentation Box .. 3 4 SPICE Model 3 5 Example of How to Download File to Disk .. 3 6 PSPICE Model Editor Icon .. 4 7 Suggested Storage Location for New 4 8 Creating an OrCad Capture Library .. 4 9 Status File Created by a Good SPICE 5 10 OrCad Capture Icon.
3 5 11 Library Editing Window .. 5 12 Raw Part Symbol .. 6 13 Pin Number Assignments for the 6 14 Progressive Steps in Making Part Symbol .. 7 15 Creating a New Project .. 8 16 Creating a New Simulation Profile .. 8 17 Simulation Type and Frequency Settings .. 9 18 Adding the Library to the Simulation 9 19 Adding the New Library to 10 20 Example PSPICE Schematic .. 11 21 Simulation Results .. 12 PSPICE is a trademark of Cadence. All other trademarks are the property of their respective owners.
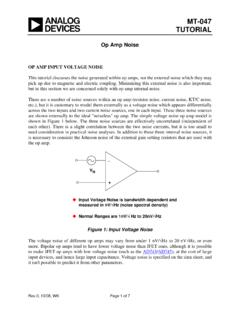
4 SLOA070 2 Using Texas Instruments SPICE Models in PSPICE 1 Introduction SPICE Models have been a mainstay of applications departments at semiconductor companies for decades. They have been provided for simulation purposes, and distributed in print, floppy disk more recently through CDs and the World Wide Web. They are provided in ASCII text format, which is generic and allows importation into a variety of programs. Unfortunately, the world has long since progressed beyond ASCII text entry SPICE . The author remembers college classes where SPICE was implemented on a mainframe.
5 The schematic was reduced to numbered nodes, and each connection was painstakingly typed onto a punch card. Years later, the schematic was typed into an ASCII .cir file and PSPICE was run from DOS, the resulting table of results seemed almost magical. Microsoft Windows introduced a new element to PSPICE graphical interface. Designers, finally free of the need to meticulously type in ASCII files, could access part symbols and draw schematics on the screen the designers produced schematics for documentation. The intuitive advantage is obvious: instead of a list of circuit connections, the designer can see the schematic.
6 The chance of error transcribing a schematic into a list of connections is all but eliminated. There is a problem, however. The parts available to the designer are limited to the list available in the program s library. From the very beginning, PSPICE has provided a method to enter new part symbols, but few designers have been able to understand the process, which is anything but intuitive. This document walks the designer through the process with a THS4131. 2 Obtaining the SPICE Model Texas Instruments SPICE Models are available from the Texas Instruments Web Site: The fastest way to get to a model is to enter the part number into the search box on the home page: Figure 1.
7 Searching for a Part on the Texas Instruments Home Page Search results from the search above produces, among other things, product folders: Figure 2. Search Results SLOA070 Using Texas Instruments SPICE Models in PSPICE 3 The product folder conveniently places all documentation related to the part in one place. Click on the device product folder for the desired device. When the product folder comes up, the SPICE Models are found in the lower left hand side of the product folder in the technical documentation box, related docs link: Figure 3. Technical Documentation Box When the related docs link is clicked, the link to the SPICE model comes up.
8 Figure 4. SPICE Model Link Different web browsers behave differently when the link is clicked. Designers need to save the ASCII text file to the desired location on their hard drive: Figure 5. Example of How to Download File to Disk This download example is from Internet Explorer Take note of the filename, and the folder name where it is placed both are needed in a moment. Texas Instruments SPICE Models are stored in the .zip format. The designer needs to have some type of decompression software, such as WinZip, to extract the actual SPICE model file from the.
9 Zip archive. Once that has been done, the designer has the file shown in Appendix A, SLOA070 4 Using Texas Instruments SPICE Models in PSPICE A quick examination shows that it is essentially a .cir file a legacy from PSPICE s past. This document describes how to create a PSPICE symbol. PSPICE is the most widely used simulation program, but these techniques are similar in many CAD programs, so hopefully this note provides some general guidance for the designer with a different simulation program. 3 Create a PSPICE Model Open the PSPICE model editor (not the Capture program).
10 Figure 6 shows the Model Editor icon: Figure 6. PSPICE Model Editor Icon When the program opens, select File, then New. Next select Model, Import, and then the file name of the model. The ASCII text file appears in the right window, and the left window shows that the model name is THS4131, and the type is SUBCKT. Next do a File, Save, and give it a filename. Suggestion 1: Make the library name the same name as the part, because it may be the only part that has to be created. Suggestion 2: Save it in the UserLib folder: Figure 7. Suggested Storage Location for New Library Next, do a File, Create Capture Parts.